สวัสดีครับ บทความนี้เป็นบทความที่ 16 แล้วนะครับ ที่ผมจะมาเขียน ในซีรีย์ Learn 30 Android Libraries in 30 days
สำหรับบทความทั้งหมด อ่านได้จากด้านล่างครับ
- Day 1 : AndroidStaggered Grid
- Day 2 : Paralloid
- Day 3 : Retrofit
- Day 4 : SwipeRefreshLayout
- Day 5 : Android GraphView
- Day 6 : Holo Color Picker
- Day 7 : Android Async Http
- Day 8 : Crashlytics
- Day 9 : Butter Knife
- Day 10 : Android Annotations
- Day 11 : DateTimePicker
- Day 12 : Circular Progress Button
- Day 13 : ViewPager
- Day 14 : ViewPagerIndicator
- Day 15 : FadingActionBar
- Day 16 : AutofitTextView
- Day 17 : SwipeListView
- Day 18 : ShowcaseView
- Day 19 : GreenDAO
- Day 20 : AndroidViewAnimation
- Day 21 : ActiveAndroid
- Day 22 : Twitter4J
- Day 23 : ListViewAnimations
- Day 24 : AndEngine
- Day 25 : EazeGraph
- Day 26 : Cardslib
- Day 27 : AdapterKit
- Day 28 : WeatherLib
- Day 29 : FlatUI
- Day 30 : Android Firebase
สำหรับวันนี้ขอนำเสนอเรื่อง AutofitTextView Library ตัวนี้ไม่มีอะไรมาก เป็นเหมือน Custom TextView ที่เอาไว้จัด TextView และปรับขนาดของ TextView ให้เราอัตโนมัติตามความยาวของข้อความครับ ขอได้รับการขอบคุณจาก CVD International เอ้ย ไม่ใช่!! ต้องขอขอบคุณ คุณเอก ที่แนะนำมาครับ
Installation
ขั้นตอนการติดตั้ง ง่ายๆครับ เพิ่ม dependencies ลงไปที่ไฟล์ build.gradle
dependencies { compile 'me.grantland:autofittextview:0.1.+'}กด Sync Project with Gradle File เป็นอันเรียบร้อย
Getting Started
การใช้งาน AutofitTextView ก็เหมือนกับการใช้ TextView ทั่วๆไปเลยครับ เพียงแค่เพิ่มแท็กลงไปในไฟล์เลเอาท์ xml ของเรา อย่างเช่น เวลาเราจะใช้ TextView ก็จะใช้แบบนี้
<TextView android:id="@+id/text" android:layout_width="match_parent" android:layout_height="match_parent" android:singleLine="false"/>หากเป็น AutofitTextView ก็จะประกาศแบบนี้
<me.grantland.widget.AutofitTextView android:layout_width="match_parent" android:layout_height="wrap_content" android:singleLine="true" />มาเริ่มสร้างโปรเจ็คง่ายๆกันเลยครับ เริ่มที่เลเอาท์ ตั้งชื่อว่า activity_autofit.xml
<?xml version="1.0" encoding="utf-8"?>
<LinearLayout xmlns:android="http://schemas.android.com/apk/res/android"              android:orientation="vertical"              android:layout_width="match_parent"              android:layout_height="match_parent">
    <EditText        android:id="@+id/edit_text"        android:hint="@string/edit_text_hint"        android:layout_width="wrap_content"        android:layout_height="wrap_content"        android:layout_marginBottom="32dp"/>
    <me.grantland.widget.AutofitTextView        android:id="@+id/text_view"        android:textSize="32sp"        android:layout_width="match_parent"        android:layout_height="wrap_content"        android:maxLines="3" />
</LinearLayout>
จากเลเอาท์ด้านบน ผมใช้ AutofitTextView โดยกำหนด จำนวนแถวทั้งหมด 3 แถว ถ้าใครอยากใช้แค่แถวเดียวก้ใส่ android:singleLine="true" ไปครับ ส่วน EditText เอาไว้พิมพ์ข้อความ ข้อความก็จะมาแสดงใน AutofitTextView ครับ ส่วนไฟล์ strings.xml เพิ่ม นี้ลงไป
<string name="edit_text_hint">Input some text</string>ต่อมาทำการสร้างคลาส AutofitActivity.java ขึ้นมา ทำการ setContentView() และ findViewById() ให้เรียบร้อย
package com.devahoy.learn30androidlibraries.day16;
import android.os.Bundle;import android.support.v7.app.ActionBarActivity;import android.text.Editable;import android.widget.EditText;
import com.devahoy.learn30androidlibraries.R;
import me.grantland.widget.AutofitTextView;
public class AutoFitTextViewActivity extends ActionBarActivity {
    AutofitTextView mTextView;    EditText mEditText;
    @Override    protected void onCreate(Bundle savedInstanceState) {        super.onCreate(savedInstanceState);        setContentView(R.layout.day16_activity_autofit);        mTextView = (AutofitTextView) findViewById(R.id.text_view);        mEditText = (EditText) findViewById(R.id.edit_text);    }}
ต่อไปก็ใช้ TextWatcher มาช่วย เพื่อให้เวลาที่เราใส่ข้อความลงบน EditText ก็จะไปทำการอัพเดทข้อความลงใน AutofitTextView
mEditText.addTextChangedListener(new TextWatcher() {    @Override    public void beforeTextChanged(CharSequence s, int start, int count, int after) {
    }
    @Override    public void onTextChanged(CharSequence s, int start, int before, int count) {        mTextView.setText(s);    }
    @Override    public void afterTextChanged(Editable s) {
    }});
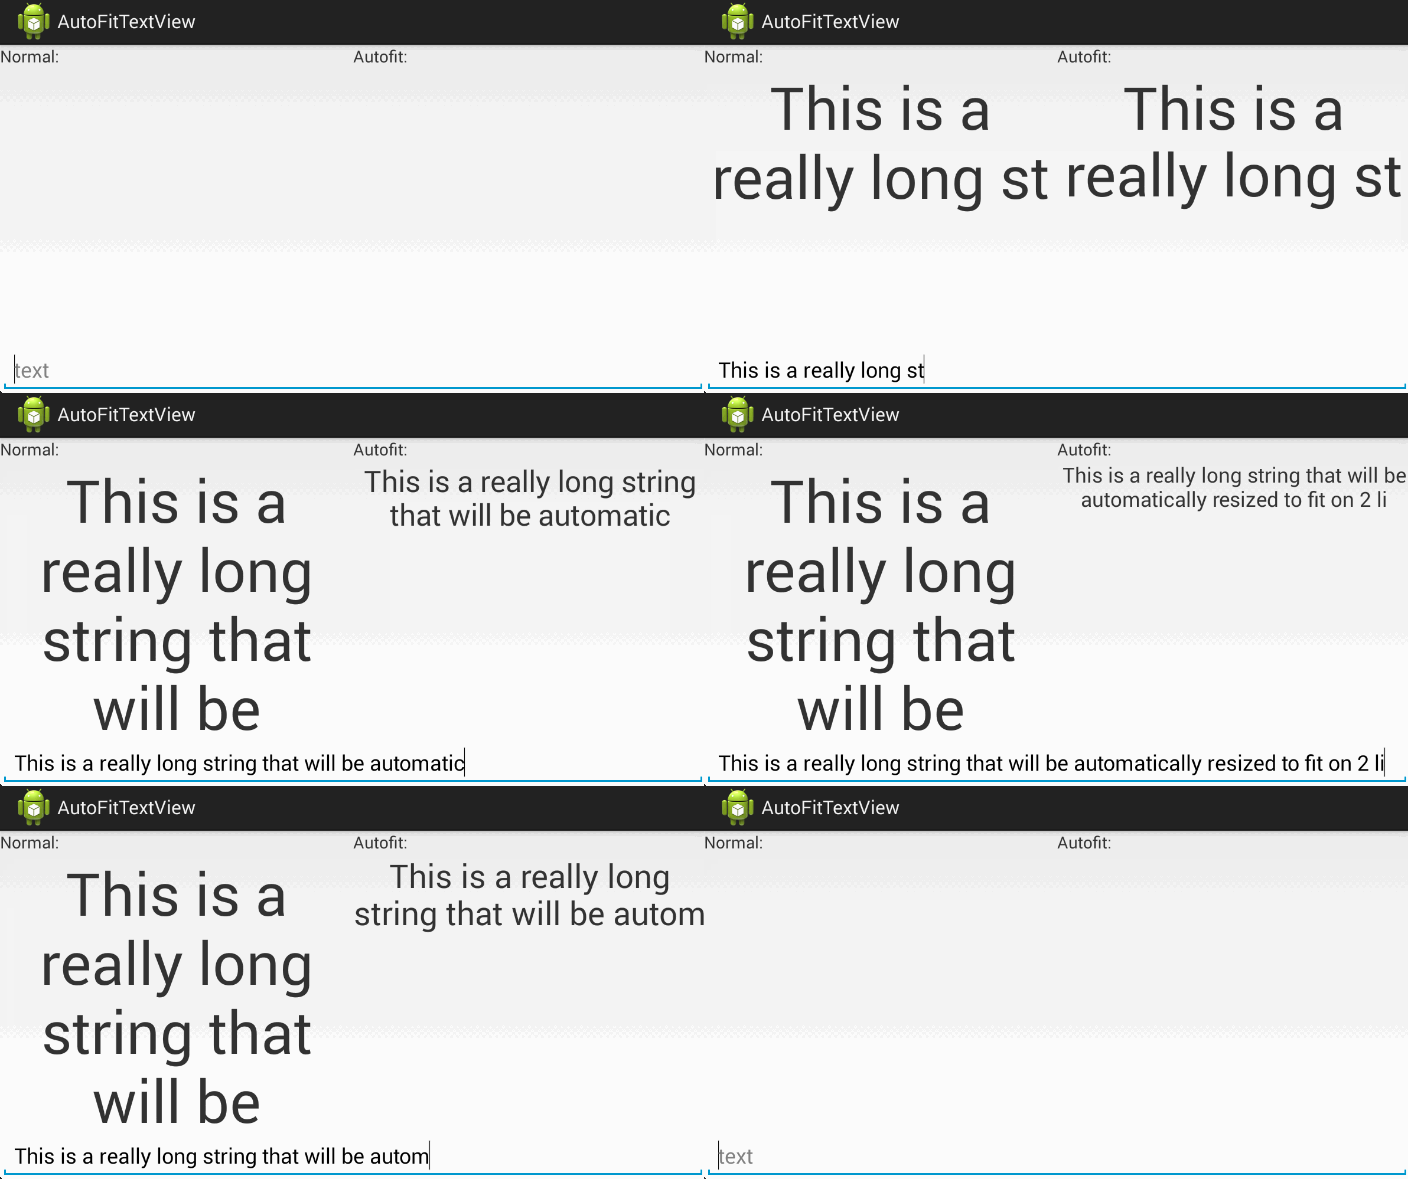
สุดท้าย ทดสอบรันโปรแกรม แล้วลองพิมพ์ข้อความดูครับ


อะ ทดสอบภาษาไทยซักหน่อยว่าได้มั้ย?


สรุป
ตัว AutofitTextView() มันก็เป็น Library แบบง่ายๆครับ หากดู source code จะเห็นว่ามีแค่คลาส AutofitTextView เท่านั้นครับ โดยคลาสที่ extends TextView อีกที เพื่อทำการ custom ครับ หากใครมีแอพที่ต้องใช้แสดงผล TextView เยอะๆ หรืออยากจัดหน้า จัดเรียงข้อความให้มันสวยๆ ก็ลองดู Library ตัวนี้นะครับ ใช้งานง่าย มีประสิทธิภาพครับ แถมภาษาไทยก็ไม่มีปัญหา แต่อาจจะมีตัดคำ ตัดตัวอักษรผิดไปบ้าง
Happy Coding :D
Source Code
References
- Authors
-

Chai Phonbopit
เป็น Web Dev ในบริษัทแห่งหนึ่ง ทำงานมา 10 ปีกว่าๆ ด้วยภาษาและเทคโนโลยี เช่น JavaScript, Node.js, React, Vue และปัจจุบันกำลังสนใจในเรื่องของ Blockchain และ Crypto กำลังหัดเรียนภาษา Rust


