มาต่อ Part ที่สอง ของการสร้าง ERC-20 token ด้วย ink! กันครับ ก่อนหน้านี้เราสร้าง Token ที่มี total_supply มีการ Transfer token ได้แล้ว
- สร้าง ERC-20 Token ด้วย ink! Part 1/2
- สร้าง ERC-20 Token ด้วย ink! Part 2/2 (บทความนี้)
สำหรับ part นี้ จะเป็นการทำให้ token สมบูรณ์แบบยิ่งขึ้น คือสามารถ transfer token ให้คนอื่นได้ โดยที่คนนั้นต้องอนุญาต (Approve) ให้เรา transfer นั่นเอง (คล้ายๆ Defi ทั้งหลาย ที่ Smart Contract ขออนุญาตเรา เพื่อให้เรา Approve contract เพื่อให้ contract transfer เงินเราได้ นั่นเอง)
Approval
ขั้นตอนนี้ เราจะเพิ่ง allowances โดยใช้ Mapping เพื่อเก็บว่า AccountId นั้นๆ Allow ให้ Contract สามารถ spend เงินของเราได้เท่าไหร่
pub struct Erc20 { /// Balances that can be transferred by non-owners: (owner, spender) -> allowed allowances: Mapping<(AccountId, AccountId), Balance>,}สิ่งที่เราต้องทำคือ สร้าง event สำหรับ Approval ขึ้นมา เพิ่มต่อจาก event Transfer ได้เลย
#[ink(event)]pub struct Approval { #[ink(topic)] owner: AccountId, #[ink(topic)] spender: AccountId, value: Balance,}เพิ่ม Error ใน enum Error ต่อจาก InsufficientBalance
#[derive(Debug, PartialEq, Eq, scale::Encode, scale::Decode)]#[cfg_attr(feature = "std", derive(scale_info::TypeInfo))]pub enum Error { InsufficientBalance, InsufficientAllowance,}สุดท้าย struct Erc20 หลังจากเพิ่ม allowances จะเป็นแบบนี้
/// Create storage for a simple ERC-20 contract.#[ink(storage)]#[derive(SpreadAllocate)]pub struct Erc20 { /// Total token supply. total_supply: Balance, /// Mapping from owner to number of owned tokens. balances: Mapping<AccountId, Balance>, /// Balances that can be transferred by non-owners: (owner, spender) -> allowed allowances: Mapping<(AccountId, AccountId), Balance>,}เพิ่ม function approve เพื่อให้เราอนุญาต ตัว Contract สามารถ transfer token เราได้
#[ink(message)]pub fn approve(&mut self, spender: AccountId, value: Balance) -> Result<()> { let owner = self.env().caller(); self.allowances.insert((&owner, &spender), &value); self.env().emit_event(Approval { owner, spender, value, }); Ok(())}เพิ่ม function allowance และ allowance_impl
#[ink(message)]pub fn allowance(&self, owner: AccountId, spender: AccountId) -> Balance {    self.allowance_impl(&owner, &spender)}
#[inline]fn allowance_impl(&self, owner: &AccountId, spender: &AccountId) -> Balance {    self.allowances.get((owner, spender)).unwrap_or_default()}
Transfer Logic
หลังจากที่เรามี function approve แล้ว ต่อมาต้องสร้าง function transfer_from เพื่อไว้ transfer token ต่างจาก transfer_from_to ที่ทำ Part 1 นะครับ function นั้น สำหรับเจ้าของ AccountId ส่งเงิน ให้ account อื่นๆ แต่ transfer_from อันนี้ สำหรับ Contract
เพิ่ม transfer_from ลงไป
/// Transfers tokens on the behalf of the `from` account to the `to account#[ink(message)]pub fn transfer_from( &mut self, from: AccountId, to: AccountId, value: Balance,) -> Result<()> { let caller = self.env().caller(); let allowance = self.allowance_impl(&from, &caller); if allowance < value { return Err(Error::InsufficientAllowance) } self.transfer_from_to(&from, &to, value)?; self.allowances .insert((&from, &caller), &(allowance - value)); Ok(())}จะสังเกตเห็นว่า transfer_from จะไปเรียก transfer_from_to ข้างใน function ครับ ในฟังค์ชันนี้คือเราเช็คว่า allowances ไว้มี balance พอมั้ย สุดท้ายเมื่อ transfer เสร็จ เราก็ต้องอัพเดทค่า allowances ด้วย
Testing
เพิ่ม test เพื่อเช็คว่า transfer_from ใช้ได้มั้ย
#[ink::test]fn transfer_from_works() {    let mut contract = Erc20::new(100);    let accounts = ink_env::test::default_accounts::<ink_env::DefaultEnvironment>();
    // Balance of alice (owner of token)    assert_eq!(contract.balance_of(accounts.alice), 100);
    // Bob fails to transfer tokens owned by Alice.    assert_eq!(        contract.transfer_from(accounts.alice, accounts.frank, 10),        Err(Error::InsufficientAllowance)    );
    // Alice approves Bob for token transfer on behalf.    assert_eq!(contract.approve(accounts.bob, 10), Ok(()));
    // Set the contract as callee and Bob as caller.    let default_contract = ink_env::account_id::<ink_env::DefaultEnvironment>();    ink_env::test::set_callee::<ink_env::DefaultEnvironment>(default_contract);    ink_env::test::set_caller::<ink_env::DefaultEnvironment>(accounts.bob);
    // Transfer from Alice to Frank.    assert_eq!(        contract.transfer_from(accounts.alice, accounts.frank, 10),        Ok(())    );
    // Frank owns 10 tokens.    assert_eq!(contract.balance_of(accounts.frank), 10);}
จะสังเกตเห็นว่าในไฟล์ test ผมสามารถใช้ accounts (เป็น Default ของ Substrate) ได้ จากฟังค์ชั่นนี้
let accounts = ink_env::test::default_accounts::<ink_env::DefaultEnvironment>();ซึ่งมันคล้ายๆ กับ ถ้าใครใช้ Hardhat หรือ Ethers
let accounts = await hre.ethers.getSigners()ต่อมาเพิ่ม test ของ allowance()
#[ink::test]fn allowances_works() {    let mut contract = Erc20::new(100);    assert_eq!(contract.balance_of(AccountId::from([0x1; 32])), 100);    assert_eq!(contract.approve(AccountId::from([0x1; 32]), 200), Ok(()));    assert_eq!(        contract.allowance(AccountId::from([0x1; 32]), AccountId::from([0x1; 32])),        200    );
    assert_eq!(        contract.transfer_from(AccountId::from([0x1; 32]), AccountId::from([0x0; 32]), 50),        Ok(())    );
    assert_eq!(contract.balance_of(AccountId::from([0x0; 32])), 50);    assert_eq!(        contract.allowance(AccountId::from([0x1; 32]), AccountId::from([0x1; 32])),        150    );
    contract        .transfer_from(AccountId::from([0x1; 32]), AccountId::from([0x0; 32]), 100)        .unwrap_or_default();
    assert_eq!(contract.balance_of(AccountId::from([0x0; 32])), 50);    assert_eq!(        contract.allowance(AccountId::from([0x1; 32]), AccountId::from([0x1; 32])),        150    );}
รันเทสด้วยคำสั่ง
cargo +nightly testจะได้ผลลัพธ์ประมาณนี้
running 5 teststest erc20::tests::new_works ... oktest erc20::tests::balance_works ... oktest erc20::tests::transfer_works ... oktest erc20::tests::transfer_from_works ... oktest erc20::tests::allowances_works ... ok
test result: ok. 5 passed; 0 failed; 0 ignored; 0 measured; 0 filtered out; finished in 0.00s
Test ผ่านหมดเลย จากนั้นลองไปทดสอบ Deploy Contract จริงๆกันครับ
Deploy with Contracts UI
เริ่มต้น เราต้อง start local substrate ขึ้นมาก่อน
substrate-contracts-node --devจะได้ผลลัพธ์ประมาณนี้ แสดงว่า server start เรียบร้อยแล้ว
2022-05-15 22:41:52 Substrate Contracts Node2022-05-15 22:41:52 ✌️ version 0.13.0-1a7fe782022-05-15 22:41:52 ❤️ by Parity Technologies <admin@parity.io>, 2021-20222022-05-15 22:41:52 📋 Chain specification: Development2022-05-15 22:41:52 🏷 Node name: brainy-bell-98712022-05-15 22:41:52 👤 Role: AUTHORITY2022-05-15 22:41:52 💾 Database: RocksDb at /var/folders/jx/4609s07j565324l22lmsdn_c0000gn/T/substrateV23MSP/chains/dev/db/full2022-05-15 22:41:52 ⛓ Native runtime: substrate-contracts-node-100 (substrate-contracts-node-1.tx1.au1)2022-05-15 22:41:52 🔨 Initializing Genesis block/state (state: 0x4a14…b6b9, header-hash: 0x730d…ce7c)2022-05-15 22:41:52 🏷 Local node identity is:2022-05-15 22:41:53 💻 Operating system: macos2022-05-15 22:41:53 💻 CPU architecture: aarch642022-05-15 22:41:53 📦 Highest known block at #02022-05-15 22:41:53 〽️ Prometheus exporter started at 127.0.0.1:96152022-05-15 22:41:53 Listening for new connections on 127.0.0.1:9944.ต่อมา Build contract ครับ
cargo +nightly contract buildจะได้ไฟล์ target/link/erc20.contract ไฟล์นี้เราจะต้องเอาไป Deploy ผ่าน Contracts UI
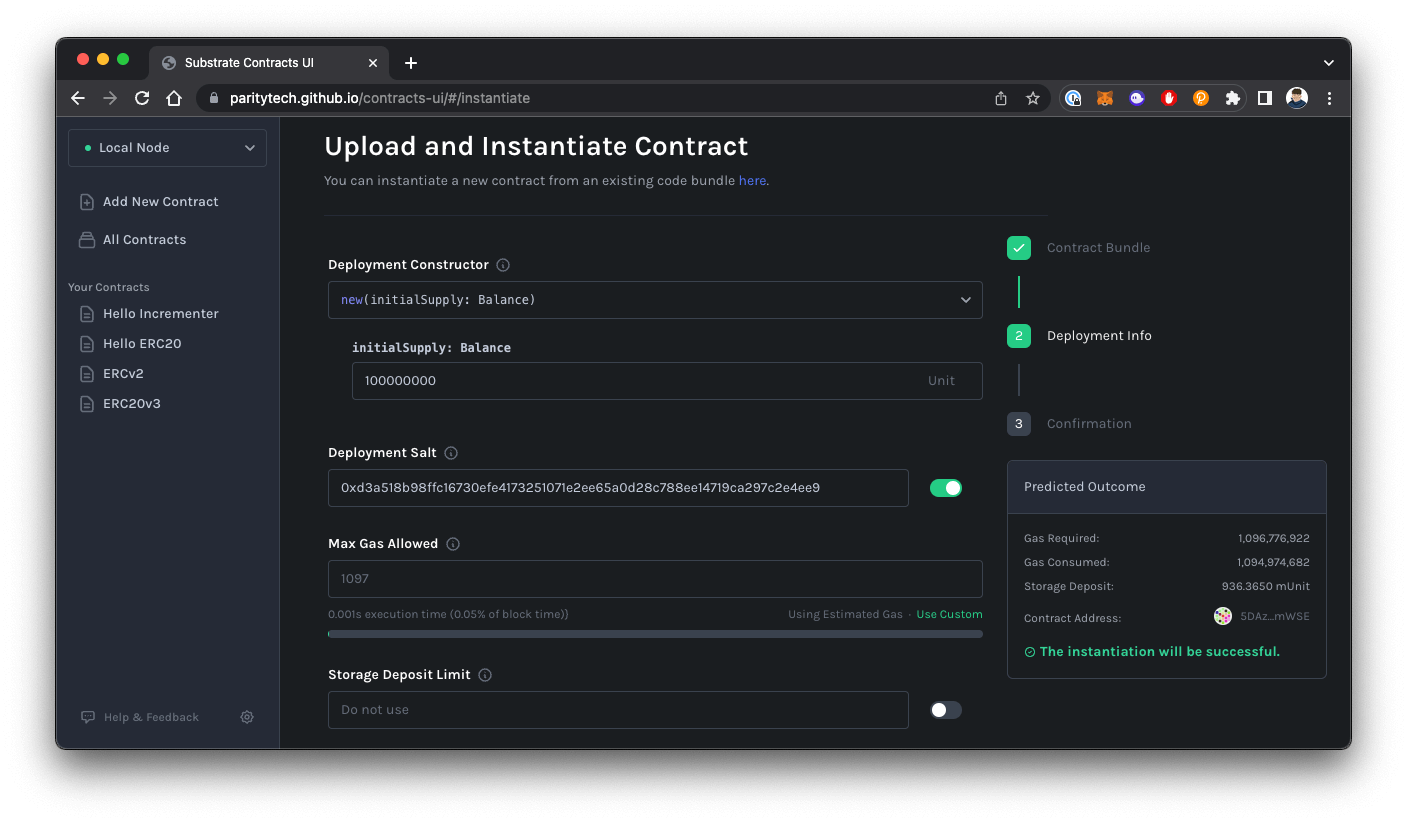
เปิด Contracts UI ขึ้นมา ทดลอง Deploy contract ที่เรา build ไว้ ใส่ total_supply ตามใจชอบ

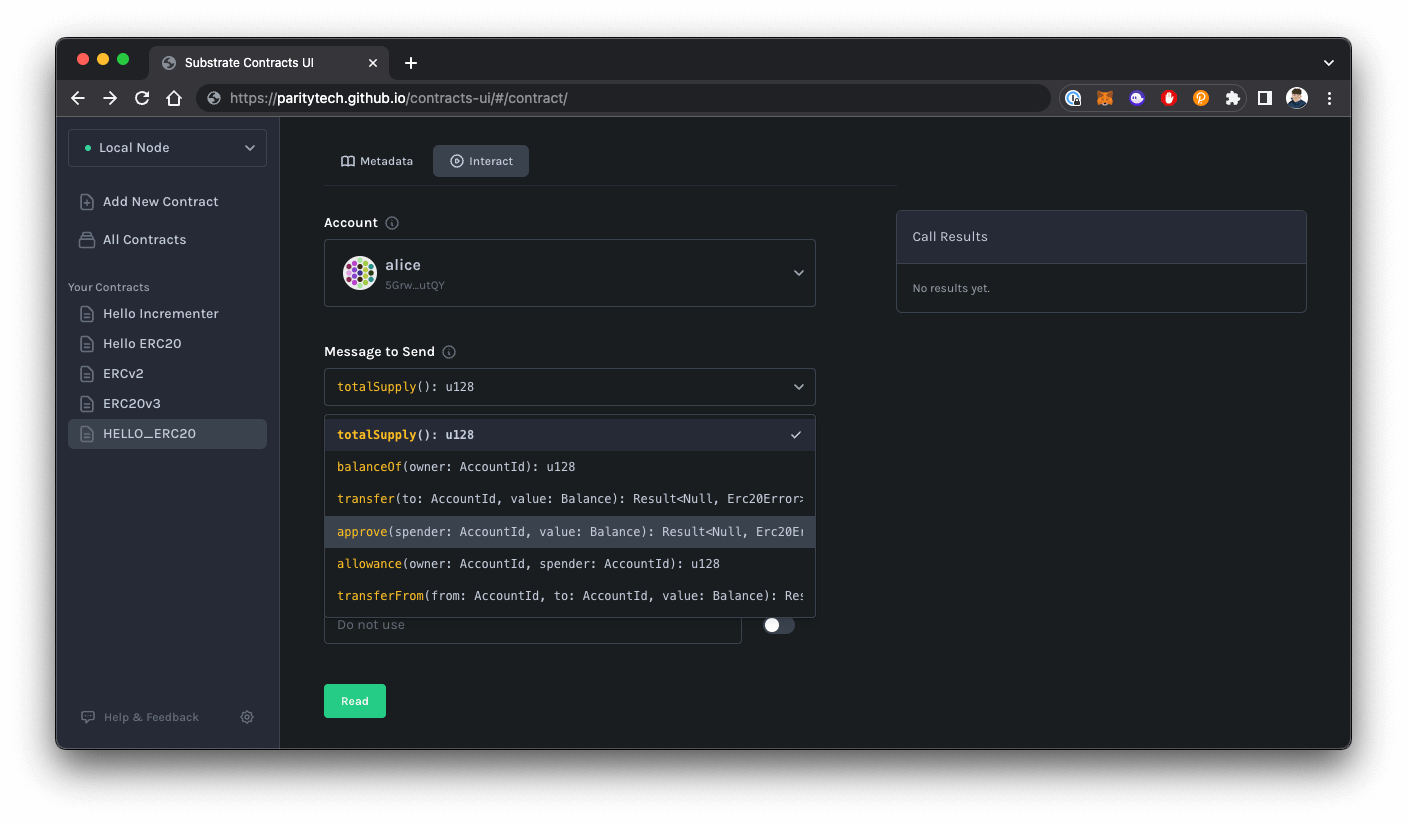
ลอง Transfer ลอง Approve หรือลอง function อื่นๆ ดูครับ

หากใครไม่อยากใช้ local เราสามารถใช้ Canvas ได้ เวลาที่เราเปิด Contracts UI ก็เลือกเป็น Canvas ครับ
🎉 ยินดีด้วยคุณคือผู้โชคดีได้รับรางวัลมูลค่า xxx บาท จะบ้า หรอ
จบไปแล้วครับ สำหรับบทความ ERC-20 ด้วยภาษา ink! จริงๆ ต้องบอกว่าบทความ ส่วนใหญ่ผมก็อ้างอิงจาก Official ครับ สิ่งสำคัญคือ เราต้องอ่าน และลงมือทำครับ ไม่ใช่แค่อ่านอย่างเดียว
เวลาอ่าน Tutorial ก็พยายามลองแก้ ให้ต่างจาก tutorial ลองเล่น function อื่นๆ แล้วเดี๋ยวจะเข้าใจมากขึ้นครับ ส่วนตัวผม ก็เพิ่งได้หัดเขียน ink! และอยู่กับ Substrate น่าจะไม่ถึงเดือน แต่รู้สึกว่าสนุกดีครับ หากมีส่วนไหนผิดพลาด ต้องขออภัยด้วยครับ พยายามเรียนรู้เพิ่มเติมเรื่อยๆ
หวังว่าจะชอบบทความนี้นะครับ ไปละ สวัสดี
Happy Coding ❤️
References
- Authors
-

Chai Phonbopit
Senior Software Engineer ประสบการณ์กว่า 12 ปี ด้าน Frontend: React, Next.js, Tailwind CSS และ Backend: Node.js, Express, NestJS ปัจจุบันสนใจ Astro, Cloudflare Workers และ AI Coding Tool
