วันนี้มาแนะนำการใช้งาน cURL สำหรับนักพัฒนาที่มักจะต้องทำการทดสอบ API ว่ามันโอเคหรือไม่ ทั้งการยิง HTTP GET/POST/PUT ต่างๆ ปกติโปรแกรมที่นิยมกันคงนี้ไม่พ้น Postman แต่วันนี้เราไม่พูดถึง Postman (ไว้บทความถัดไป)
วันนี้จะมาพูดถึงเฉพาะ cURL ว่ามันคืออะไร ใช้งานยังไง ซึ่งในตัวอย่างบทความนี้ส่วนใหญ่จะใช้ Github API มาเป็นตัวอย่างครับ เพราะมันมี API ค่อนข้างที่จะครบเลยทีเดียว
TLDR;
$ curl https://api.github.com
$ curl -i https://api.github.com
# use `--user` (`-u`) for basic http authentication$ curl --user "user:password" https://api.github.com
# only username without the colon will prompted for input password.$ curl --user "user" https://api.github.com
$ curl -H 'Content-Type: application/json' https://api.github.com
# HTTP Post use `--request` (`-X`) กับ `--data` (`-d`)$ curl -H 'Content-Type: application/json' -d '{}' -X POST https://api.github.com
$ curl -H "Accept: application/json" \-H 'Content-Type: application/json' \-H 'Authorization: Bearer eJ0.....' \-d '{"username": "chai"}' \-X POST \https://api.github.com
cURL คืออะไร?
cURL ตามความหมายเลยมันอธิบายว่า
curl is a tool to transfer data from or to a server, using one of the supportedprotocols (DICT, FILE, FTP, FTPS, GOPHER, HTTP, HTTPS,IMAP, IMAPS, LDAP, LDAPS, POP3,POP3S, RTMP, RTSP, SCP, SFTP, SMB, SMBS, SMTP, SMTPS, TELNET and TFTP).The command is designed to work without user interaction.หรือเรียกง่ายๆก็คือ เครื่องมือแบบไม่ต้องมีหน้า Graphic User Interface ที่เอาไว้รับ/ส่งข้อมูลจาก Server ผ่านโปรโตคอลต่างๆได้เช่น FTP, HTTP, HTTPS
ส่วนใหญ่แล้วก็เอาไว้ทดสอบ API ดู Request/Response ตรวจเช็ค HTTP Status หรือดู HTTP Headers ต่างๆ
Basic
ก่อนใช้งาน cURL เราต้องทำการติดตั้งมันซะก่อน หากไม่มีสามารถดาวน์โหลดได้จากนี้ Download cURL
บน Mac OS X สามารถติดตั้งผ่าน homebrew ได้ง่ายๆ:
$ brew install curlบน Linux ก็เช่นกัน
$ sudo apt-get install curlทดสอบว่ามี cURL บนเครื่องจริงหรือไม่ โดยการเปิด Terminal แล้วพิมพ์
$ curl --version
curl 7.49.1 (x86_64-apple-darwin16.0)
การใช้งาน cURL นั้นง่ายมากๆ แล้วพิพม์คำสั่งตาม syntax ของมันเลย
$ curl <OPTION> <URL>ตัวอย่าง เช่น การดึงข้อมูลจากเว็บไซต์ https://google.com
$ curl https://google.com
<HTML><HEAD><meta http-equiv="content-type" content="text/html;charset=utf-8"><TITLE>302 Moved</TITLE></HEAD><BODY><H1>302 Moved</H1>The document has moved<A HREF="https://www.google.co.th/?gws_rd=x">here</A>.</BODY></HTML>
จะเห็นว่าข้อมูลนั้นขึ้นว่า “The document has moved” หมายความว่า url ที่เราทำการขอดึงข้อมูลนั้นมีการ redirect ไปที่อื่น การที่เราจะให้มัน following redirect ด้วย ทำได้โดยการใส่ option -L ให้มัน ดังนี้
$ curl -L https://google.com
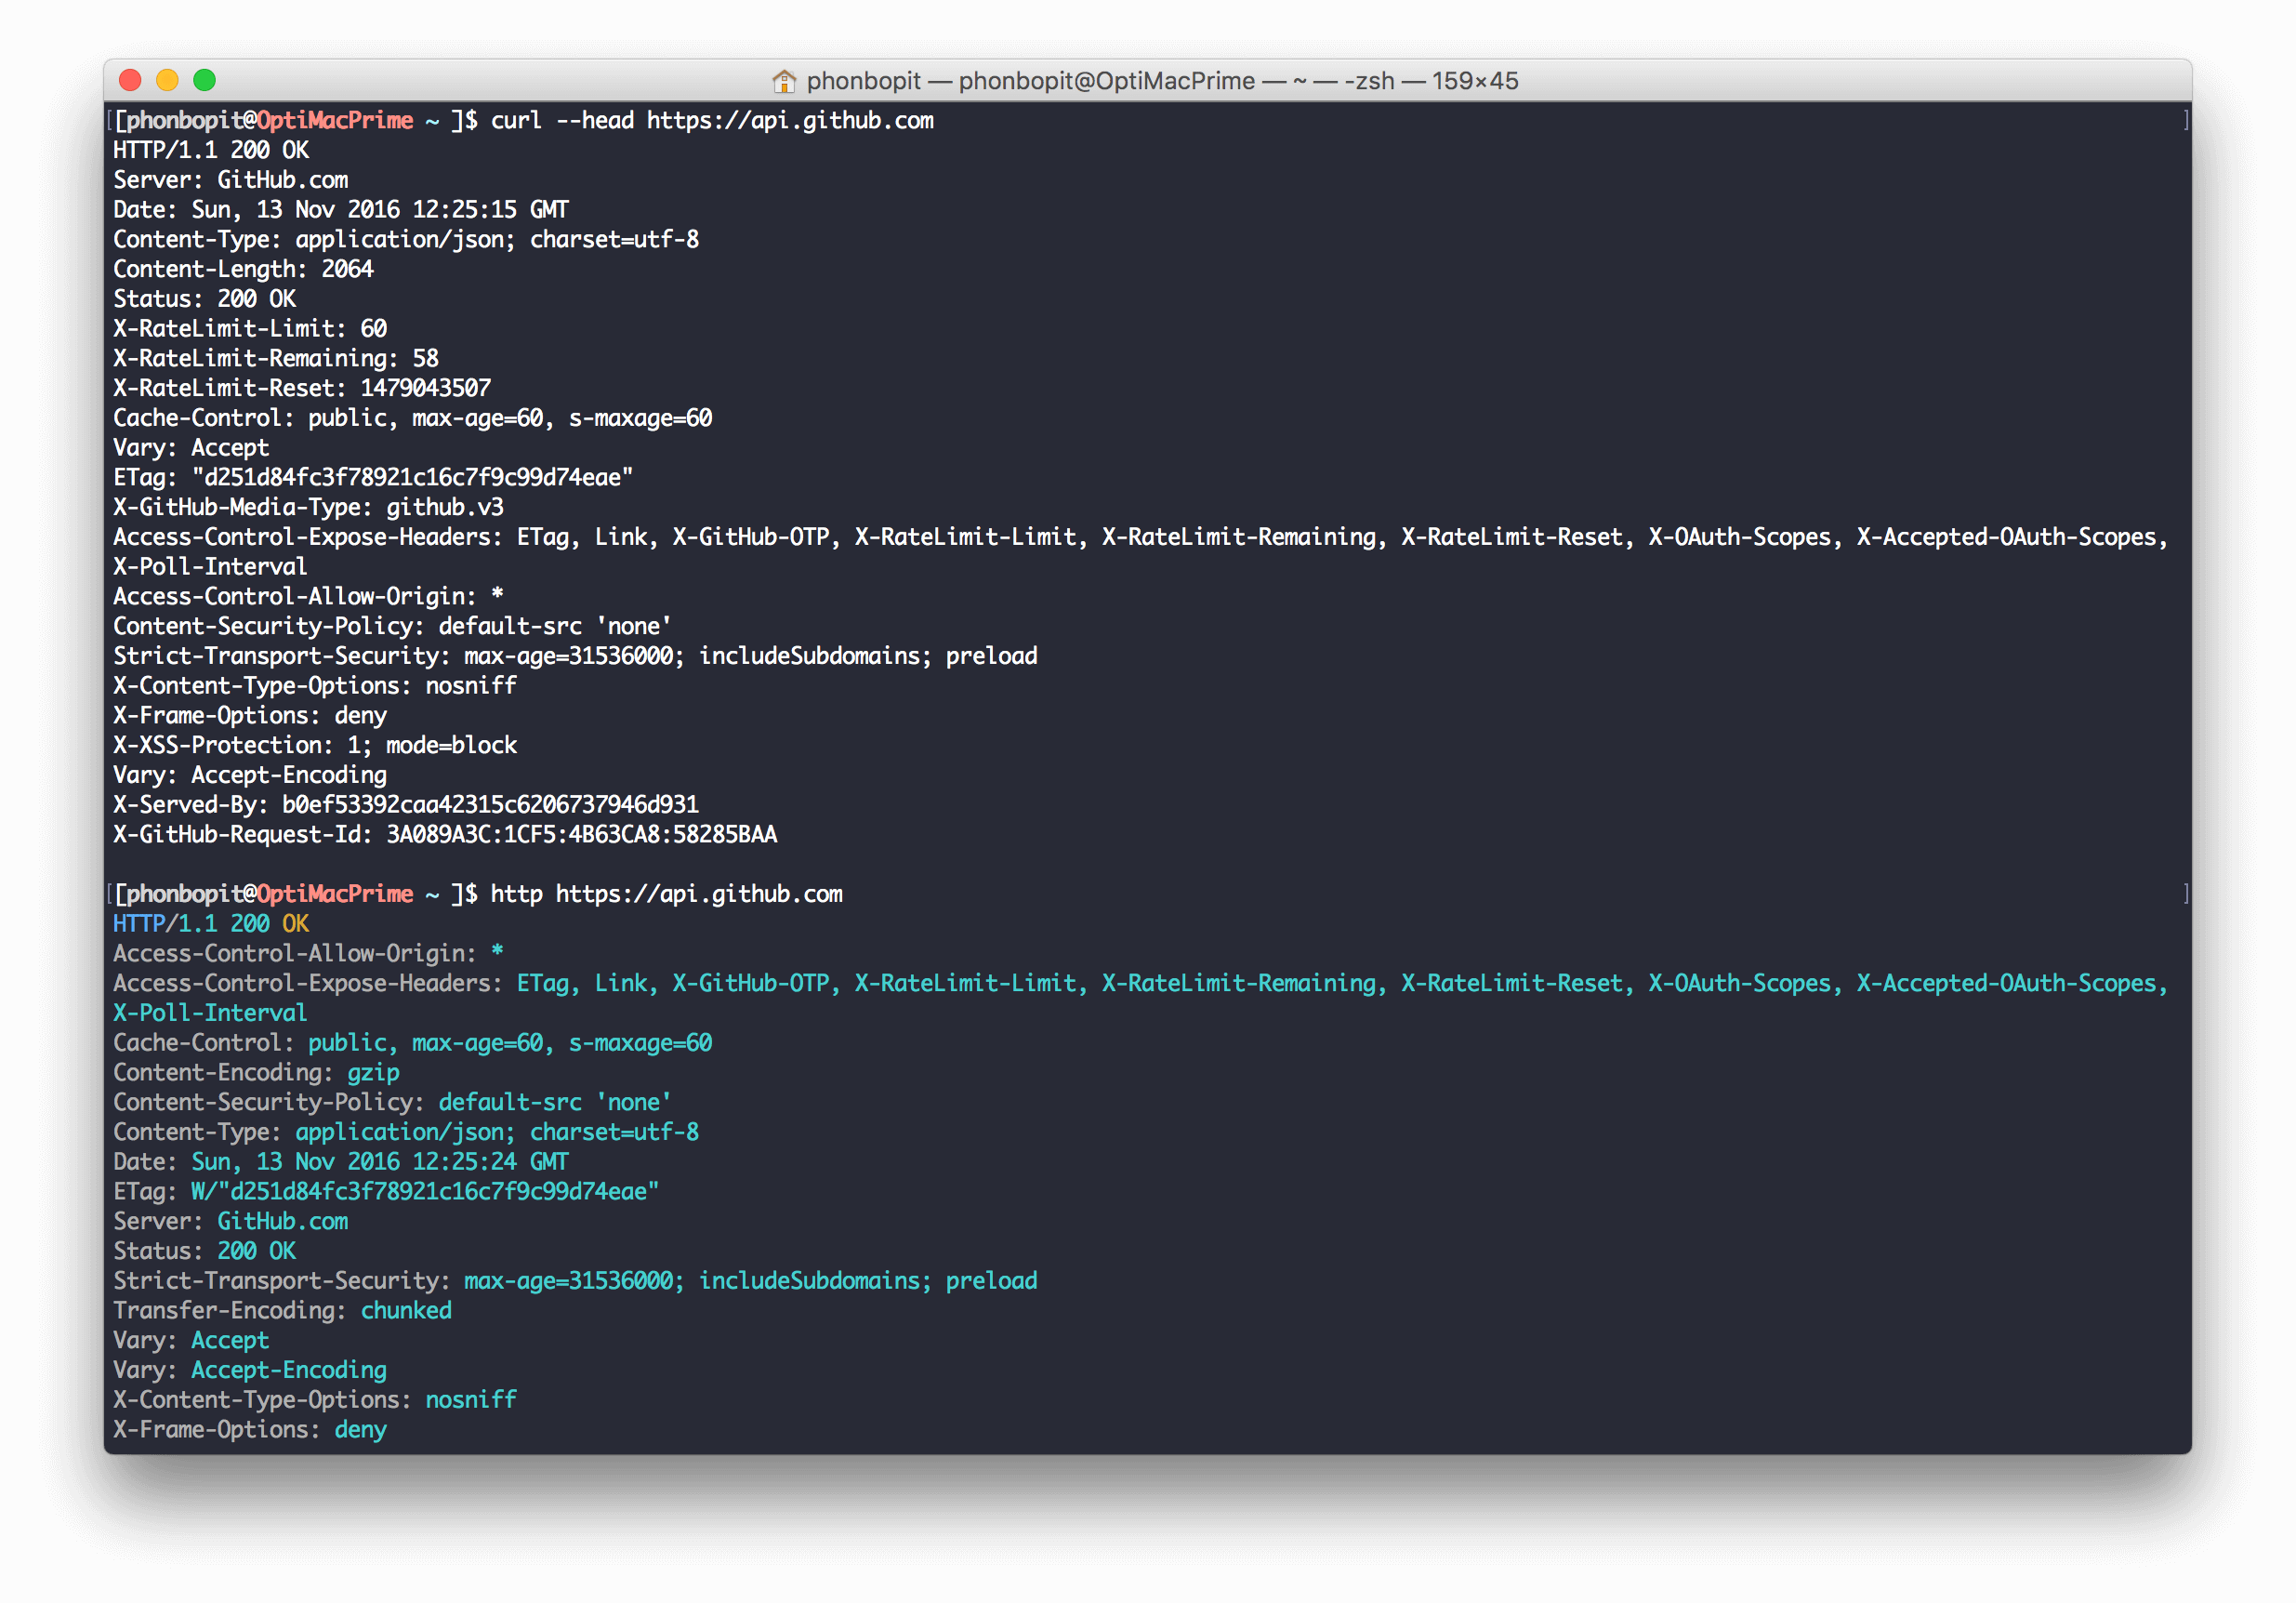
<!doctype html><html>......</html>หากอยากดูเฉพาะส่วน Header ละ? ก็แค่ใส่ option --head หรือ -I แบบนี้
$ curl -I https://api.github.com
HTTP/1.1 200 OKServer: GitHub.comDate: Mon, 14 Nov 2016 15:01:51 GMTContent-Type: application/json; charset=utf-8Content-Length: 2064Status: 200 OKX-RateLimit-Limit: 60X-RateLimit-Remaining: 59X-RateLimit-Reset: 1479137814Cache-Control: public, max-age=60, s-maxage=60Vary: AcceptETag: "d643d84fc3f78921c16c7f9c99d743f4"X-GitHub-Media-Type: github.v3Access-Control-Expose-Headers: ETag, Link, X-GitHub-OTP, X-RateLimit-Limit, X-RateLimit-Remaining, X-RateLimit-Reset, X-OAuth-Scopes, X-Accepted-OAuth-Scopes, X-Poll-IntervalAccess-Control-Allow-Origin: *Content-Security-Policy: default-src 'none'Strict-Transport-Security: max-age=31536000; includeSubdomains; preloadX-Content-Type-Options: nosniffX-Frame-Options: denyX-XSS-Protection: 1; mode=blockVary: Accept-EncodingX-Served-By: bae57931a6fe678a3dffe9be8e7811zgX-GitHub-Request-Id: 735798AA:15603:814D4CE:5829D33E
Option อื่นๆ ก็จะมี
--verbose(-v) เพื่อเอาไว้ debug เพราะมันจะแสดงข้อมูลทุกๆ action--include(-i) เพื่อใส่ Header แนบมาด้วยกับ response body (ต่างจาก--headที่เอาเฉพาะ header ไม่เอา body)
Downloading files (-o)
เราสามารถใช้ cURL เพื่อทำการดาวน์โหลดไฟล์ได้ เช่น ตัวอย่าง จะโหลดไฟล์ จากเว็บ bigbuckbunny โดยเลือกไฟล์ BigBuckBunny_320x180.mp4 เราสามารถใช้ option -O เพื่อดาวน์โหลดไฟล์ได้ :
$ curl -O http://download.blender.org/peach/bigbuckbunny_movies/BigBuckBunny_320x180.mp4
% Total    % Received % Xferd  Average Speed   Time    Time     Time  Current                               Dload  Upload   Total   Spent    Left  Speed0 61.6M    0  510k    0     0    98k      0  0:10:38  0:00:05  0:10:33  103k
เราสามารถใช้ option อื่นๆร่วมกันได้ เช่น
-o 'filename': เพื่อทำการเปลี่ยนชื่อไฟล์ output ได้-C -: เพื่อให้มันทำการ resume ดาวน์โหลดที่ค้างไว้-#: เปลี่ยนให้เป็นในรูป Progress Bar
ลองใช้ option เพิ่มเข้ามาจะเป็นแบบนี้
$ curl -# -C - -o 'bunny.mp4' http://download.blender.org/peach/bigbuckbunny_movies/BigBuckBunny_320x180.mp4
########################################                                  56.9%
Download/Upload FTP
ตัวอย่างการ Download ข้อมูลจาก FTP ทำเหมือนกับการดาวน์โหลดไฟล์ปกติเลย เพียงแค่เปลี่ยนโปรโตคอลจาก http/https เป็น ftp พร้อมกับใส่ user และ password แนบไปด้วย ดังนี้
$ curl ftp://myserver.com/path/to/my/folder/super_file.txt --user user:passwordส่วนวิธีการอัพโหลดข้อมูลผ่าน FTP ก็ทำเหมือนกัน เพียงแค่ใส่ option -T และระบุชื่อไฟล์ดังนี้
$ curl -T super_secret.zip ftp://myserver.com/path/to/my/folder --user user:passwordHTTP Basic Auth
ตัวอย่างการใช้งานเพื่อ Access เข้า Web ที่มี Basic Authentication ทำได้โดยการใส่ option --user หรือ -u แล้วตามด้วย username:password (username ตามด้วย colon(:) และ password) เช่น
$ curl -u "user:pass" [URL]ซึ่งเมื่อเราส่ง -u "user:pass" ตัว cURL จะ build ให้เป็น Header ชื่อ Authorization และเข้ารหัสเราด้วย base64encoding ซึ่งจากด้านบน cURL จะแปลงได้เป็นแบบนี้
$ curl -H 'Authorization: Basic dXNlcjpwYXNz' [URL]Headers
ต่อมาการใส่ custom header ให้กับ HTTP Header ได้ เช่น ให้ Accept เฉพาะ JSON หรือ Content-Type ต้องเป็น JSON เท่านั้น หรือกรณีใส่ authToken, accessToken ผ่าน custom header สามารถทำได้ผ่าน option --header หรือ -H ตัวอย่าง:
$ curl -H "x-access-token: mytoken" [URL]
$ curl -H "Content-Type: application/json" -H "Accept: application/json" [URL]
POST
มาถึงส่วนของ HTTP POST กันบ้างส่วนนี้จะมีปัญหากันเยอะ เนื่องจากว่า วิธีการส่งข้อมูล นั้นสามารถส่งได้หลายแบบ ไม่ว่าจะเป็น
- x-xxx-form-urlencoded
- form-data
- JSON
ซึ่งส่วนที่เราจะรู้ว่า body payload ที่จะส่งไปแต่ละชนิดเป็นอะไร ก็ดูจาก Content-Type ในส่วน HTTP Header นั่นเอง
ส่ง payload แบบ x-xxx-form-urlencoded
การส่ง ข้อมูล body payload ทำด้วยด้วย option --data หรือ -d พร้อมกับข้อมูลแบบ key=value&key2=value ดังนี้
$ curl -X POST -d "name=Chai&password=xxxx" [URL]ซึ่งด้านบนเป็นการส่ง body payload ชนิด Content-Type: application/x-www-form-urlencoded
ส่ง payload แบบ form-data
ต่อมาการส่ง body payload แบบ upload file จะใช้ option -F และตั้งค่า Header เป็นแบบ Content-Type: multipart/form-data
สมมติไฟล์ HTML เราเป็นแบบนี้
<form method="POST" enctype="multipart/form-data" action="..."> <input type="file" name="file" /> <input type="submit" name="press" value="OK" /></form>การส่ง File Upload แนบไปกับ POST สามารถทำได้แบบนี้
$ curl -X POST -H "Content-Type: multipart/form-data -F "file=@filename.png" -F "press=ok" [URL]ส่ง payload แบบ JSON
การส่ง body payload แบบ JSON ทำได้ด้วยการ add Content-Type: application/json แบบนี้
$ curl -X POST -H "Content-Type: application/json" -d '{"name": "Chai"}' [URL]หรือถ้าหากเรามีไฟล์ data.json
{ "firstname": "Chai", "lastname": "Phonbopit", "website": "https://devahoy.com"}เราก็สามารถส่งข้อมูลโดยอ้างอิงข้อมูลในไฟล์ JSON ก็ได้ โดยใช้เครื่องหมาย @filename.json ดังเช่น
$ curl -X POST -H "Content-Type: application/json" -d @data.json [URL]สุดท้าย หากคำสั่ง cURL มันยาวเกิน เราสามารถขึ้นบรรทัดใหม่ได้ด้วย / (อย่ามีอะไรต่อท้าย / ก่อนขึ้นบรรทัด) เช่น
$ curl -X POST \-H "Content-Type: application/json" \-d @data.json [URL]Github API Example
มาลองใช้ cURL ยิง Github API กันดูบ้างดีกว่า เริ่มแรกต้องรู้ว่า Github API มี API ไหนที่ยิงได้แบบไม่ต้องผ่าน Authentication และอันไหนต้อง required
สำหรับ API ที่ไม่ต้อง required authentication ก็พวก public data ต่างๆ เช่นข้อมูล user
$ curl https://api.github.com/users/phonbopitAuthentication
ส่วนที่ต้อง Authentication ก่อน ซึ่งวิธี Authentication ก็มีหลายแบบ เช่น
- Basic Authentication
curl -u "username" https://api.github.comซึ่งหากเราติด 2 Factor Authentication ก็ต้องส่ง X-Github-OTP: number แนบติด Header ไปด้วย
- OAuth2 Token ส่งได้ทั้งแบบ header และ queryString
curl -H "Authorization: token OAUTH-TOKEN" https://api.github.comcurl https://api.github.com/?access_token=OAUTH-TOKENซึ่งวิธีการที่เราจะได้ OAuth2 มานั้นมีหลายวิธี แต่เอาวิธีที่ทำได้ง่ายๆ ด้วยการ generate ผ่านหน้าเว็บเลย Generate new token
ทำการเลือก scope ที่ต้องการ เช่น repo, delete_repo เป็นต้น
ต่อมาลองเรียก เพื่อดู repositories ทั้งหมดของเรา
$ curl https://api.github.com/user/repos
{  "message": "Requires authentication",  "documentation_url": "https://developer.github.com/v3"}
จะได้ HTTP/1.1 401 Unauthorized ไม่ผ่านการ Authentication เนื่องจากว่าส่วนนี้จำเป็นต้องแนบ Token หรือระบุ Basic Auth ไปด้วย วิธีการก็คือใช้ token ที่เรา generate จากด้านบน ส่งไปเป็น queryString แบบนี้
$ curl https://api.github.com/user/repos?access_token=your_tokenหรือจะส่งเป็น Header ก็ได้แบบนี้
$ curl https://api.github.com/user/repos -H "Authorization: token your_token"Create repo
ลองใช้ cURL ทำการสร้าง repository เราดูบ้าง ซึ่ง API ที่ทาง Github ให้ใช้ก็คือ POST https://api.github.com/user/repos โดยข้อมูลที่ต้องส่งไปก็มีพวก name, description, homepage, private อื่นๆ ซึ่งตัวอย่าง JSON ตามข้างล่างนี ชื่อ create_repo.json
{ "name": "Hello-World", "description": "This is repo create from cURL", "homepage": "https://devahoy.com/blog/2016/11/getting-started-with-curl/", "private": false, "has_issues": true, "has_wiki": true, "has_downloads": true, "auto_init": true}ต่อมาสร้าง repo ผ่าน cURL
$ curl -u username -X POST -d @create_repo.json https://api.github.com/user/reposแบบใช้ token
$ curl -X POST -H "Authorization: token your_token" -d @create_repo.json https://api.github.com/user/reposทีนี้ repo เราก็ถูกสร้างเรียบร้อยแล้ว
HTTP/1.1 201 Created
{  "id": 73729178,  "name": "Hello-World",  "full_name": "Phonbopit/Hello-World",  "owner": {  },  "html_url": "https://github.com/Phonbopit/Hello-World",  "description": "This is repo create from cURL",  "fork": false,  "url": "https://api.github.com/repos/Phonbopit/Hello-World",}
เรียบร้อย ¯\_ (ツ) _/¯
HTTPie
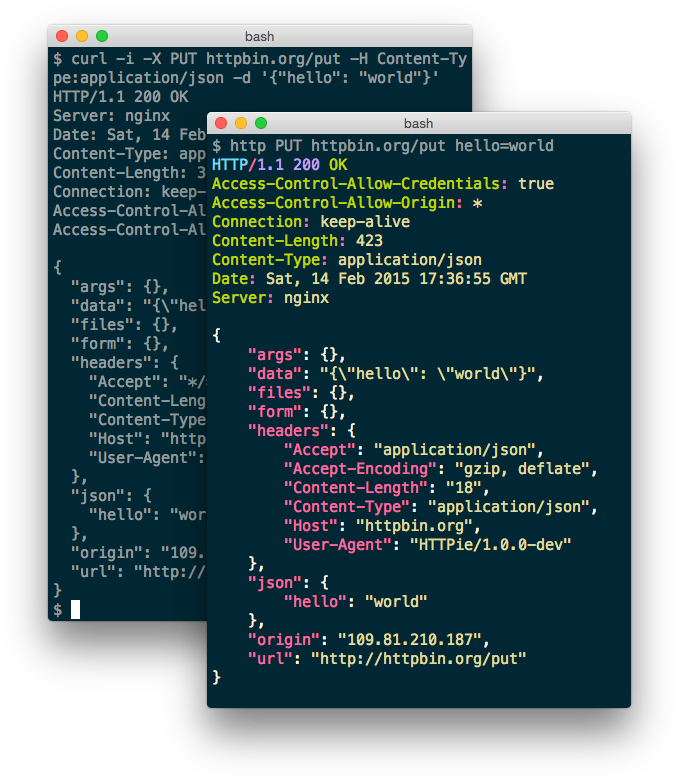
แนะนำ HTTPie สำหรับคนที่ไม่อยากใช้ cURL ก็มีอีก Tool ที่ทำหน้าที่แบบเดียวกับ cURL เลยแต่ว่ามันดูง่ายกว่า มีสี highlight อ่านง่าย รวมถึงวิธีใช้งานก็ง่ายกว่า cURL
วิธีการติดตั้งบน Mac OS X ผ่าน Homebrew
brew install httpieบน Linux
sudo apt-get install httpieติดตั้งผ่าน python pip
pip install --upgrade httpieวิธีใช้งานก็ง่ายๆ แค่
$ http [URL]เช่น
$ http https://google.com
HTTP/1.1 302 FoundAlt-Svc: quic=":443"; ma=2592000; v="36,35,34"Cache-Control: privateContent-Length: 262Content-Type: text/html; charset=UTF-8Date: Mon, 14 Nov 2016 17:06:08 GMTLocation: https://www.google.co.th/?gws_rd=cr&ei=xP3P: CP="This is not a P3P policy! See https://www.google.com/support/accounts/answer/151657?hl=en for more info."Server: gwsSet-Cookie: NID=90=x; expires=Tue, 16-May-2017 17:06:08 GMT; path=/; domain=.google.com; HttpOnlyX-Frame-Options: SAMEORIGINX-XSS-Protection: 1; mode=block
<HTML><HEAD><meta http-equiv="content-type" content="text/html;charset=utf-8"><TITLE>302 Moved</TITLE></HEAD><BODY><H1>302 Moved</H1>The document has moved<A HREF="https://www.google.co.th/?gws_rd=cr&ei=x">here</A>.</BODY></HTML>จุดเด่นของ HTTPie คือ
Content-TypeและAcceptเป็นapplication/jsonโดย default- แสดง Header มาเป็น default
- แสดงสี highlight และจัด format output ให้ง่ายต่อการอ่าน
สำหรับ HTTPie ยังมี Features อื่นๆที่น่าสนใจอีกเยอะ และบางทีก็สะดวกกว่าใช้ cURL ก็ลองไปอ่านเพิ่มเติมดูได้ครับ
References
- Authors
-

Chai Phonbopit
Senior Software Engineer ประสบการณ์กว่า 12 ปี ด้าน Frontend: React, Next.js, Tailwind CSS และ Backend: Node.js, Express, NestJS ปัจจุบันสนใจ Astro, Cloudflare Workers และ AI Coding Tool