[Workshop] ทำ Chat Application ด้วย Node.js, Express และ Socket.io
![[Workshop] ทำ Chat Application ด้วย Node.js, Express และ Socket.io](/_vercel/image?url=%2Fimages%2F2023%2F10%2Fchat-app-nodejs-socketio.png&w=828&q=80)
สวัสดีครับ วันนี้มาลองฝึกทำ Workshop ง่ายๆ กัน ด้วยการทำ Chat Application ด้วยการใช้ socket.io ในตัวอย่าง ผมจะใช้ socket.io ร่วมกับ Node.js + Express.js และตัว Client ที่เป็นหน้าบ้าน ก็จะเป็นแค่ HTML ธรรมดานะครับ
ซีรีย์ทำ Chap Application
- ทำ Chat Application ด้วย Node.js, Express และ Socket.io
- ทำ Chat Application ด้วย Express + Socket.io และ React.js
ระดับความยาก: ⭐️
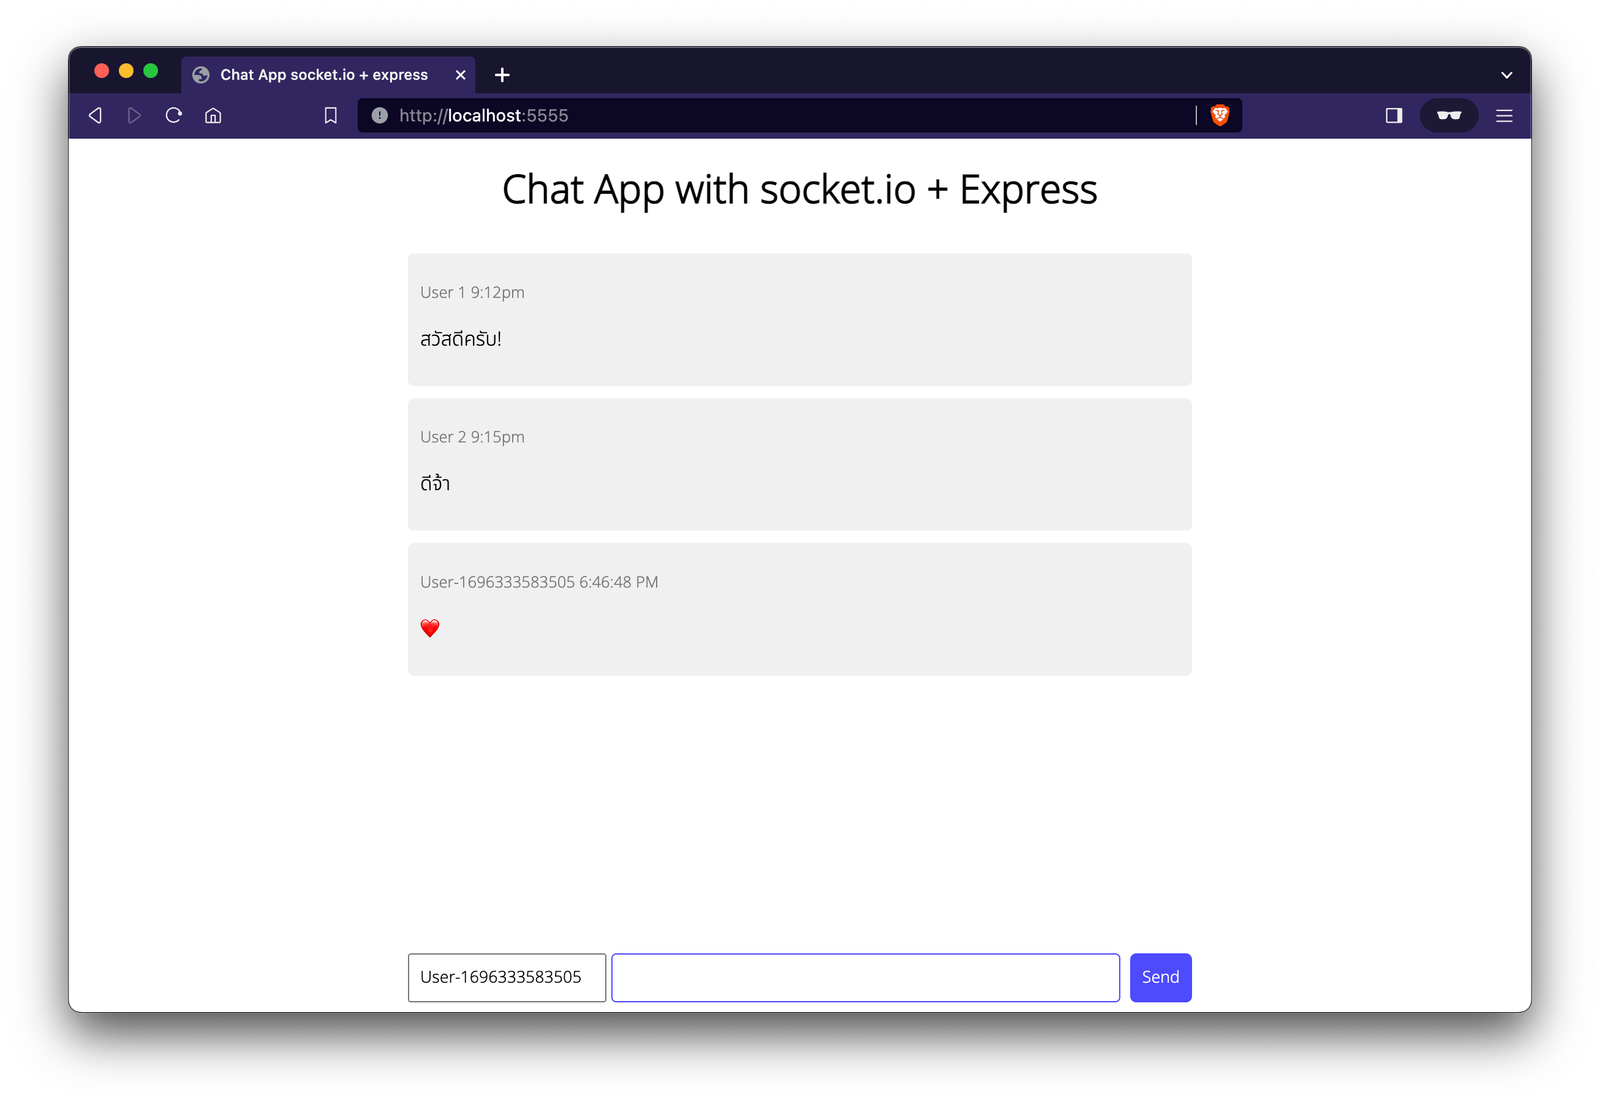
หน้าตาเว็บแชตเป็นแบบนี้
สำหรับ Package Manager ในตัวอย่างใช้เป็น pnpm นะครับ สามารถใช้ npm, yarn หรือ bun แทนได้ แล้วแต่ชอบเลยครับ
Step 1 - เริ่มต้นสร้างโปรเจ็ค
สร้างโปรเจ็คแบบ module โดยการ init project ขึ้นมา
pnpm init# หรือ bun, pnpm# bun init, npm init
ทำการติดตั้ง express
และ socket.io
pnpm install express socket.io
ตัวไฟล์ package.json
ควรจะเป็นแบบนี้ มี type คือ module
{ "name": "chat-app-express", "type": "module", "dependencies": { "express": "^4.18.2", "socket.io": "^4.7.2" }}
สร้าง server ขึ้นมาง่ายๆ ด้วยการใช้ express
รันที่ port 5555 ตั้งชื่อว่า index.js`
import path from 'path'import { fileURLToPath } from 'url'
import express from 'express'
const APP_PORT = 5555const __dirname = path.dirname(fileURLToPath(import.meta.url))
const app = express()
app.get('/', (req, res) => { res.sendFile(path.join(__dirname + '/index.html'))})
app.listen(APP_PORT, () => { console.log(`App running on port ${APP_PORT}`)})
ตัว express app ไม่มีอะไรมาก แค่ให้มันทำการ serve index.html
เวลาที่มีคนเข้ามาที่เว็บไซต์ / (ใช้ sendFile
ธรรมดา)
และก็เพิ่มไฟล์ index.html
เป็นแบบนี้
<!DOCTYPE html><html lang="en"> <head> <meta charset="UTF-8" /> <meta name="viewport" content="width=device-width, initial-scale=1.0" /> <title>Chat App socket.io + express</title> </head> <body> <h2>Chat App with socket.io + Express</h2> </body></html>
ทดลอง start server และลองเข้าเว็บ http://localhost:5555 ต้องเห็นข้อความบนหน้าจอ ถ้าไม่เห็นแสดงว่า ตั้งค่า หรือทำอะไรผิด ลองเช็คโค๊ดดีๆครับ
node index.js
Step 2 - เพิ่ม Socket.io
ต่อมา ทำการเพิ่ม socket.io เพิ่มต่อจากตัว server express เริ่มโดยทำการ import createServer
และ Server จาก socket.io
import { createServer } from 'node:http'import { Server } from 'socket.io'
จากนั้น ก็ทำการสร้าง server ด้วย createServer
โดยใช้ app ตัว express
// 1. สร้าง `server` ด้วย `app` โดยใช้ `createServer` จาก `node:http`const server = createServer(app)
สร้าง io
เพื่อกำหนด server instance จากนั้น ก็คอยรับ event connection
// 2. สร้าง `io` โดยใช้ `new Server` จาก `socket.io`const io = new Server(server)
// 3. คอยรับ event connection เวลามี user connectedio.on('connection', (socket) => { console.log('a user connected')})
สุดท้าย ก็ start server เปลี่ยนจาก app.listen()
เป็น server.listen()
แทน
server.listen(APP_PORT, () => { console.log(`App running on port ${APP_PORT}`)})
โค๊ดที่ได้ตอนนี้จะเป็นแบบนี้:
import path from 'path'import { fileURLToPath } from 'url'
import express from 'express'
const __dirname = path.dirname(fileURLToPath(import.meta.url))
import { createServer } from 'node:http'import { Server } from 'socket.io'
const app = express()
// 1. สร้าง `server` ด้วย `app` โดยใช้ `createServer` จาก `node:http`const server = createServer(app)
// 2. สร้าง `io` โดยใช้ `new Server` จาก `socket.io`const io = new Server(server)
// 3. คอยรับ event connection เวลามี user connectedio.on('connection', (socket) => { console.log('a user connected')})
const APP_PORT = 5555
app.get('/', (req, res) => { res.sendFile(path.join(__dirname + '/index.html'))})
// 4. เปลี่ยน `app.listen` เป็น `server.listen`server.listen(APP_PORT, () => { console.log(`App running on port ${APP_PORT}`)})
ต่อมา หลังจากเราแก้ฝั่ง server ไปแล้ว ก็แก้ฝั่ง client บ้าง โดยเปลี่ยนไฟล์ index.html
ให้ทำการ connect socket จากฝั่ง client
<!DOCTYPE html><html lang="en"> <head> <meta charset="UTF-8" /> <meta name="viewport" content="width=device-width, initial-scale=1.0" /> <title>Chat App socket.io + express</title> </head> <body> <h2>Chat App with socket.io + Express</h2>
<script src="https://cdn.socket.io/4.5.4/socket.io.min.js"></script> <script> const socket = io() </script> </body></html>
- ใช้ script โดยโหลด socket.io จาก CDN
- ตัว
io()
ปกติ เราต้องใส่ url ไปด้วยเช่นio('ws://hostname')
แต่ถ้าตัว default มันจะ connect ไปที่ web เดียวกัน เมื่อเรารันอยู่ที่ express server เดียวกัน ทำให้ตรงนี้ ฝั่ง client ไม่จำเป็นต้องระบุ url ก็ได้
สุดท้าย ลอง re-start server ดูใหม่ และลองเข้าเว็บ จะสังเกตเห็นว่า console ของเรามี user connected แสดง
node index.js
App running on port 5555a user connected
Step 3 - รับส่งข้อมูล
ตัว socket.io จะมี function หลักๆ 2 ตัวคือ
socket.on(event, callback)
: ใช้สำหรับรับข้อความ จากชื่อ event ที่เราต้องการsocket.emit(event, message)
: ใช้สำหรับส่งข้อความ ไปตาม event ที่เราต้องการ
โดยในการ รับ ส่ง ข้อความ chat เราจะคุยกันด้วยการตั้งชื่อ event ว่า chat:message
ครับ
ทำการแก้ไขไฟล์ index.html
โดยเพิ่ม style และ html markup ลงไป
<!DOCTYPE html><html lang="en"> <head> <meta charset="UTF-8" /> <meta name="viewport" content="width=device-width, initial-scale=1.0" /> <title>Chat App socket.io + express</title>
<style> .page-title { text-align: center; font-size: 2rem; }
.chat-container { display: flex; flex-direction: column; justify-content: flex-end; height: 100vh; width: 640px; margin: 0 auto; }
.chat-messages { flex: 1; overflow-y: scroll; }
.message { background-color: #f1f0f0; border-radius: 5px; padding: 10px; margin-bottom: 10px; }
.message .meta { font-size: 0.8rem; color: #777; }
.message .text { font-size: 1rem; }
.chat-form { display: flex; margin-top: 10px; }
.chat-form #name { padding: 0.5rem; margin-right: 0.25rem; }
.chat-form #message { flex: 1; padding: 0.5rem; border-radius: 0.25rem; border: 1px solid #4e4bfc; margin-right: 0.5rem; }
.chat-form button { background-color: #4e4bfc; color: #fff; border: none; border-radius: 5px; padding: 10px; cursor: pointer; } </style> </head> <body> <div class="chat-container"> <h2 class="page-title">Chat App with socket.io + Express</h2>
<div class="chat-messages"> <div class="message"> <p class="meta">User 1 <span>9:12pm</span></p> <p class="text">Hello, how are you?</p> </div> <div class="message"> <p class="meta">User 2 <span>9:15pm</span></p> <p class="text">I'm good, thanks for asking. How about you?</p> </div> </div> <form class="chat-form" id="form"> <input type="text" id="name" /> <input type="text" id="message" /> <button type="submit">Send</button> </form> </div>
<script src="https://cdn.socket.io/4.5.4/socket.io.min.js"></script> <script> const socket = io() </script> </body></html>
ทีนี้ หน้านี้ เวลาที่ผม submit ก็จะส่งข้อมูลใน #message
ไปที่ socket server ด้วย emit('chat:message', message)
ในส่วน frontend ไฟล์ index.html
ที่ส่วน <script>
ก็ทำการ เพิ่ม event listener เวลาที่ form submit เราก็จะส่ง payload ที่มี name, message และ time ไปที่ socket event chat:message
const form = document.getElementById('form')const message = document.getElementById('message')const name = document.getElementById('name')
// initial namename.value = getName()
form.addEventListener('submit', (e) => { e.preventDefault() if (message.value) { const payload = { username: name.value, message: message.value, time: new Date().toLocaleTimeString(), } socket.emit('chat:message', payload)
message.value = '' }})
function getName() { // get name from date timestamp const date = new Date() return 'User-' + date.getTime()}
ที่ฝั่ง Server เราก็ต้องเพิ่ม socket.on
เพื่อรอรับ event ถ้ามีคนส่งมา
io.on('connection', (socket) => { console.log('a user connected')
socket.on('chat:message', (msg) => { console.log('msg received : ' + JSON.stringify(msg)) })})
เมื่อเรา submit ข้อมูล ทีนี้ฝั่ง server ก็จะเห็นข้อมูลที่ user (client) ส่งมา เรียบร้อย
Broadcasting
ฝั่ง Server index.js
เมื่อได้ message แล้ว ขั้นต่อไปก็คือการ broadcasting ข้อมูลทั้งหมด ไปให้กับ client ทุกๆ คนที่ทำการ connect socket นี้มา โดย broadcast ไปตามชื่อ event ตัวอย่าง
ทำการ emit
ข้อมูลที่ได้ ไปหา client ทั้งหมด
io.emit('chat:message', msg)
ไฟล์ index.js
ที่ส่วน io connection เป็นแบบนี้
io.on('connection', (socket) => { console.log('a user connected')
socket.on('chat:message', (msg) => { console.log('message: ' + JSON.stringify(msg))
io.emit('chat:message', msg) })})
กลับมาที่ Client (index.html
) เพิ่ม socket.on ที่ฝั่ง client ด้วย เพื่อจะได้แสดง message เวลาที่มีข้อความใหม่ เมื่อฝั่ง client ได้รับข้อความ ก็จะเอา ข้อมูลที่ได้ มาแสดง โดยใช้ innerHTML
socket.on('chat:message', (data) => { const div = document.createElement('div') div.classList.add('message') div.innerHTML = ` <p class="meta">${data.username} <span>${data.time}</span></p> <p class="text">${data.message}</p> ` document.querySelector('.chat-messages').appendChild(div)})
ตอนนี้ จะเห็นว่า เวลาที่เรา submit message เราจะเห็น message ใหม่ แสดงที่หน้าจอ เรียบร้อย
สรุป
จบแล้วสำหรับตัวอย่างการทำ Chat Application แบบง่ายๆ ลองเอาไปประยุกต์ใช้กันดูนะครับ มีหัวข้อที่อยากให้ลองไปฝึกทำ และลองคิดดูครับ เช่น
- เราเก็บ message history ไว้ใน database ได้มั้ย?
- มี user session จริงๆ มี token หรือ user จริงๆ ไม่ใช่พิมพ์อะไรก็ได้
- ทำเป็นห้องแชต แยก channel หรือ private chat ยังไง?
- ส่ง รูป หรือ ข้อความแบบ encrypted?
- แสดง online / offline คนที่กำลังอยู่ในแชต
- แสดงว่ากำลังพิมพ์อยู่ ยังไง?
สำหรับ Source Code ก็ไปดูเพิ่มเติมได้ที่ Link Github ด้านล่างนี้เลย
Happy Coding ❤️
- Authors
-
Chai Phonbopit
เป็น Web Dev ในบริษัทแห่งหนึ่ง ทำงานมา 10 ปีกว่าๆ ด้วยภาษาและเทคโนโลยี เช่น JavaScript, Node.js, React, Vue และปัจจุบันกำลังสนใจในเรื่องของ Blockchain และ Crypto กำลังหัดเรียนภาษา Rust