สวัสดีครับ บทความนี้เป็นบทความที่ 29 แล้วนะครับ ที่ผมจะมาเขียน ในซีรีย์ Learn 30 Android Libraries in 30 days
สำหรับบทความทั้งหมด อ่านได้จากด้านล่างครับ
- Day 1 : AndroidStaggered Grid
- Day 2 : Paralloid
- Day 3 : Retrofit
- Day 4 : SwipeRefreshLayout
- Day 5 : Android GraphView
- Day 6 : Holo Color Picker
- Day 7 : Android Async Http
- Day 8 : Crashlytics
- Day 9 : Butter Knife
- Day 10 : Android Annotations
- Day 11 : DateTimePicker
- Day 12 : Circular Progress Button
- Day 13 : ViewPager
- Day 14 : ViewPagerIndicator
- Day 15 : FadingActionBar
- Day 16 : AutofitTextView
- Day 17 : SwipeListView
- Day 18 : ShowcaseView
- Day 19 : GreenDAO
- Day 20 : AndroidViewAnimation
- Day 21 : ActiveAndroid
- Day 22 : Twitter4J
- Day 23 : ListViewAnimations
- Day 24 : AndEngine
- Day 25 : EazeGraph
- Day 26 : Cardslib
- Day 27 : AdapterKit
- Day 28 : WeatherLib
- Day 29 : FlatUI
- Day 30 : Android Firebase
สำหรับวันนี้ขอนำเสนอเรื่อง FlatUI


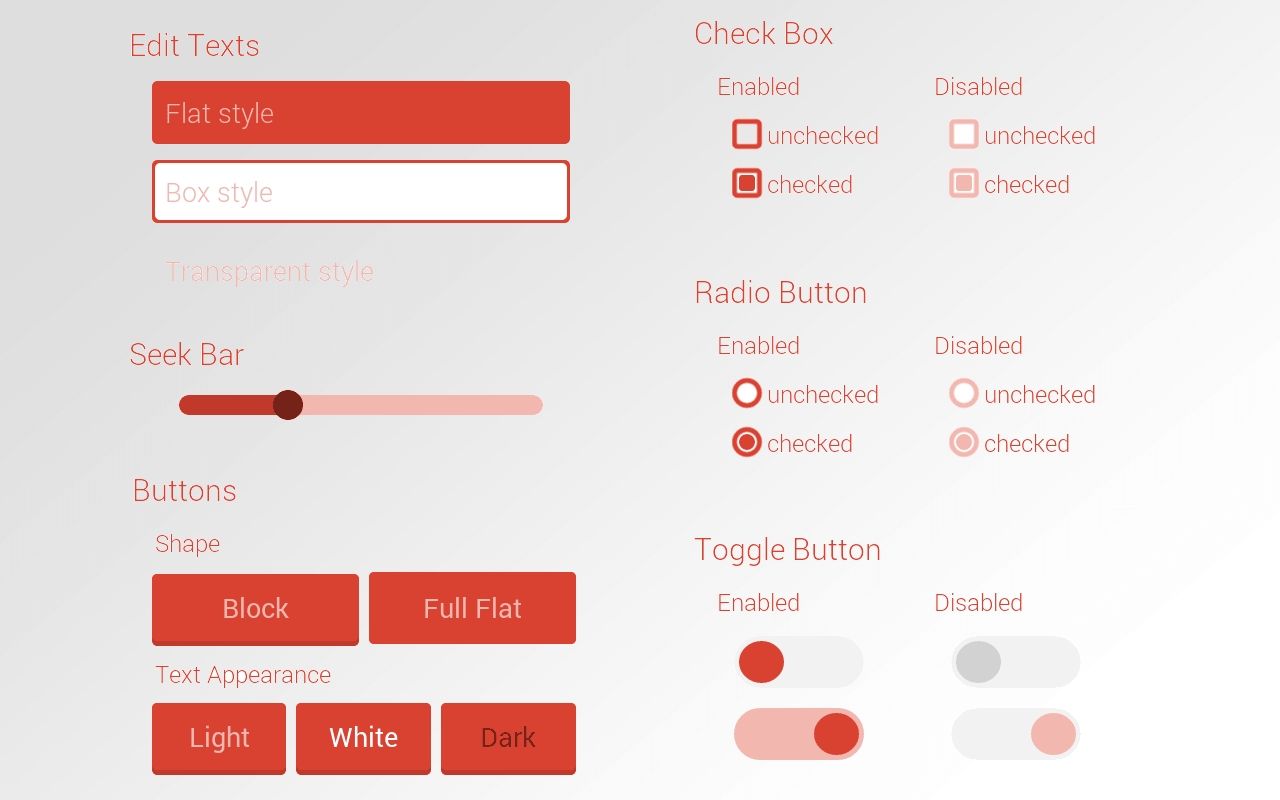
หลายๆคนคงจะคุ้นหูกับคำว่า FlatUI หรือใครที่ไม่เคยได้ยิน หรือรู้จัก ก็ดูตามรูปด้านบนเลยครับ มันก็คือ Trend การออกแบบ แบบหนึ่ง ที่เน้นเรียบง่าย สีสันส่วนมากก็จะอยู่ในโทนๆแนวๆนี้ น่าจะชุดสีแนวๆ Monochrome ถ้าจำไม่ผิด ส่วนตัว Library ตัวนี้ จะทำให้แอพ Android มีสีแนวๆ FlatUI โดยปรับแต่งผ่านทาง XML หรือว่าจะสร้างขณะ Run Time ในโค๊ด java ก้ได้ สิ่งที่สามารถปรับแต่งได้ เช่น
- Widget : ต่างๆ พวก EditText, Button, TextView, Checkbox อื่นๆ
- ActionBar : สามารถปรับแต่งสีของ ActionBar ได้
- Theme : เลือกปรับแต่งธีมได้
Installation
ขั้นตอนการติดตั้ง เปิดไฟล์ build.gradle ขึ้นมา แล้วเพิ่ม dependencies ลงไปดังนี้
dependencies { compile 'com.github.eluleci:flatui:2.1.1'}กด Sync Gradle เป็นอันเรียบร้อย
Usage
การใช้งาน FlatUI สามารถทำได้โดยการประกาศ View ในไฟล์ xml แบบนี้ อย่างเช่น EditText
<com.cengalabs.flatui.views.FlatEditText android:id="@+id/edittext_transparentbox" android:layout_width="match_parent" android:layout_height="wrap_content" android:layout_margin="5dip" android:maxLines="1" android:gravity="center_vertical" android:hint="Transparent box" android:includeFontPadding="true" flatui:fl_fieldStyle="transparent" flatui:fl_theme="@array/grass" />โค๊ดด้านบน การใช้งานเหมือนการประกาศ View อื่นๆเลย เพียงแต่ว่าอันนี้เป็น Custom Class ที่ชื่อ FlatEditText ส่วน flatui:fl_fieldStyle และ flatui:fl_theme คือ attribute ที่สามารถใช้ได้นะครับ ในส่วนของ flatui: มันคือ namespace attribute ของ FlatUI
<LinearLayout    xmlns:android="http://schemas.android.com/apk/res/android"    xmlns:flatui="http://schemas.android.com/apk/res-auto"    android:orientation="vertical"    android:layout_width="match_parent"    android:layout_height="match_parent"    android:layout_margin="5dip"    android:paddingLeft="10dip"    android:paddingRight="10dip">
</linearlayout>
่ส่วน Atribute มันมีอะไรบ้าง มาดูครับ
fl_theme: เอาไว้เปลี่ยนธีม (สีแต่ละสี เช่นsea,grass,candyแบบรูปแรกเลย)fl_textAppearance: สีของ Text เช่นnone,darkหรือlightfl_borderWidth: ขนาดของของ Borderfl_cornerRadius: มุมของ Border (Corner Radius)fl_fieldStyle: เป็นการกำหนด Style เช่นflat,boxหรือtransparent
ส่วนไฟล์ Java หลัก เรียกใช้ด้วยคำสั่งดังนี้
// กำหนดให้ใช้ ทุกๆอย่าง ใช้หน่วยวัดหน่วยเดียวกันFlatUI.initDefaultValues(this);
// ปรับแต่ง Theme ให้เป็นสไตล์ grassFlatUI.setDefaultTheme(FlatUI.GRASS);
// ปรับแต่ง ActionBar ให้เป็นสไตล์ DEEPgetSupportActionBar().setBackgroundDrawable(FlatUI.getActionBarDrawable(this, FlatUI.DEEP, false));
Create Project
ทีนี้ลองสร้างโปรเจ็คเล่นๆ ขึ้นมาดู สร้างไฟล์ xml ขึ้นมาใหม่ ชื่อว่า activity_flatui.xml
<?xml version="1.0" encoding="utf-8"?>
<LinearLayout xmlns:android="http://schemas.android.com/apk/res/android"              xmlns:flatui="http://schemas.android.com/apk/res-auto"              android:orientation="vertical"              android:layout_width="match_parent"              android:layout_height="match_parent"              android:layout_margin="5dip"              android:paddingLeft="10dip"              android:paddingRight="10dip">
            <com.cengalabs.flatui.views.FlatEditText                android:id="@+id/edittext_flat"                android:layout_width="match_parent"                android:layout_height="wrap_content"                android:layout_margin="5dip"                android:maxLines="1"                android:gravity="center_vertical"                android:hint="Flat"                android:includeFontPadding="true"                flatui:fl_fieldStyle="flat"                flatui:fl_theme="@array/sea" />
            <com.cengalabs.flatui.views.FlatEditText                android:id="@+id/edittext_box"                android:layout_width="match_parent"                android:layout_height="wrap_content"                android:layout_margin="5dip"                android:maxLines="1"                android:gravity="center_vertical"                android:hint="Box"                android:includeFontPadding="true"                flatui:fl_fieldStyle="box"                flatui:fl_theme="@array/grass" />
            <com.cengalabs.flatui.views.FlatEditText                android:id="@+id/edittext_transparentbox"                android:layout_width="match_parent"                android:layout_height="wrap_content"                android:layout_margin="5dip"                android:maxLines="1"                android:gravity="center_vertical"                android:hint="Transparent box"                android:includeFontPadding="true"                flatui:fl_fieldStyle="transparent"                flatui:fl_theme="@array/grass" />
            <com.cengalabs.flatui.views.FlatEditText                android:id="@+id/edittext_transparent"                android:layout_width="match_parent"                android:layout_height="wrap_content"                android:layout_margin="5dip"                android:maxLines="1"                android:gravity="center_vertical"                android:hint="Transparent"                android:includeFontPadding="true"                flatui:fl_fieldStyle="transparent"                flatui:fl_theme="@array/grass"                flatui:fl_borderWidth="0dp" />
            <com.cengalabs.flatui.views.FlatToggleButton                android:id="@+id/toggle_button"                android:layout_width="96dp"                android:layout_height="48dp"                android:checked="true"                flatui:fl_space="18dp"                flatui:fl_cornerRadius="24dp" />
            <com.cengalabs.flatui.views.FlatSeekBar                android:id="@+id/seek_bar"                android:layout_width="match_parent"                android:layout_height="wrap_content"                android:layout_margin="5dip"                android:max="100" /></LinearLayout>
ส่วนคลาส Activity ก็มีดังนี้
package com.devahoy.learn30androidlibraries.day29;
import android.os.Bundle;import android.support.v7.app.ActionBar;import android.support.v7.app.ActionBarActivity;
import com.cengalabs.flatui.FlatUI;import com.cengalabs.flatui.views.FlatToggleButton;import com.devahoy.learn30androidlibraries.R;
public class FlatUIActivity extends ActionBarActivity {
    @Override    protected void onCreate(Bundle savedInstanceState) {        super.onCreate(savedInstanceState);
        FlatUI.initDefaultValues(this);        FlatUI.setDefaultTheme(FlatUI.SEA);
        ActionBar actionBar = getSupportActionBar();        actionBar.setBackgroundDrawable(FlatUI.getActionBarDrawable(this, FlatUI.GRASS, false));
        setContentView(R.layout.day29_activity_flatui);
    }}
โค๊ดด้านบน จะเห็นว่าต้องทำการ inidDefaultValues() และ setDefaultTheme ก่อนที่จะ setContentView()
สุดท้าย เราสามารถปรับแต่ง View ของเราเอง เป็นธีมนั้นๆในโปรแกรม นอกเหนือจาก xml ได้เช่นกัน เช่น
FlatToggleButton toggleButton = (FlatToggleButton) findViewById(R.id.toggle_button);toggleButton.getAttributes().setTheme(FlatUI.BLOSSOM, getResources());ทำการปรับแต่ง FlatToggleButton เป็นธีม BLOSSOM ผ่าน getAttributes().setTheme()
สรุป
Library ตัวนี้มันก็เป็นเพียงการปรับแต่งหน้าตา UI ของเรา ให้เป็นตามสไตล์ FlatUI สำหรับใครที่ชื่นชอบ FlatUI หรือโทนสีแนวนี้อยู่แล้ว ก็ลองโหลดไปลองเล่นกันดูครับ
Reference
- Authors
-

Chai Phonbopit
เป็น Web Dev ในบริษัทแห่งหนึ่ง ทำงานมา 10 ปีกว่าๆ ด้วยภาษาและเทคโนโลยี เช่น JavaScript, Node.js, React, Vue และปัจจุบันกำลังสนใจในเรื่องของ Blockchain และ Crypto กำลังหัดเรียนภาษา Rust


