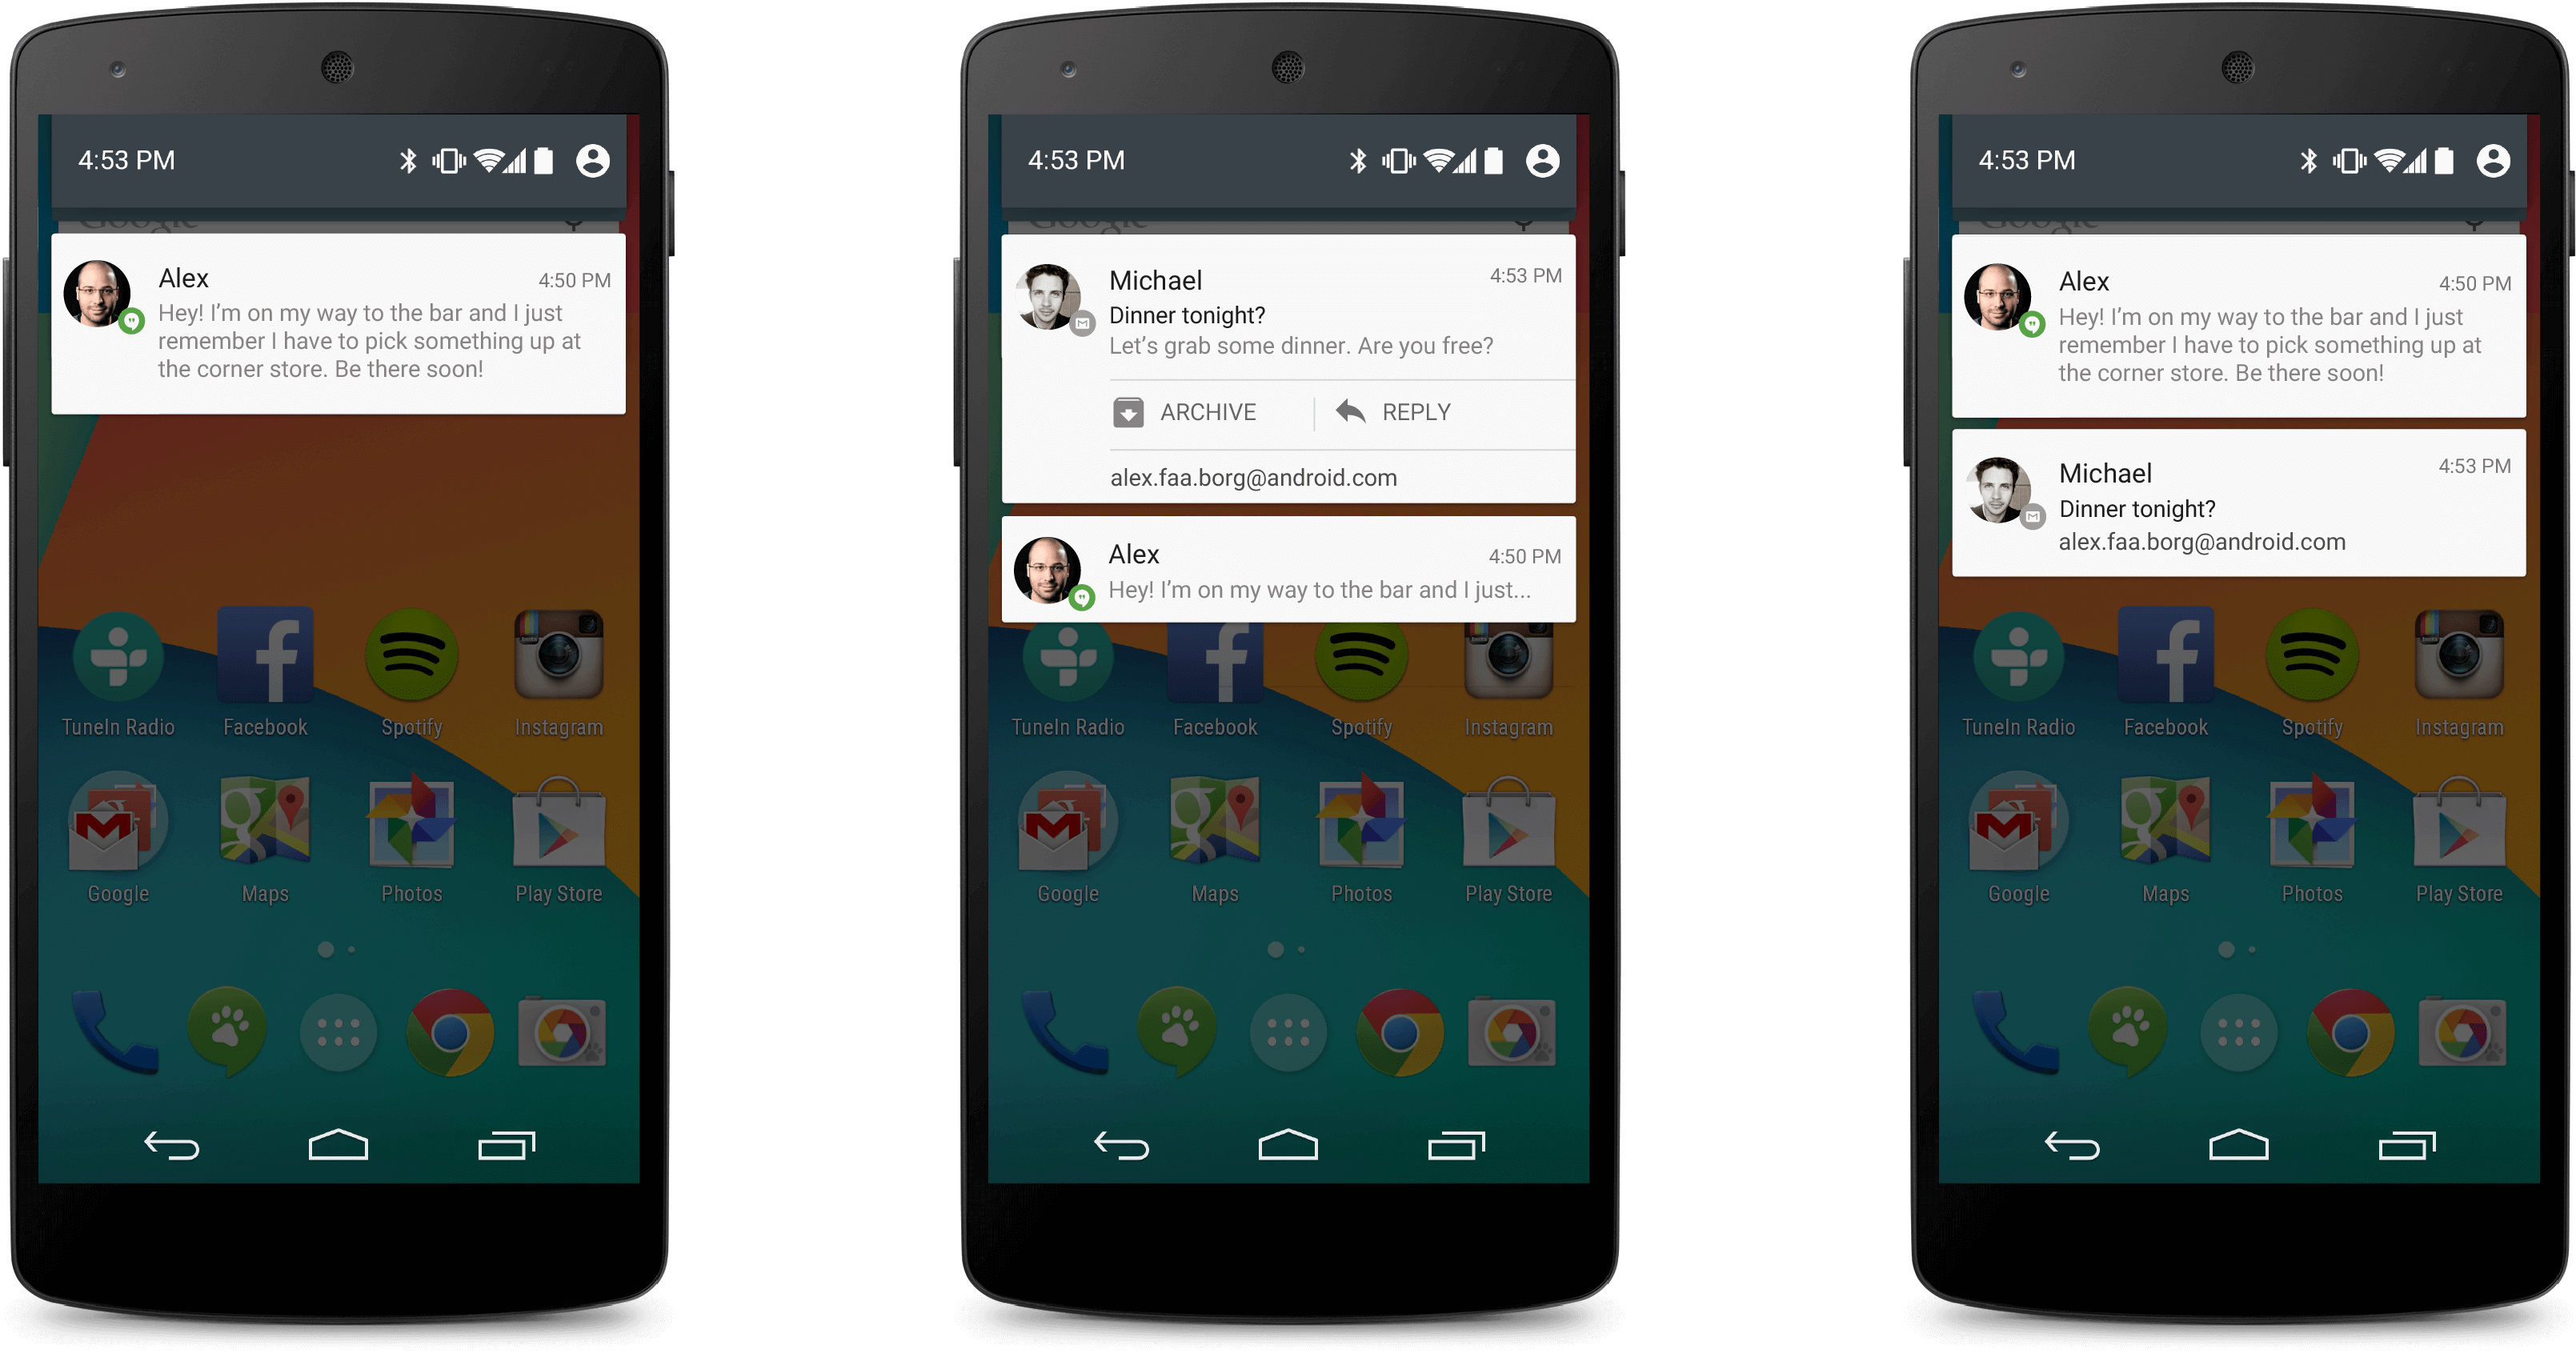
Dialog มันก็คือ Popup ที่เอาไว้แสดง Alert เตือนผู้ใช้ หรือว่า ให้กรอกข้อมูลอะไรก็ว่าไป เป็น Window ขนาดเล็กๆ จริงๆ ไม่ต้องอธิบายอะไรมาก คิดว่าทุกคนคงรู้จัก Dialog อยู่แล้ว ตัวอย่างก็ประมาณนี้
ภาพ จาก Android Developer
เห็นว่าบางที การสร้าง Dialog ต่างๆ ทั้งแบบธรรมดา แบบ AlertDialog แบบ CustomDialog บางทีผมก็มีการลืมๆเหมือนกัน บางทีก็ขี้เกียจเขียน ก็อปของเก่ามาเลยง่ายดี วันนี้ก็เลยนำมาเขียนเป็นบทความไปซะเลย
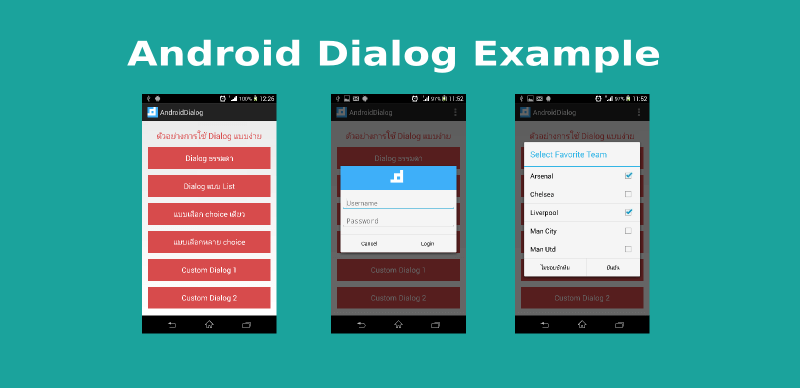
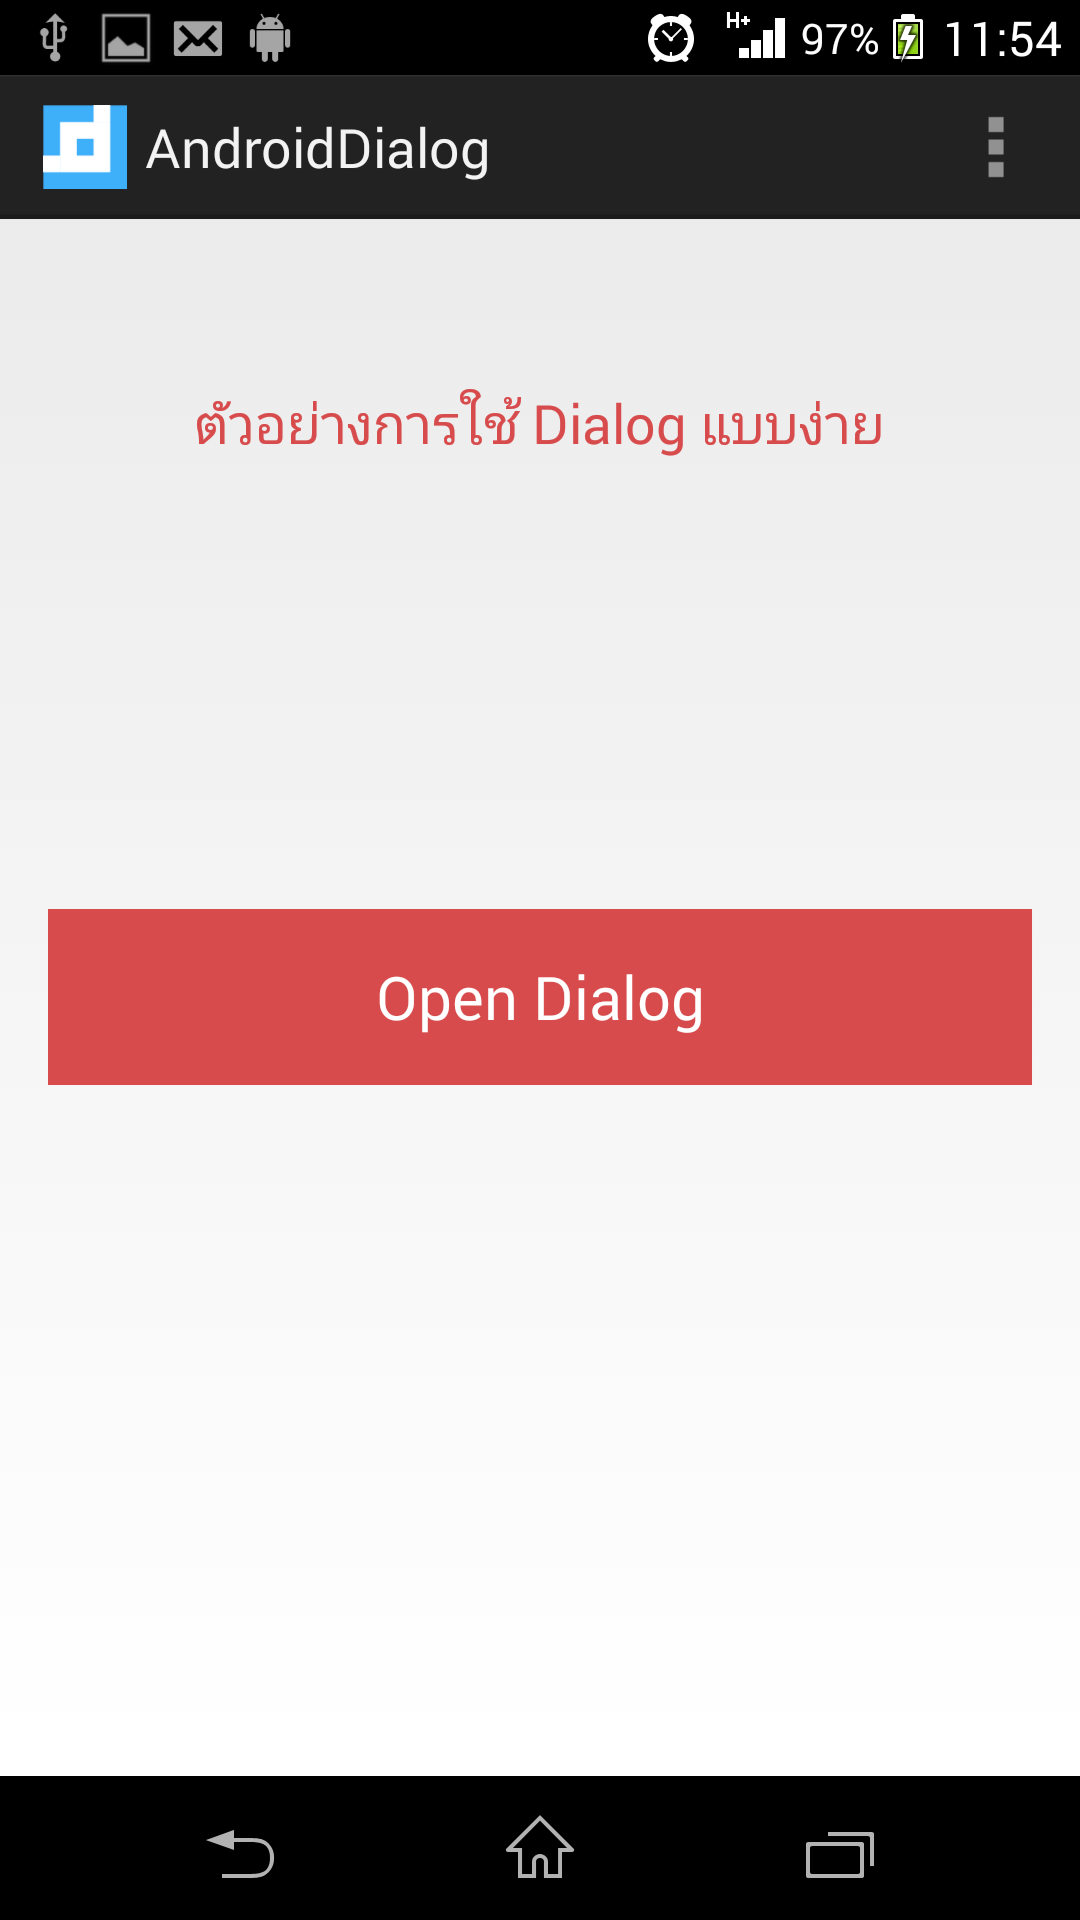
ตัวอย่าง Dialog
- Dialog ธรรมดา
- Dialog แบบ List
- Dialog แบบเลือก choice เดียว
- Dialog แบบเลือกหลาย choice
- Custom Dialog แบบที่ 1
- Custom Dialog แบบที่ 2
Dialog ธรรมดา
เริ่มต้นด้วย Dialog แบบธรรมดาก่อนครับ เป็น Dialog ที่แสดง Title แล้วก็มีปุ่ม 2 ปุ่มให้เราตัดสินใจ ว่าจะทำอะไร เช่น Dialog ที่บอกเราว่า ต้องการออกจากแอพนี้จริงๆงั้นหรอ? ก็จะมีตัวเลือก ให้กด ว่า ออก กับ อยู่ต่อ โดยส่วนประกอบหลักๆของ Dialog จะเป็นดังนี้
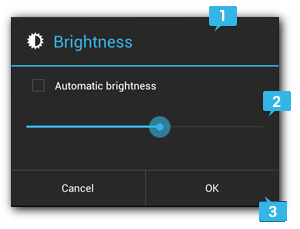
- 1 Title สำหรับแสดงข้อความ Title
- 2 Content ส่วนนี้จะไว้แสดงข้อความต่างๆ รวมถึง Custom Layout
- 3 Button ส่วนนี้จะแสดง Button ของ Dialog
โดยทั่วไป ส่วนประกอบหลักๆของ Dialog ที่กล่าวมา จะใช้พวกนี้แหละ ในการสร้าง Dialog ต่างๆ
เริ่มแรกเลย การสร้างโปรเจ็คใน Android จะไม่ขอพูดถึงละกัน ข้ามมาดูที่โค๊ดเลย โค๊ดผมจะใช้ สองส่วนคือ activity_main.xml และ MainActivity.java สำหรับหน้าจอ Layout ผมออกแบบดังนี้ เป็นแค่เบสิค ไม่มีอะไรมาก มีแค่ข้อความ แล้วก็ปุ่ม Button เมื่อกดปุ่มนี้ก็จะโชว์ Dialog
activity_main.xml
<RelativeLayout xmlns:android="http://schemas.android.com/apk/res/android"    xmlns:tools="http://schemas.android.com/tools"    android:layout_width="match_parent"    android:layout_height="match_parent"    android:paddingLeft="@dimen/activity_horizontal_margin"    android:paddingRight="@dimen/activity_horizontal_margin"    android:paddingTop="@dimen/activity_vertical_margin"    android:paddingBottom="@dimen/activity_vertical_margin">
    <TextView        android:text="ตัวอย่างการใช้ Dialog แบบง่าย"        android:layout_width="wrap_content"        android:layout_height="wrap_content"        android:id="@+id/text_title"        android:textSize="18sp"        android:textColor="#D74B4C"        android:layout_alignParentTop="true"        android:layout_centerHorizontal="true"        android:layout_marginTop="40dp"/>
    <Button        android:layout_width="match_parent"        android:layout_height="wrap_content"        android:id="@+id/button_open_dialog"        android:text="Open Dialog"        android:padding="20dp"        android:textSize="20sp"        android:textColor="#FFFFFF"        android:background="#D74B4C"        android:layout_centerVertical="true"        android:layout_alignParentRight="true"        android:layout_alignParentEnd="true" />
</RelativeLayout>
ส่วน MainActivity.java เริ่มแรก คลาสจะหน้าตาเป็นแบบนี้ (ส่วนอื่นๆ เมธอดอื่นๆ ผมไม่สนครับ สนแค่ onCreate() )
public class MainActivity extends ActionBarActivity {
    private Button mButtonDialog;
    @Override    protected void onCreate(Bundle savedInstanceState) {        super.onCreate(savedInstanceState);        setContentView(R.layout.activity_main);    }    ...}
ภายในเมธอด onCreate() ใช้ Button ที่ประกาศไว้ที่ xml ไฟล์ จากนั้นรับ Event Listener เมื่อคลิ๊ก ก็ให้ไปเปิด Dialog
mButtonDialog = (Button) findViewById(R.id.button_open_dialog);
mButtonDialog.setOnClickListener(new View.OnClickListener() {    @Override    public void onClick(View v) {
    }});
ทีนี้จะสร้าง Dialog ผมใช้คลาส AlertDialog.Builder ในการสร้าง Dialog โดยมีโครงสร้างดังนี้
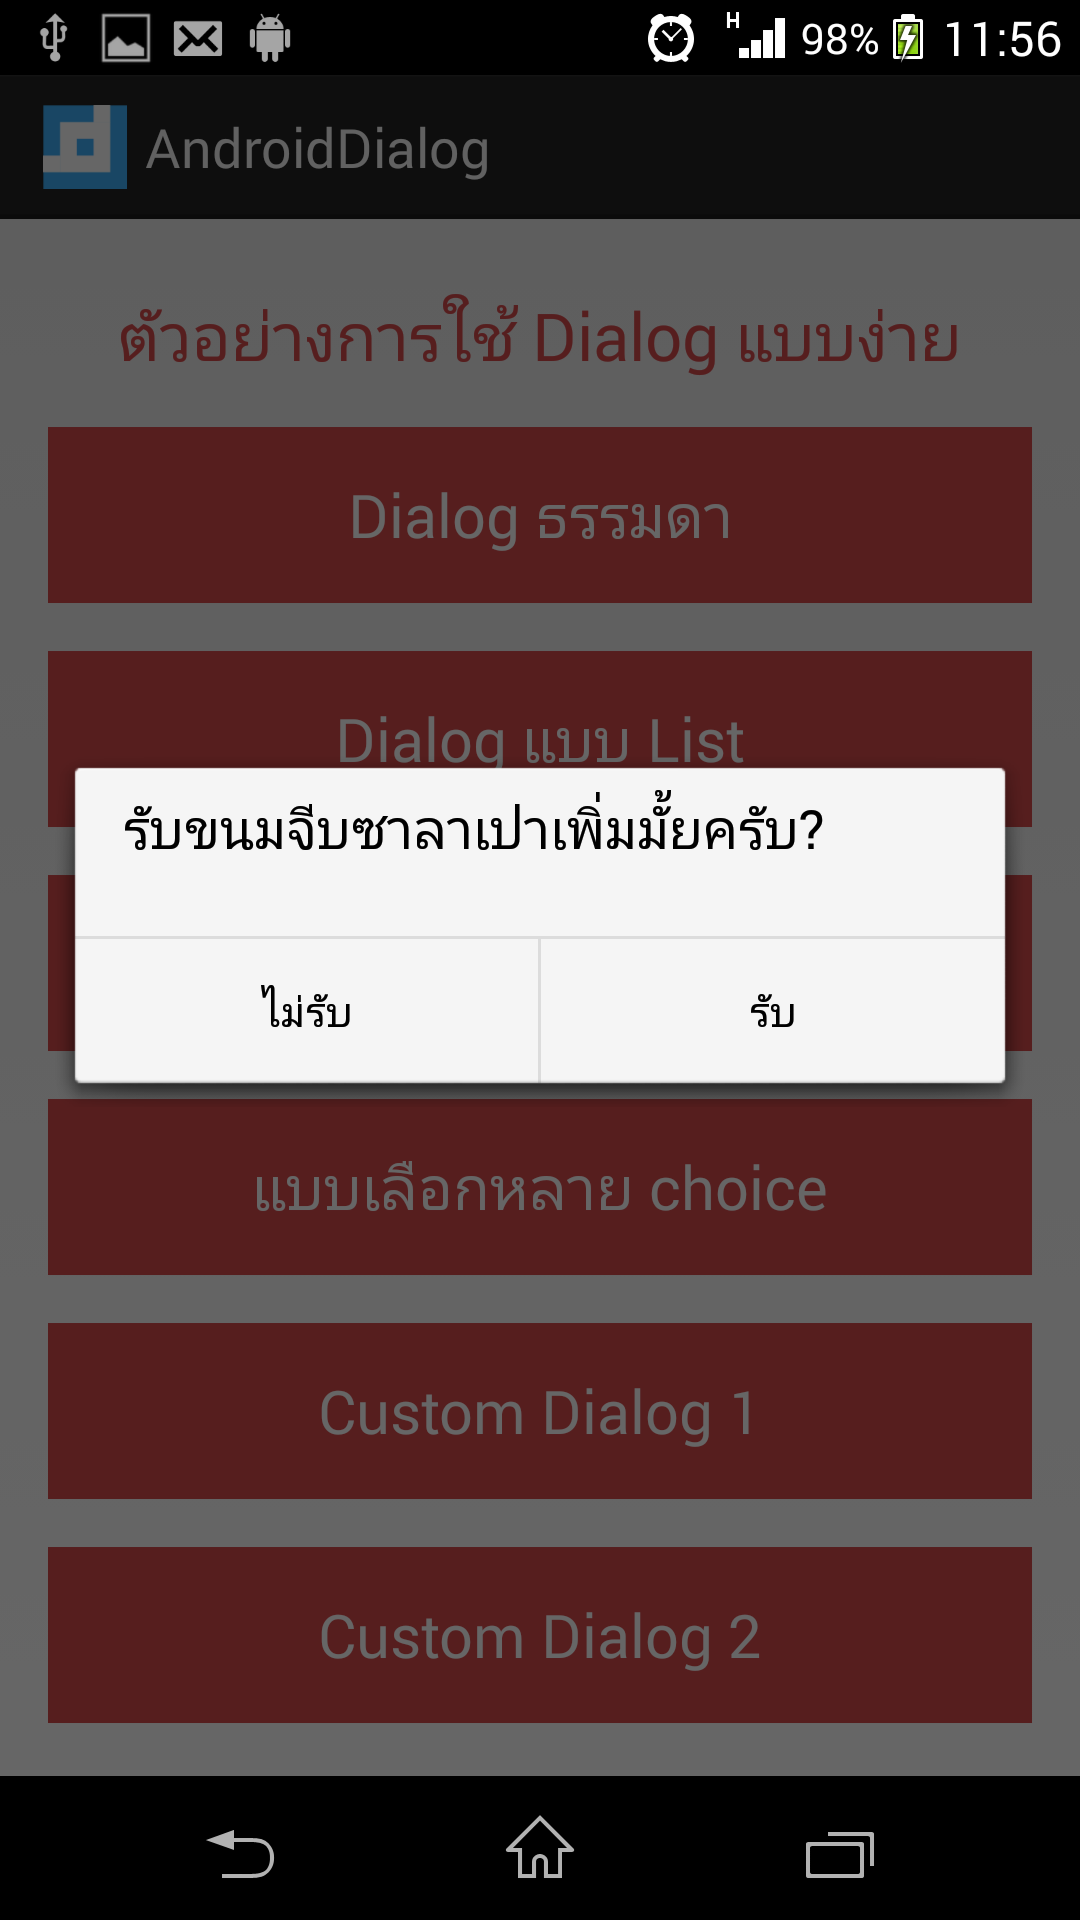
AlertDialog.Builder builder = new AlertDialog.Builder(MainActivity.this);builder.setMessage("รับขนมจีบซาลาเปาเพิ่มมั้ยครับ?");builder.setPositiveButton("รับ", new DialogInterface.OnClickListener() { public void onClick(DialogInterface dialog, int id) { Toast.makeText(getApplicationContext(), "ขอบคุณครับ", Toast.LENGTH_SHORT).show(); }});builder.setNegativeButton("ไม่รับ", new DialogInterface.OnClickListener() { @Override public void onClick(DialogInterface dialog, int which) { //dialog.dismiss(); }});builder.show();จากข้างบน AlertDialog.Builder รับ argument เป็น context #setMessage ไว้สำหรับตั้งชื่อข้อความที่ต้องการแสดง ส่วน setPositiveButton และ setNegativeButton ไว้สำหรับตั้งค่าปุ่ม โดย argument ตัวแรก คือ ข้อความ ส่วน argument ที่สองคือ callback OnClickListener สำหรับ handler ว่าเวลากดแล้วจะทำอะไร โดยโค๊ดผมคือ เมื่อกด “รับ” ก็จะโชว์ข้อความ Toast ส่วน Dialog ก็มีหน้าตาแบบนี้
Dialog แบบโชว์ List
Dialog แบบโชว์ List ก็คล้ายๆ กับแบบธรรมดา เพียงแค่มี List ข้อมูลแสดงมาด้วย ตัวอย่าง ผมสร้างข้อมูลเก็บเป็น String[] ไฟล์ layout และ MainActivity ใช้จากตัวอย่างก่อนหน้าครับ
เมื่อผู้ใช้กดปุ่ม Button จากทีแรกโชว์แค่ Dialog ธรรมดา ตอนนี้จะมี List มาแสดงด้วย ผมใช้โค๊ดนี้
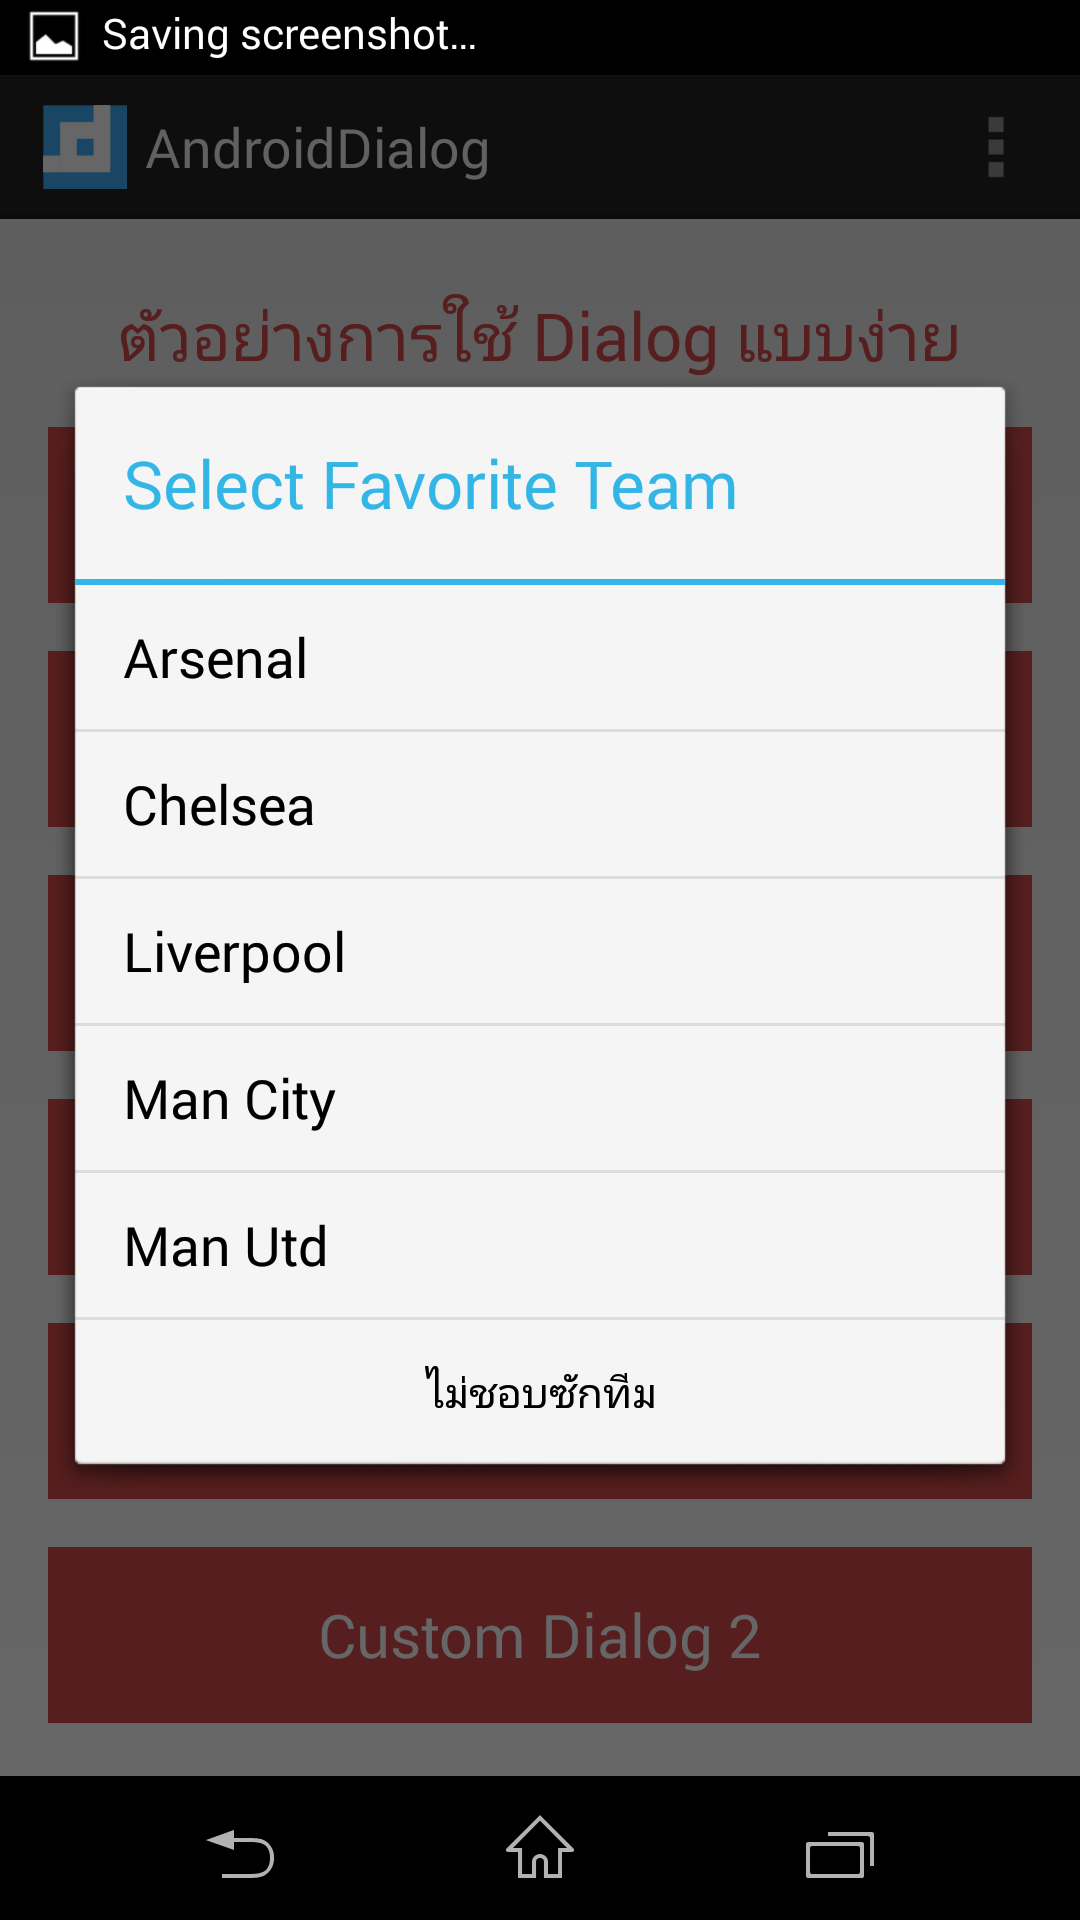
AlertDialog.Builder builder =        new AlertDialog.Builder(MainActivity.this);builder.setTitle("Select Favorite Team");builder.setItems(CLUBS, new DialogInterface.OnClickListener() {    @Override    public void onClick(DialogInterface dialog, int which) {        String selected = CLUBS[which];        Toast.makeText(getApplicationContext(), "คุณชอบ " +                selected, Toast.LENGTH_SHORT).show();    }});builder.setNegativeButton("ไม่ชอบซักทีม", null);builder.create();
// สุดท้ายอย่าลืม show() ด้วยbuilder.show();
สิ่งที่เปลี่ยนไปคือ ใช้ setTitle เพื่อแสดง Title ของ Dialog และใช้ setItems(List, Listener) เพื่อแสดง List แทนการแสดงข้อความ โดยรับ argument เป็น List และ Listener สำหรับ handler เมื่อผู้ใช้เลือกไอเท็มใน List ก็จะแสดง Toast ว่าเลือกไอเท็มอะไรไป หน้าตา Dialog ก็จะได้แบบนี้
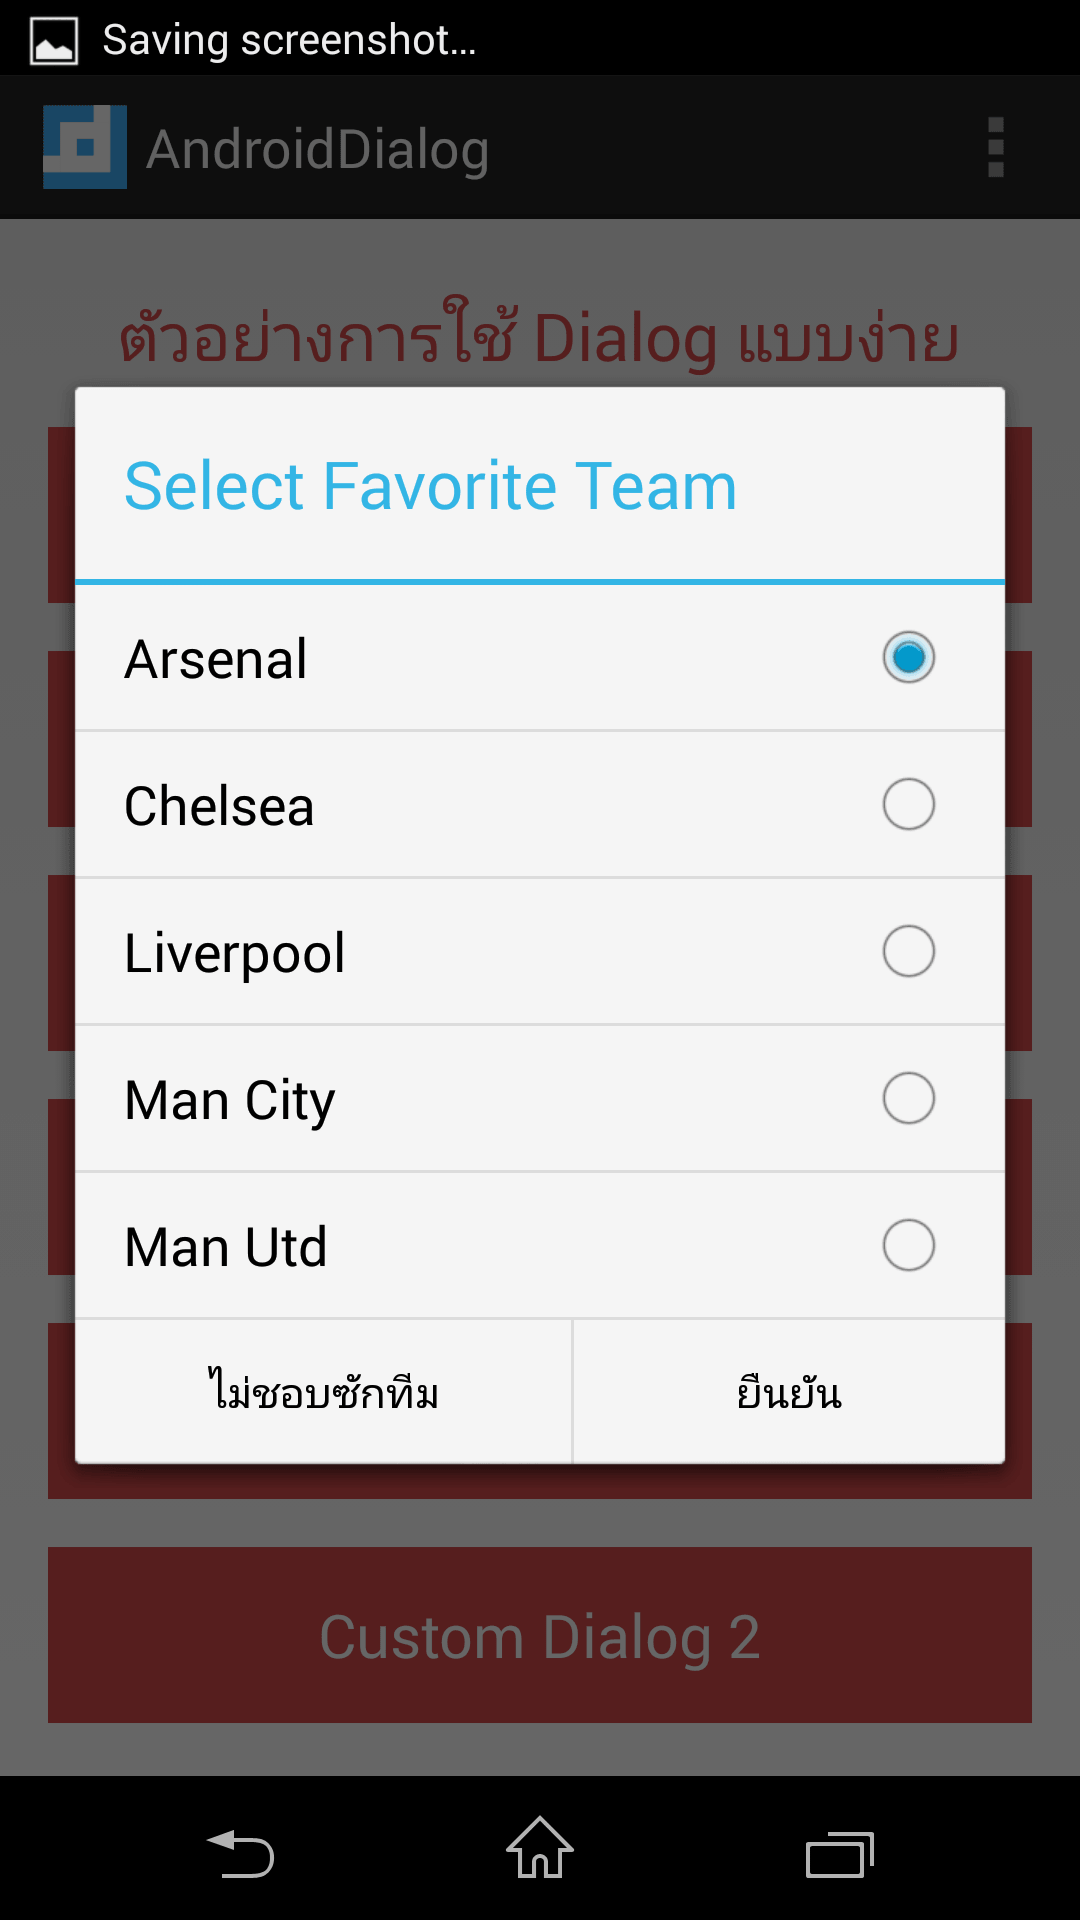
Dialog แบบเลือก choice เดียว
Dialog แบบนี้คล้ายๆกับแบบ List ต่างกันที่มี ปุ่ม RadioButton มาให้ด้วย ว่าเราเลือกไอเท็มไหน ปุ่มก็จะไปปรากฎอยู่ที่ไอเท็มนั้นๆ ตามโค๊ดนี้เลย
AlertDialog.Builder builder =        new AlertDialog.Builder(MainActivity.this);builder.setTitle("Select Favorite Team");builder.setSingleChoiceItems(CLUBS, 0, new DialogInterface.OnClickListener() {    @Override    public void onClick(DialogInterface dialog, int which) {        mSelected = CLUBS[which];    }});builder.setPositiveButton("ยืนยัน", new DialogInterface.OnClickListener() {    @Override    public void onClick(DialogInterface dialog, int which) {        // ส่วนนี้สำหรับเซฟค่าลง database หรือ SharedPreferences.        Toast.makeText(getApplicationContext(), "คุณชอบ " +                mSelected, Toast.LENGTH_SHORT).show();        dialog.dismiss();    }});
builder.setNegativeButton("ไม่ชอบซักทีม", null);builder.create();
// สุดท้ายอย่าลืม show() ด้วยbuilder.show();
จากด้านบน จะเห็นว่าผมได้ทำการลบ setItems และเปลี่ยนมาใช้ setSingleChoiceItems() ที่ใช้สำหรับแสดงตัวเลือกแบบ ตัวเลือกเดียวแทน โดย argument ที่มันรับคือ List, ตำแหน่งไอเท็มที่เลือก (ค่าเริ่มต้น) และ Listener ตามลำดับ และใช้ setPositiveButton เพิ่มเข้ามา เพื่อเอาไว้ยืนยัน ว่าเราทำการเลือกไอเท็มนี้แล้ว
โดยโค๊ดไม่มีอะไรซับซ้อนมาก Listener เมื่อมีการเลือกไอเท็ม ก็แค่หา ตำแหน่งไอเท็มนี้ มีค่าว่าอะไร จากนั้นเก็บลงตัวแปร String ชื่อ mSelected ซึ่งผมประกาศไว้เป็น member variable ส่วน Listener ของ ปุ่ม PossitiveButton ก็ให้แสดง Toast และปิด Dialog ด้วยคำสั่ง dialog.dismiss() หน้าตา Dialog ก็จะเป็นแบบนี้
Dialog แบบเลือกหลาย choice
Dialog แบบเลือกหลาย choice ชื่อก็ตรงตัวเลยครับ แสดงรายชื่อแบบ List และมี Choice ให้เลือกได้หลายๆตัวเลือก ดังโค๊ดนี้
mMultiSelected = new ArrayList<Integer>();
AlertDialog.Builder builder =        new AlertDialog.Builder(MainActivity.this);builder.setTitle("Select Favorite Team");builder.setMultiChoiceItems(CLUBS, null, new DialogInterface.OnMultiChoiceClickListener() {    @Override    public void onClick(DialogInterface dialog, int which, boolean isChecked) {        if (isChecked) {            mMultiSelected.add(which);        } else if (mMultiSelected.contains(which)) {            mMultiSelected.remove(Integer.valueOf(which));        }    }});
builder.setPositiveButton("ยืนยัน", new DialogInterface.OnClickListener() {    @Override    public void onClick(DialogInterface dialog, int which) {        // เซฟค่าลง database หรือ SharedPreferences.        StringBuffer buffer = new StringBuffer();        for (Integer team : mMultiSelected) {            buffer.append(" ");            buffer.append(CLUBS[team]);        }        Toast.makeText(getApplicationContext(), "คุณชอบ" +                buffer.toString(), Toast.LENGTH_SHORT).show();        dialog.dismiss();    }});
builder.setNegativeButton("ไม่ชอบซักทีม", null);builder.create();
// สุดท้ายอย่าลืม show() ด้วยbuilder.show();
จากโค๊ดด้านบน ได้เปลี่ยนจาก setSingleChoice เป็น setMultiChoiceItems โดยรับ argument 3 ตัวคือ ข้อมูล List, ค่าเริ่มต้นของไอเท็ม เช็คหรือไม่เช็ค และ Listener เป็น OnMultiChoiceClickListener ตามลำดับ
ส่วน onClick ของ OnMultiChoiceClickListener จะมีเงื่อนไข ว่า ถ้า isCheck แสดงว่า มีการเลือกไอเท็มนี้ ก็จะทำการเพิ่มไปยัง ArrayList ที่สร้างไว้ชื่อ mMultiSelected จากนั้นที่ setPositiveButton เมื่อทำการ onClick ก็ให้แสดง ไอเท็มที่เลือกทั้งหมด หน้าตาก็ประมาณนี้

Custom Dialog
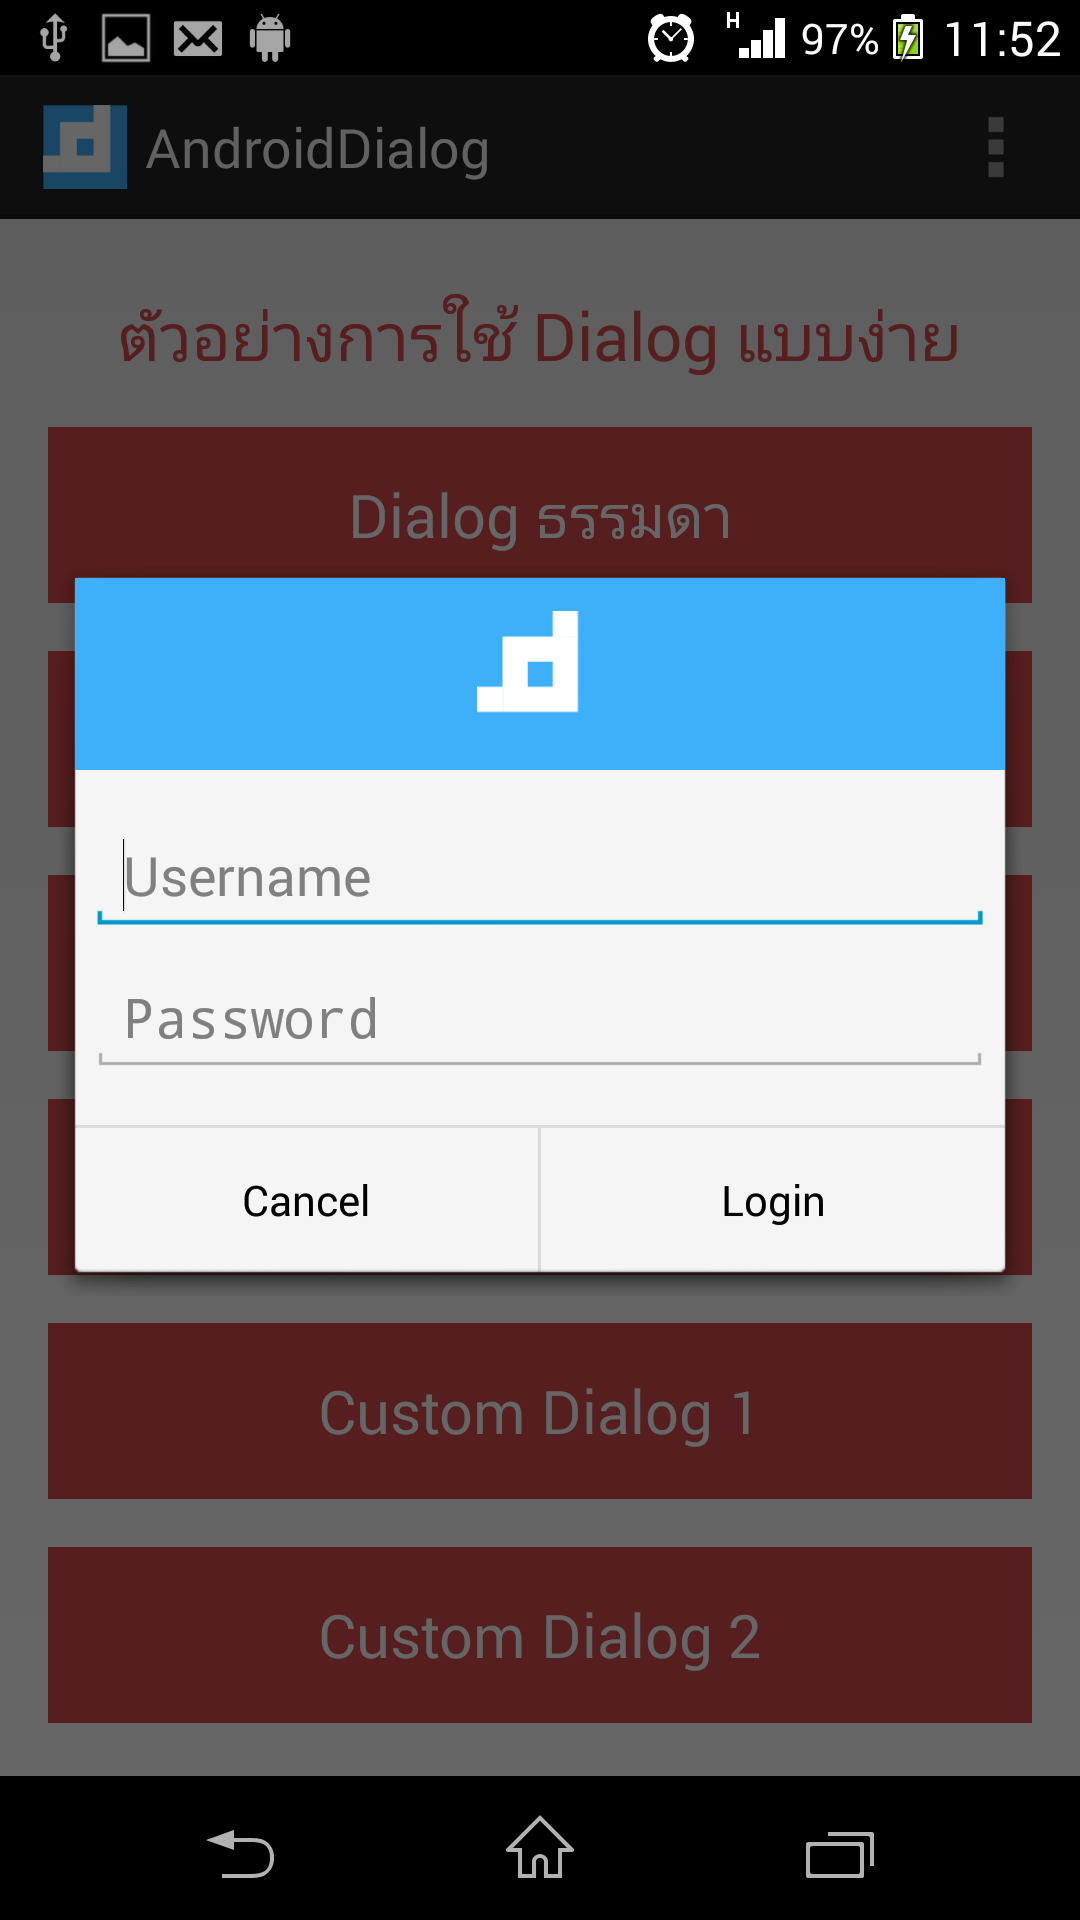
มาถึง Dialog อันสุดท้าย คือ Custom Dialog เป็น Dialog ที่เราสามารถจะปรับแต่งได้เอง สามารถสร้าง Layout ได้เอง หลักการของมันคือ ให้ layout xml ที่เราได้ทำขึ้นมา คล้ายๆ เวลาเราเรียก setContentView(layout) ใน Activity ทั่วไป เราอยาก ให้ Dialog มี Layout แบบไหน ก็สร้างมา แล้ว setView ให้กับ Dialog ก็จะได้ Dialog หน้าตานั้นๆ จะให้ Dialog มีรูป มีปุ่ม Button มี TextView, EditText ก็ได้ทั้งนั้น
มาดูวิธีการสร้างกันเลยดีกว่า เริ่มแรก ให้ทำการสร้าง Layout ที่จะใช้ ผมตั้งชือ่ว่า dialog_custom.xml
<LinearLayout xmlns:android="http://schemas.android.com/apk/res/android" android:orientation="vertical" android:layout_width="match_parent" android:layout_height="match_parent"> <ImageView android:src="@drawable/ic_launcher" android:layout_width="match_parent" android:layout_height="64dp" android:scaleType="center" android:background="#ff3eaff9" android:contentDescription="@string/app_name" /> <EditText android:id="@+id/username" android:inputType="textEmailAddress" android:layout_width="match_parent" android:layout_height="wrap_content" android:layout_marginTop="16dp" android:layout_marginLeft="4dp" android:layout_marginRight="4dp" android:layout_marginBottom="4dp" android:hint="Username" /> <EditText android:id="@+id/password" android:inputType="textPassword" android:layout_width="match_parent" android:layout_height="wrap_content" android:layout_marginTop="4dp" android:layout_marginLeft="4dp" android:layout_marginRight="4dp" android:layout_marginBottom="16dp" android:hint="Password"/></LinearLayout>ส่วนตัว AlertDialog.Builder ก็จะได้หน้าตาแบบนี้
AlertDialog.Builder builder =        new AlertDialog.Builder(MainActivity.this);LayoutInflater inflater = getLayoutInflater();
View view = inflater.inflate(R.layout.dialog_custom, null);builder.setView(view);
final EditText username = (EditText) view.findViewById(R.id.username);final EditText password = (EditText) view.findViewById(R.id.password);
builder.setPositiveButton("Login", new DialogInterface.OnClickListener() {    @Override    public void onClick(DialogInterface dialog, int which) {        // Check username password        if (username.getText().equals("demo@example.com") &&                password.getText().equals("demo")) {            Toast.makeText(getApplicationContext(), "Login success!",                    Toast.LENGTH_SHORT).show();        } else {            Toast.makeText(getApplicationContext(), "Login Failed!",                    Toast.LENGTH_SHORT).show();        }    }});builder.setNegativeButton("Cancel", new DialogInterface.OnClickListener() {    @Override    public void onClick(DialogInterface dialog, int which) {
    }});
builder.show();
สิ่งที่เปลี่ยนไปจาก Dialog อื่นๆคือ เราจะใช้เมธอด setView(View) สำหรับตั้งค่า Layout ต้องการ โดย View เราก็ทำการลิงค์มาจาก dialog_custom.xml ที่ได้สร้างไว้ ต่อมาก็ทำการเชื่อม EditText , username กับ password ที่สร้างไว้ โดยใช้ view.findViewById(int id) เพื่อที่จะสั่งให้หา id ใน dialog_custom.xml ถ้ามีแค่ findViewById มันจะไปหาใน activity_main.xml ซึ่งจะ null pointer exception แน่นอน
ส่วนที่เหลือก็ไม่มีอะไรมาก ตรง onClick ใครจะเอาไปทำอะไรต่อก็ตามสะดวก เช่นเช็ค username password ถูกต้องไหม ถ้าถูกก็เข้าสู่ระบบ ถ้าไม่ถูกก็พิมใหม่ เป็นต้น แต่ตรงส่วนนี้ ผมจะให้โชว์แค่ ข้อความธรรมดา ว่า ล็อคอินได้หรือไม่ได้ เท่านั้น สุดท้าย ก็ได้หน้าตาแบบนี้
Custom Dialog แบบที่ 2
Custom Dialog แบบนี้ การแสดงผล ก็ไม่แตกต่างจากแบบแรก คือนำ Layout ของเราเองมาแสดง แต่ที่แตกต่างกันคือ แบบนี้จะใช้ Dialog แทนที่จะเป็น AlertDialog.Builder โดย Layout ผมได้ทำการเพิ่มปุ่ม Button สำหรับ ล็อคอิน และ ยกเลิก ไปด้วย เนื่องจาก Dialog ธรรมดา จะไม่มี setPositiveButton กับ setNegativeButton มาให้ ฉะนั้นผมสร้างอีกไฟล์ชื่อ dialog_custom2.xml จะได้ดังนี้
<LinearLayout xmlns:android="http://schemas.android.com/apk/res/android"              android:orientation="vertical"              android:layout_width="match_parent"              android:layout_height="match_parent">    <EditText        android:id="@+id/username"        android:inputType="textEmailAddress"        android:layout_width="match_parent"        android:layout_height="wrap_content"        android:layout_marginTop="16dp"        android:layout_marginLeft="4dp"        android:layout_marginRight="4dp"        android:layout_marginBottom="4dp"        android:hint="Username" />    <EditText        android:id="@+id/password"        android:inputType="textPassword"        android:layout_width="match_parent"        android:layout_height="wrap_content"        android:layout_marginTop="4dp"        android:layout_marginLeft="4dp"        android:layout_marginRight="4dp"        android:layout_marginBottom="16dp"        android:hint="Password"/>
    <LinearLayout        android:layout_width="match_parent"        android:layout_height="wrap_content"        android:orientation="horizontal"        android:weightSum="1">
        <Button            android:id="@+id/button_cancel"            android:layout_weight="0.5"            android:layout_width="0dp"            android:layout_height="wrap_content"            android:padding="16dp"            android:text="Cancel"/>
        <Button            android:id="@+id/button_login"            android:layout_weight="0.5"            android:layout_width="0dp"            android:layout_height="wrap_content"            android:padding="16dp"            android:text="Login"/>        </LinearLayout></LinearLayout>
ส่วนโค๊ด Dialog ก็จะได้ดังนี้
final Dialog dialog = new Dialog(MainActivity.this);dialog.setTitle("Devahoy");dialog.setContentView(R.layout.dialog_custom);
final EditText username = (EditText) dialog.findViewById(R.id.username);final EditText password = (EditText) dialog.findViewById(R.id.password);Button buttonCancel = (Button) dialog.findViewById(R.id.button_cancel);Button buttonLogin = (Button) dialog.findViewById(R.id.button_login);
buttonCancel.setOnClickListener(new View.OnClickListener() {    @Override    public void onClick(View v) {        dialog.dismiss();    }});
buttonLogin.setOnClickListener(new View.OnClickListener() {    @Override    public void onClick(View v) {        // Check username password        if (username.getText().equals("demo@example.com") &&                password.getText().equals("demo")) {            Toast.makeText(getApplicationContext(), "Login success!",                    Toast.LENGTH_SHORT).show();            dialog.dismiss();        } else {            Toast.makeText(getApplicationContext(), "Login Failed!",                    Toast.LENGTH_SHORT).show();        }    }});

dialog.show();
จะเห็นว่าการสร้าง Dialog คล้ายๆกันเลย คือ new Dialog(MainActivity.this) รับเป็น context เหมือนกัน แล้วก็ใช้ setTitle สำหรับตั้งชื่อ , setContentView สำหรับตั้งค่า Layout ที่เราสร้างไว้ สุดท้ายก็เชื่อม EditText และ Button ต่างๆ ด้วย dialog.findViewById() จากนั้นก็ใช้ Listener ของ Button ทำการเช็ค username password ก็ได้หน้าตาประมาณนี้
Demo
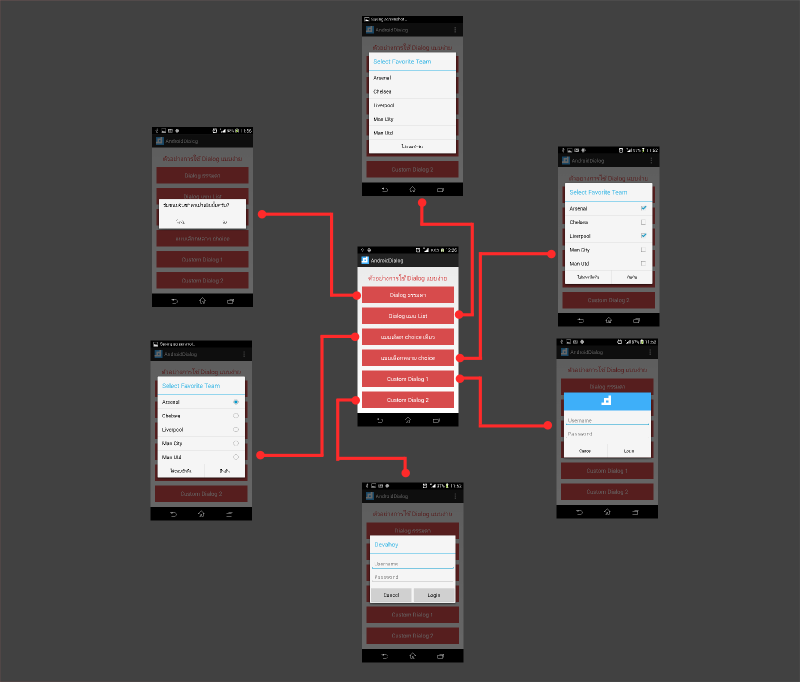
สุดท้าย ผมสร้างเลเอาท์ รวบรวมตัวอย่าง Dialog ทั้งหมด โดยเมื่อคลิกก็จะแสดงตัวอย่าง Dialog นั้นๆ แบบนี้
ส่วนโค๊ดก็ตามข้างล่าง
activity_main.xml
<RelativeLayout xmlns:android="http://schemas.android.com/apk/res/android"                xmlns:tools="http://schemas.android.com/tools"                android:layout_width="match_parent"                android:layout_height="match_parent"                android:paddingLeft="@dimen/activity_horizontal_margin"                android:paddingRight="@dimen/activity_horizontal_margin"                android:paddingTop="@dimen/activity_vertical_margin"                android:paddingBottom="@dimen/activity_vertical_margin" >
    <TextView        android:text="ตัวอย่างการใช้ Dialog แบบง่าย"        android:layout_width="wrap_content"        android:layout_height="wrap_content"        android:id="@+id/text_title"        android:textSize="22sp"        android:textColor="#D74B4C"        android:layout_alignParentTop="true"        android:layout_centerHorizontal="true"        android:layout_marginTop="8dp"/>
    <Button        android:layout_width="match_parent"        android:layout_height="wrap_content"        android:id="@+id/button_dialog_simple"        android:text="Dialog ธรรมดา"        android:padding="16dp"        android:textSize="20sp"        android:textColor="#FFFFFF"        android:background="#D74B4C"        android:layout_marginTop="16dp"        android:layout_below="@+id/text_title"        android:layout_alignParentLeft="true"        android:layout_alignParentStart="true"/>
    <Button        android:layout_width="match_parent"        android:layout_height="wrap_content"        android:id="@+id/button_dialog_list"        android:text="Dialog แบบ List"        android:layout_marginTop="16dp"        android:padding="16dp"        android:textSize="20sp"        android:textColor="#FFFFFF"        android:background="#D74B4C"        android:layout_below="@+id/button_dialog_simple" />
    <Button        android:layout_width="match_parent"        android:layout_height="wrap_content"        android:id="@+id/button_dialog_single_choice"        android:text="แบบเลือก choice เดียว"        android:layout_marginTop="16dp"        android:padding="16dp"        android:textSize="20sp"        android:textColor="#FFFFFF"        android:background="#D74B4C"        android:layout_below="@+id/button_dialog_list" />
    <Button        android:layout_width="match_parent"        android:layout_height="wrap_content"        android:id="@+id/button_dialog_multi_choice"        android:text="แบบเลือกหลาย choice"        android:layout_marginTop="16dp"        android:padding="16dp"        android:textSize="20sp"        android:textColor="#FFFFFF"        android:background="#D74B4C"        android:layout_below="@+id/button_dialog_single_choice"/>
    <Button        android:layout_width="match_parent"        android:layout_height="wrap_content"        android:id="@+id/button_dialog_custom"        android:text="Custom Dialog 1"        android:layout_marginTop="16dp"        android:padding="16dp"        android:textSize="20sp"        android:textColor="#FFFFFF"        android:background="#D74B4C"        android:layout_below="@+id/button_dialog_multi_choice" />
    <Button        android:layout_width="match_parent"        android:layout_height="wrap_content"        android:id="@+id/button_dialog_custom2"        android:text="Custom Dialog 2"        android:layout_marginTop="16dp"        android:padding="16dp"        android:textSize="20sp"        android:textColor="#FFFFFF"        android:background="#D74B4C"        android:layout_below="@+id/button_dialog_custom" />
</RelativeLayout>
dialog_custom.xml
<LinearLayout xmlns:android="http://schemas.android.com/apk/res/android"              android:orientation="vertical"              android:layout_width="match_parent"              android:layout_height="match_parent">    <ImageView        android:src="@drawable/ic_launcher"        android:layout_width="match_parent"        android:layout_height="64dp"        android:scaleType="center"        android:background="#ff3eaff9"        android:contentDescription="@string/app_name" />    <EditText        android:id="@+id/username"        android:inputType="textEmailAddress"        android:layout_width="match_parent"        android:layout_height="wrap_content"        android:layout_marginTop="16dp"        android:layout_marginLeft="4dp"        android:layout_marginRight="4dp"        android:layout_marginBottom="4dp"        android:hint="Username" />    <EditText        android:id="@+id/password"        android:inputType="textPassword"        android:layout_width="match_parent"        android:layout_height="wrap_content"        android:layout_marginTop="4dp"        android:layout_marginLeft="4dp"        android:layout_marginRight="4dp"        android:layout_marginBottom="16dp"        android:hint="Password"/>
</LinearLayout>
dialog_custom2.xml
<LinearLayout xmlns:android="http://schemas.android.com/apk/res/android"              android:orientation="vertical"              android:layout_width="match_parent"              android:layout_height="match_parent">    <EditText        android:id="@+id/username"        android:inputType="textEmailAddress"        android:layout_width="match_parent"        android:layout_height="wrap_content"        android:layout_marginTop="16dp"        android:layout_marginLeft="4dp"        android:layout_marginRight="4dp"        android:layout_marginBottom="4dp"        android:hint="Username" />    <EditText        android:id="@+id/password"        android:inputType="textPassword"        android:layout_width="match_parent"        android:layout_height="wrap_content"        android:layout_marginTop="4dp"        android:layout_marginLeft="4dp"        android:layout_marginRight="4dp"        android:layout_marginBottom="16dp"        android:hint="Password"/>
    <LinearLayout        android:layout_width="match_parent"        android:layout_height="wrap_content"        android:orientation="horizontal"        android:weightSum="1">
        <Button            android:id="@+id/button_cancel"            android:layout_weight="0.5"            android:layout_width="0dp"            android:layout_height="wrap_content"            android:padding="16dp"            android:text="Cancel"/>
        <Button            android:id="@+id/button_login"            android:layout_weight="0.5"            android:layout_width="0dp"            android:layout_height="wrap_content"            android:padding="16dp"            android:text="Login"/>    </LinearLayout></LinearLayout>
MainActivity.java
package com.phonbopit.androiddialog.demo;
import android.app.AlertDialog;import android.app.Dialog;import android.content.DialogInterface;import android.os.Bundle;import android.support.v7.app.ActionBarActivity;import android.view.LayoutInflater;import android.view.Menu;import android.view.MenuItem;import android.view.View;import android.widget.Button;import android.widget.EditText;import android.widget.Toast;
import java.util.ArrayList;
public class MainActivity extends ActionBarActivity {
    private static final String[] CLUBS =            {"Arsenal", "Chelsea", "Liverpool", "Man City", "Man Utd"};
    String mSelected;    ArrayList<Integer> mMultiSelected;
    Button mDialogSimple;    Button mDialogList;    Button mDialogSingleChoice;    Button mDialogMultipleChoice;    Button mDialogCustom;    Button mDialogCustom2;
    @Override    protected void onCreate(Bundle savedInstanceState) {        super.onCreate(savedInstanceState);        setContentView(R.layout.activity_main);
        mDialogSimple = (Button) findViewById(R.id.button_dialog_simple);        mDialogList = (Button) findViewById(R.id.button_dialog_list);        mDialogSingleChoice = (Button) findViewById(R.id.button_dialog_single_choice);        mDialogMultipleChoice = (Button) findViewById(R.id.button_dialog_multi_choice);        mDialogCustom = (Button) findViewById(R.id.button_dialog_custom);        mDialogCustom2 = (Button) findViewById(R.id.button_dialog_custom2);

        mDialogSimple.setOnClickListener(new View.OnClickListener() {            @Override            public void onClick(View v) {                AlertDialog.Builder builder =                        new AlertDialog.Builder(MainActivity.this);                builder.setMessage("รับขนมจีบซาลาเปาเพิ่มมั้ยครับ?");                builder.setPositiveButton("รับ", new DialogInterface.OnClickListener() {                    public void onClick(DialogInterface dialog, int id) {                        Toast.makeText(getApplicationContext(),                                "ขอบคุณครับ", Toast.LENGTH_SHORT).show();                    }                });                builder.setNegativeButton("ไม่รับ", null);                builder.create();
                // สุดท้ายอย่าลืม show() ด้วย                builder.show();            }        });
        mDialogList.setOnClickListener(new View.OnClickListener() {            @Override            public void onClick(View v) {                AlertDialog.Builder builder =                        new AlertDialog.Builder(MainActivity.this);                builder.setTitle("Select Favorite Team");                builder.setItems(CLUBS, new DialogInterface.OnClickListener() {                    @Override                    public void onClick(DialogInterface dialog, int which) {                        String selected = CLUBS[which];                        Toast.makeText(getApplicationContext(), "คุณชอบ " +                                selected, Toast.LENGTH_SHORT).show();                    }                });                builder.setNegativeButton("ไม่ชอบซักทีม", null);                builder.create();
                // สุดท้ายอย่าลืม show() ด้วย                builder.show();            }        });
        mDialogSingleChoice.setOnClickListener(new View.OnClickListener() {            @Override            public void onClick(View v) {                AlertDialog.Builder builder =                        new AlertDialog.Builder(MainActivity.this);                builder.setTitle("Select Favorite Team");                builder.setSingleChoiceItems(CLUBS, 0, new DialogInterface.OnClickListener() {                    @Override                    public void onClick(DialogInterface dialog, int which) {                        mSelected = CLUBS[which];                    }                });                builder.setPositiveButton("ยืนยัน", new DialogInterface.OnClickListener() {                    @Override                    public void onClick(DialogInterface dialog, int which) {                        // เซฟค่าลง database หรือ SharedPreferences.                        Toast.makeText(getApplicationContext(), "คุณชอบ " +                                mSelected, Toast.LENGTH_SHORT).show();                        dialog.dismiss();                    }                });
                builder.setNegativeButton("ไม่ชอบซักทีม", null);                builder.create();
                // สุดท้ายอย่าลืม show() ด้วย                builder.show();            }        });
        mDialogMultipleChoice.setOnClickListener(new View.OnClickListener() {            @Override            public void onClick(View v) {                mMultiSelected = new ArrayList<Integer>();
                AlertDialog.Builder builder =                        new AlertDialog.Builder(MainActivity.this);                builder.setTitle("Select Favorite Team");                builder.setMultiChoiceItems(CLUBS, null, new DialogInterface.OnMultiChoiceClickListener() {                    @Override                    public void onClick(DialogInterface dialog, int which, boolean isChecked) {                        if (isChecked) {                            mMultiSelected.add(which);                        } else if (mMultiSelected.contains(which)) {                            mMultiSelected.remove(Integer.valueOf(which));                        }                    }                });
                builder.setPositiveButton("ยืนยัน", new DialogInterface.OnClickListener() {                    @Override                    public void onClick(DialogInterface dialog, int which) {                        // เซฟค่าลง database หรือ SharedPreferences.                        StringBuffer buffer = new StringBuffer();                        for (Integer team : mMultiSelected) {                            buffer.append(" ");                            buffer.append(CLUBS[team]);                        }                        Toast.makeText(getApplicationContext(), "คุณชอบ" +                                buffer.toString(), Toast.LENGTH_SHORT).show();                        dialog.dismiss();                    }                });
                builder.setNegativeButton("ไม่ชอบซักทีม", null);                builder.create();
                // สุดท้ายอย่าลืม show() ด้วย                builder.show();            }        });
        mDialogCustom.setOnClickListener(new View.OnClickListener() {            @Override            public void onClick(View v) {                AlertDialog.Builder builder =                        new AlertDialog.Builder(MainActivity.this);                LayoutInflater inflater = getLayoutInflater();
                View view = inflater.inflate(R.layout.dialog_custom, null);                builder.setView(view);
                final EditText username = (EditText) view.findViewById(R.id.username);                final EditText password = (EditText) view.findViewById(R.id.password);
                builder.setPositiveButton("Login", new DialogInterface.OnClickListener() {                    @Override                    public void onClick(DialogInterface dialog, int which) {                        // Check username password                        if (username.getText().equals("demo@example.com") &&                                password.getText().equals("demo")) {                            Toast.makeText(getApplicationContext(), "Login success!",                                    Toast.LENGTH_SHORT).show();                        } else {                            Toast.makeText(getApplicationContext(), "Login Failed!",                                    Toast.LENGTH_SHORT).show();                        }                    }                });                builder.setNegativeButton("Cancel", new DialogInterface.OnClickListener() {                    @Override                    public void onClick(DialogInterface dialog, int which) {
                    }                });
                builder.create();
                builder.show();            }        });
        mDialogCustom2.setOnClickListener(new View.OnClickListener() {            @Override            public void onClick(View v) {                final Dialog dialog = new Dialog(MainActivity.this);                dialog.setTitle("Devahoy");                dialog.setContentView(R.layout.dialog_custom2);
                final EditText username = (EditText) dialog.findViewById(R.id.username);                final EditText password = (EditText) dialog.findViewById(R.id.password);                Button buttonCancel = (Button) dialog.findViewById(R.id.button_cancel);                Button buttonLogin = (Button) dialog.findViewById(R.id.button_login);
                buttonCancel.setOnClickListener(new View.OnClickListener() {                    @Override                    public void onClick(View v) {                        dialog.dismiss();                    }                });
                buttonLogin.setOnClickListener(new View.OnClickListener() {                    @Override                    public void onClick(View v) {                        // Check username password                        if (username.getText().equals("demo@example.com") &&                                password.getText().equals("demo")) {                            Toast.makeText(getApplicationContext(), "Login success!",                                    Toast.LENGTH_SHORT).show();                            dialog.dismiss();                        } else {                            Toast.makeText(getApplicationContext(), "Login Failed!",                                    Toast.LENGTH_SHORT).show();                        }                    }                });
                dialog.show();            }        });    }}
นำเอาไปประยุกต์ใช้กันดูครับ สำหรับบทความนี้ก็จบเพียงเท่านี้ หวังว่าจะมีประโยชน์กับหลายๆคนนะครับ หากชื่นชอบบทความนี้ อย่าลืมช่วยกันแชร์ให้เพื่อนๆด้วยครับ ขอบคุณครับ
Reference:
- Authors
-

Chai Phonbopit
Senior Software Engineer ประสบการณ์กว่า 12 ปี ด้าน Frontend: React, Next.js, Tailwind CSS และ Backend: Node.js, Express, NestJS ปัจจุบันสนใจ Astro, Cloudflare Workers และ AI Coding Tool