- จดบันทึกคอร์ส CS50x - Harvard
- CS50x : Week 0 - Scratch
- CS50x : Week 1 - C
- CS50x : Week 2 - Arrays
CS50x : Week 2 - Arrays
เขียนวันที่ : Apr 13, 2022
สวัสดีครับ ของ Week 2 เรื่องของ Arrays ผมอาจจะไม่ได้ฟังและดู Video ทั้งหมดนะครับ มีข้ามๆไปบ้าง ส่วนใหญ่คือดู Slide และก็อ่าน Note เอาครับ ซึ่งก็แปล และสรุปจาก Note เป็นหลักครับ
References
Compling
- make is actually just a program that calls clang, a compiler named for the “C language”.
makeเรียกclangที่เป็น Compiler เพื่อ compile ไฟล์ภาษาซี- เราสามารถ compile source code ด้วยการใช้
clang
clang hello.c
ls- list directory contents เพื่อดูไฟล์ในโฟลเดอร์นั้น จะเห็นไฟล์a.outคือไฟล์ default output ที่ clang compileclang -o hello hello.c- สามารเพิ่ม commend line argument (option) เพื่อกำหนด output ไฟล์ได้- ถ้าลองใช้โค๊ดจาก Week 1 ด้านล่าง
#include <cs50.h>
#include <stdio.h>

int main(void)
{
    string name = get_string("What's your name? ");
    printf("hello, %s\n", name);
}
แล้วลอง compile ด้วย clang
$ clang hello.c
/usr/bin/ld: /tmp/hello-733e0f.o: in function `main':
hello.c:(.text+0x19): undefined reference to `get_string'
clang: error: linker command failed with exit code 1 (use -v to see invocation)
clangหาget_stringไม่เจอ เราต้องบอกให้ compiler รู้ด้วย ว่าเรา link กับcs50โดยใช้คำสั่ง
clang -o hello hello.c -lcs50
- ถ้าใช้
makeมันจะ auto generate ให้เลย - ขั้นตอนการ compile code เป็น machine code จะมี steps แบบนี้
preprocessing -> compling -> assembling -> linking
- preprocessing คือทำงานในบรรทัดที่เริ่มต้น
#เช่น#includeโดย preprocessing จะบอกclangว่าให้ไปหา header file ที่เราต้องการ include มาในโปรแกรม (คล้ายๆ prototype) ส่ิงที่ clang ทำ ก็คือ copy และมาแปะไว้ - ตัวอย่าง เช่น
#include <cs50.h>
#include <stdio.h>

int main(void)
{
    string name = get_string("What's your name? ");
    printf("hello, %s\n", name);
}
สิ่งที่ preprocessing ทำ คือ ก็อปโค๊ดมาวาง เป็นแบบนี้
...
string get_string(string prompt);
...
int printf(string format, ...);
...

int main(void)
{
    string name = get_string("Name: ");
    printf("hello, %s\n", name);
}
string get_string(string prompt);มาจากcs50.hint printf(string format, ...);มาจากstdio.h- compling คือขั้นตอน เอา source code แปลงเป็นภาษา Assembly ที่หน้าตาเป็นแบบนี้ (ไม่ต้องเข้าใจนะครับ ถ้าเข้าใจน่าจะแปลกแล้ว 🤣)
...
main:                         # @main
    .cfi_startproc
# BB#0:
    pushq    %rbp
.Ltmp0:
    .cfi_def_cfa_offset 16
.Ltmp1:
    .cfi_offset %rbp, -16
    movq    %rsp, %rbp
.Ltmp2:
    .cfi_def_cfa_register %rbp
    subq    $16, %rsp
    xorl    %eax, %eax
    movl    %eax, %edi
    movabsq    $.L.str, %rsi
    movb    $0, %al
    callq    get_string
    movabsq    $.L.str.1, %rdi
    movq    %rax, -8(%rbp)
    movq    -8(%rbp), %rsi
    movb    $0, %al
    callq    printf
- assembling คือขั้นตอนแปลง Assembly เป็น binanry
- linking คือขั้นตอนสุดท้าย linking เหมือนการรวมๆ machine code ทั้ง header ทั้งโค๊ดเรา เข้าด้วยกัน เป็น binary file เช่น
a.out
แนะนำเนื้อหา C++ Programming Tutorial สำหรับอ่านเพิ่มเติมครับ
Debugging
- Bugs คือข้อผิดพลาดของโปรแกรม (ทุกคนน่าจะคุ้นหูคำว่า เจอบัค ติดบัค โปรแกรมมีบัค) ซึ่ง debugging ก็คือขั้นตอนในการหาบัคและแก้บัค
- มันมีที่มาจาก เมื่อก่อน มันคือบัคจริงๆ (bug) คือเจอตัวแมลงอยู่ในโปรแกรม Link
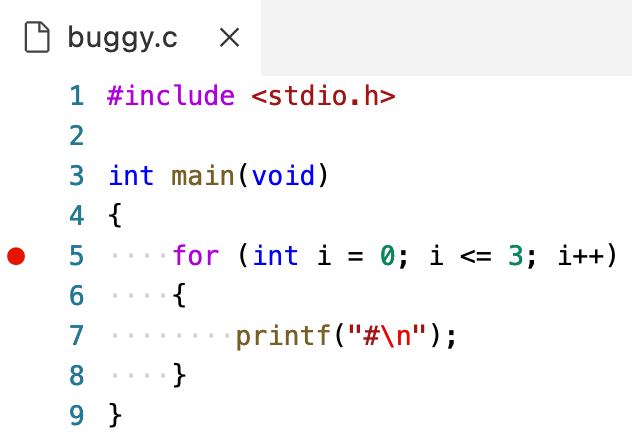
#include <stdio.h>

int main(void)
{
    for (int i = 0; i <= 3; i++)
    {
        printf("#\n");
    }
}
- อย่างตัวอย่าง อยากแสดง
#3 แต่มันดันแสดง 4 อันนี้คือข้อผิดพลาดโปรแกรม เราก็ต้องทำการ debugging หาว่าผิดตรงไหน - ปกติ เราสามารถ debugging เพื่อดูการทำงานของโปรแกรมได้ เพราะปกติโปรแกรมทำงาน บน ลงล่าง อยู่แล้ว
- ตัว
debug50เป็น command ที่ใช้กับ cs50 (น่าจะต้องใช้ผ่านเว็บ) ซึ่งถ้าเราใช้บนเครื่องเรา จะไม่มีคำสั่งนี้ - ใน VS Code สามารถกดที่ line แต่ละบรรทัด เพื่อให้โปรแกรมมันหยุด ทำงานที่บรรทัดนั้นๆได้ จะมีวงกลมแดงๆ อยู่ (breakpoint)

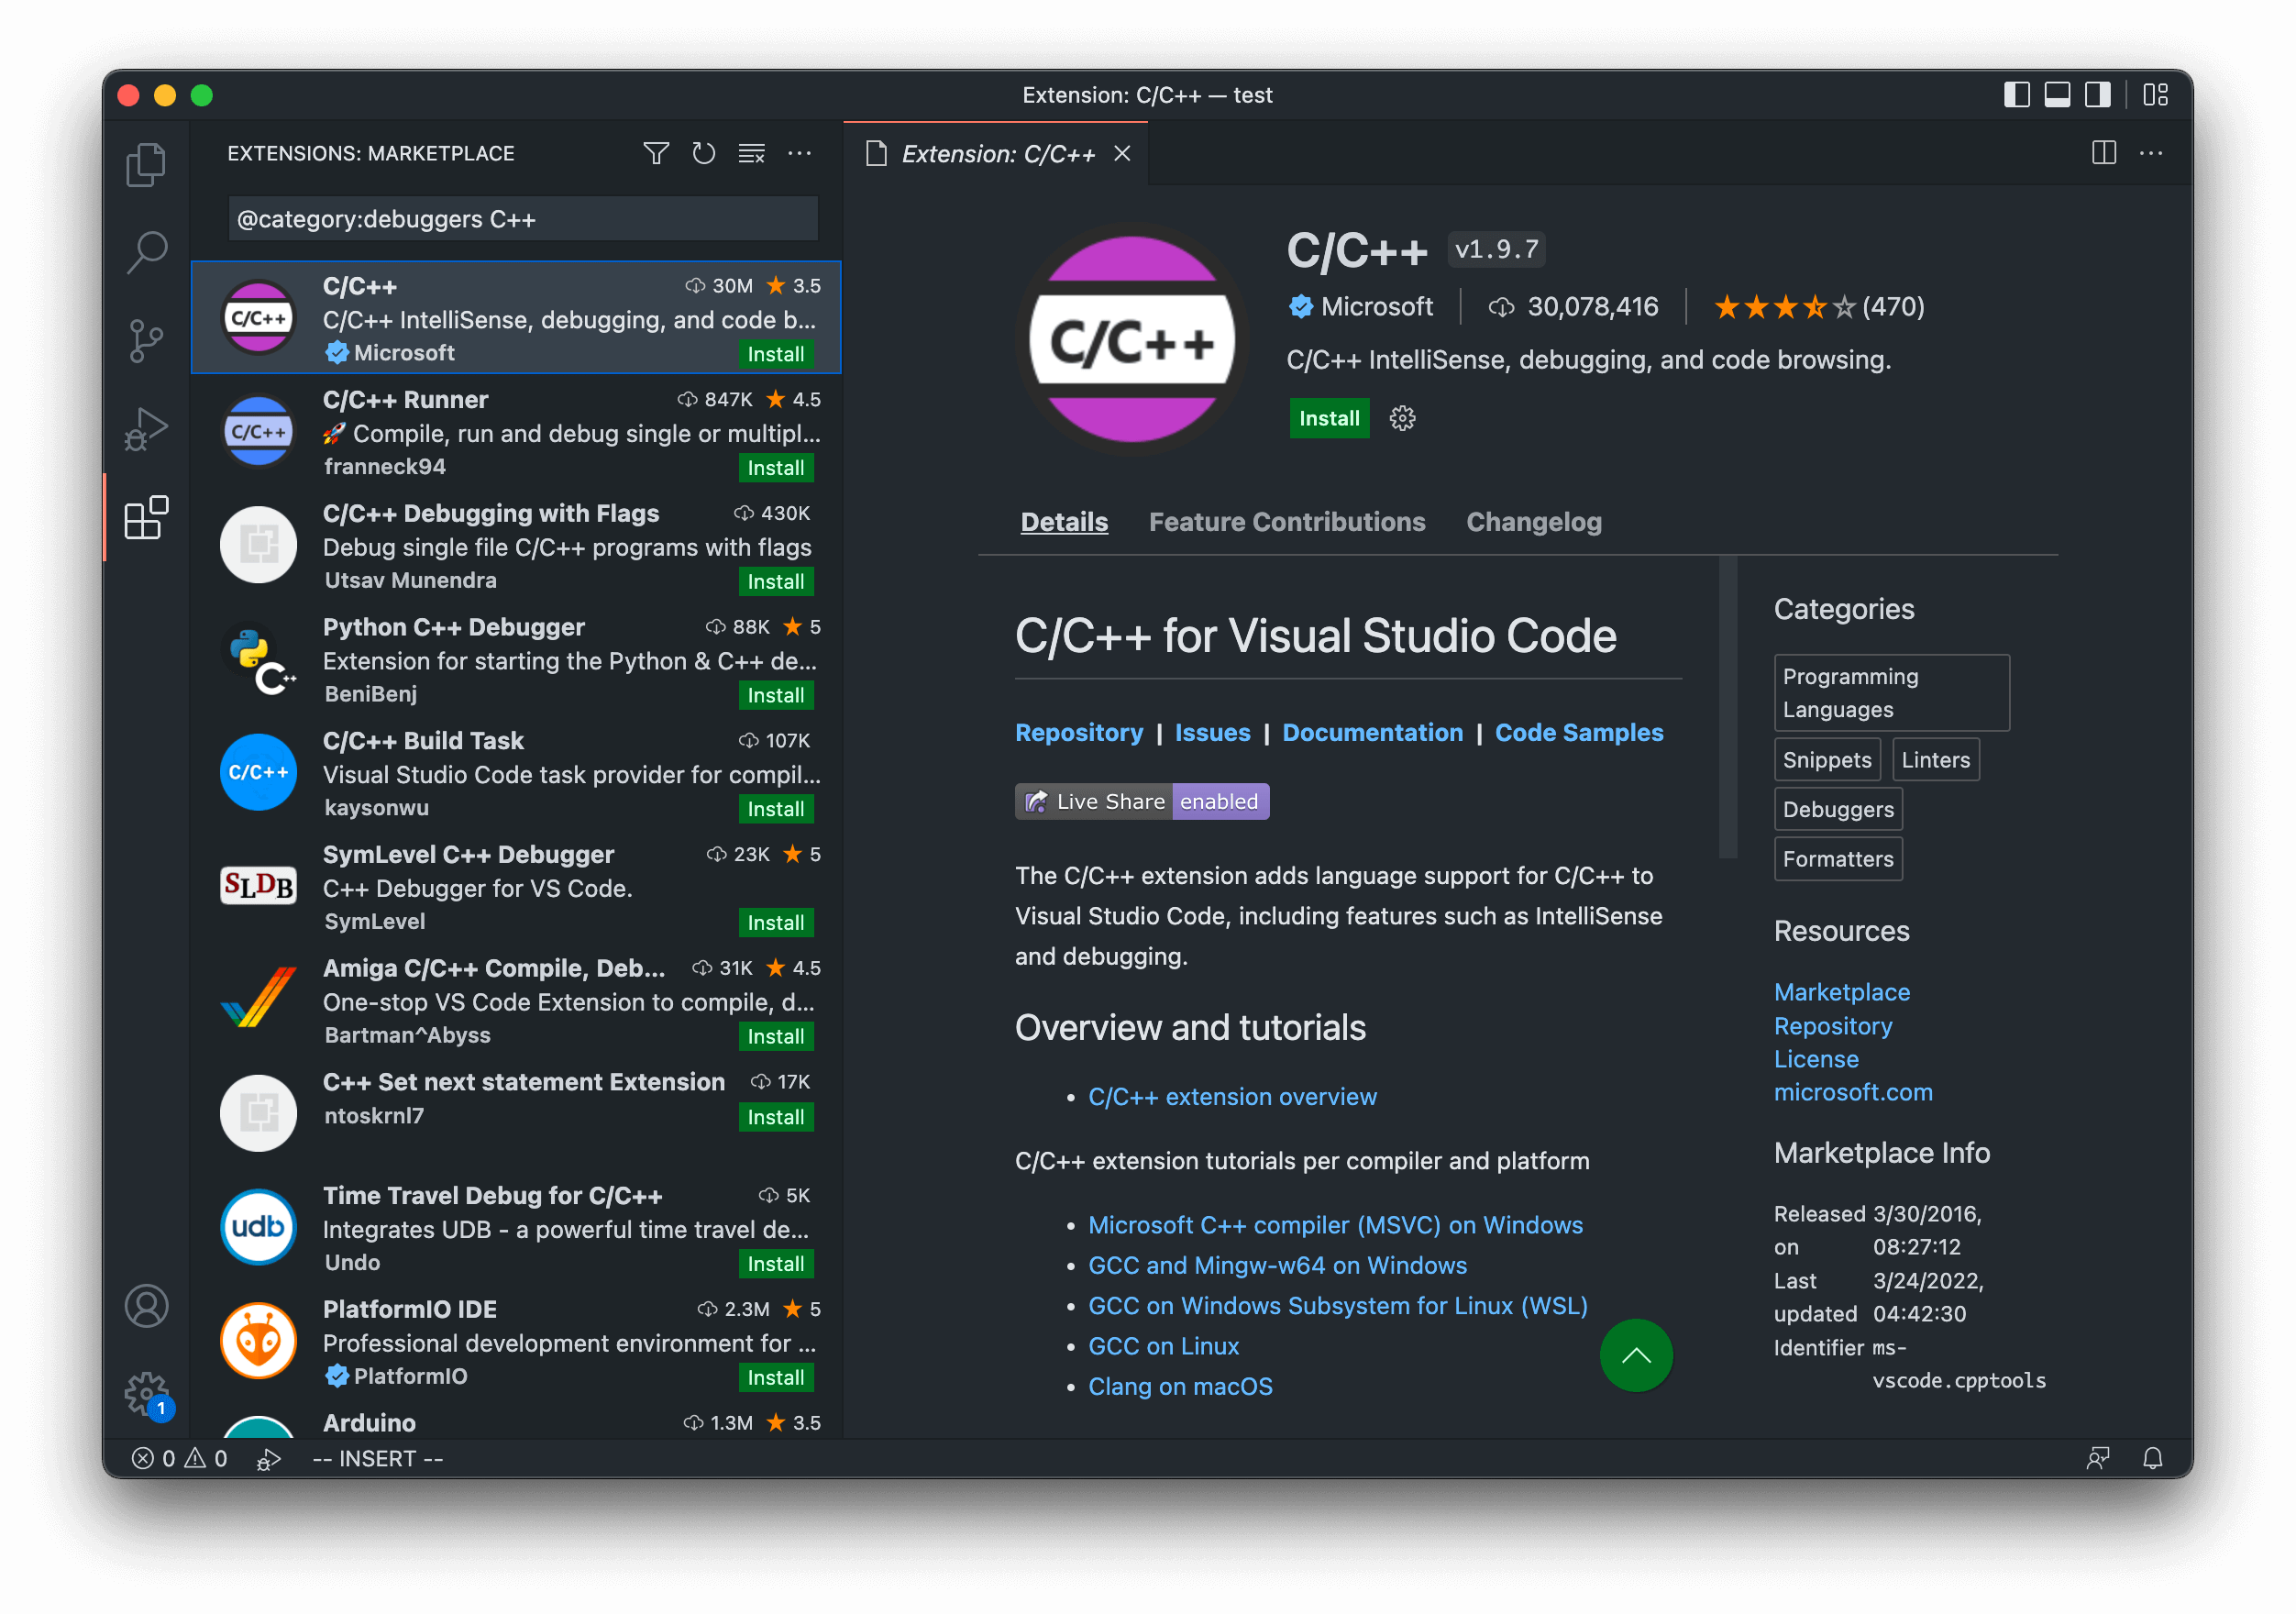
- ใน VS Code เราสามารถกด Run -> Start Debugging ได้ครับ

หน้าเว็บอ่านรายละเอียดเพิ่มเติม https://code.visualstudio.com/docs/languages/cpp
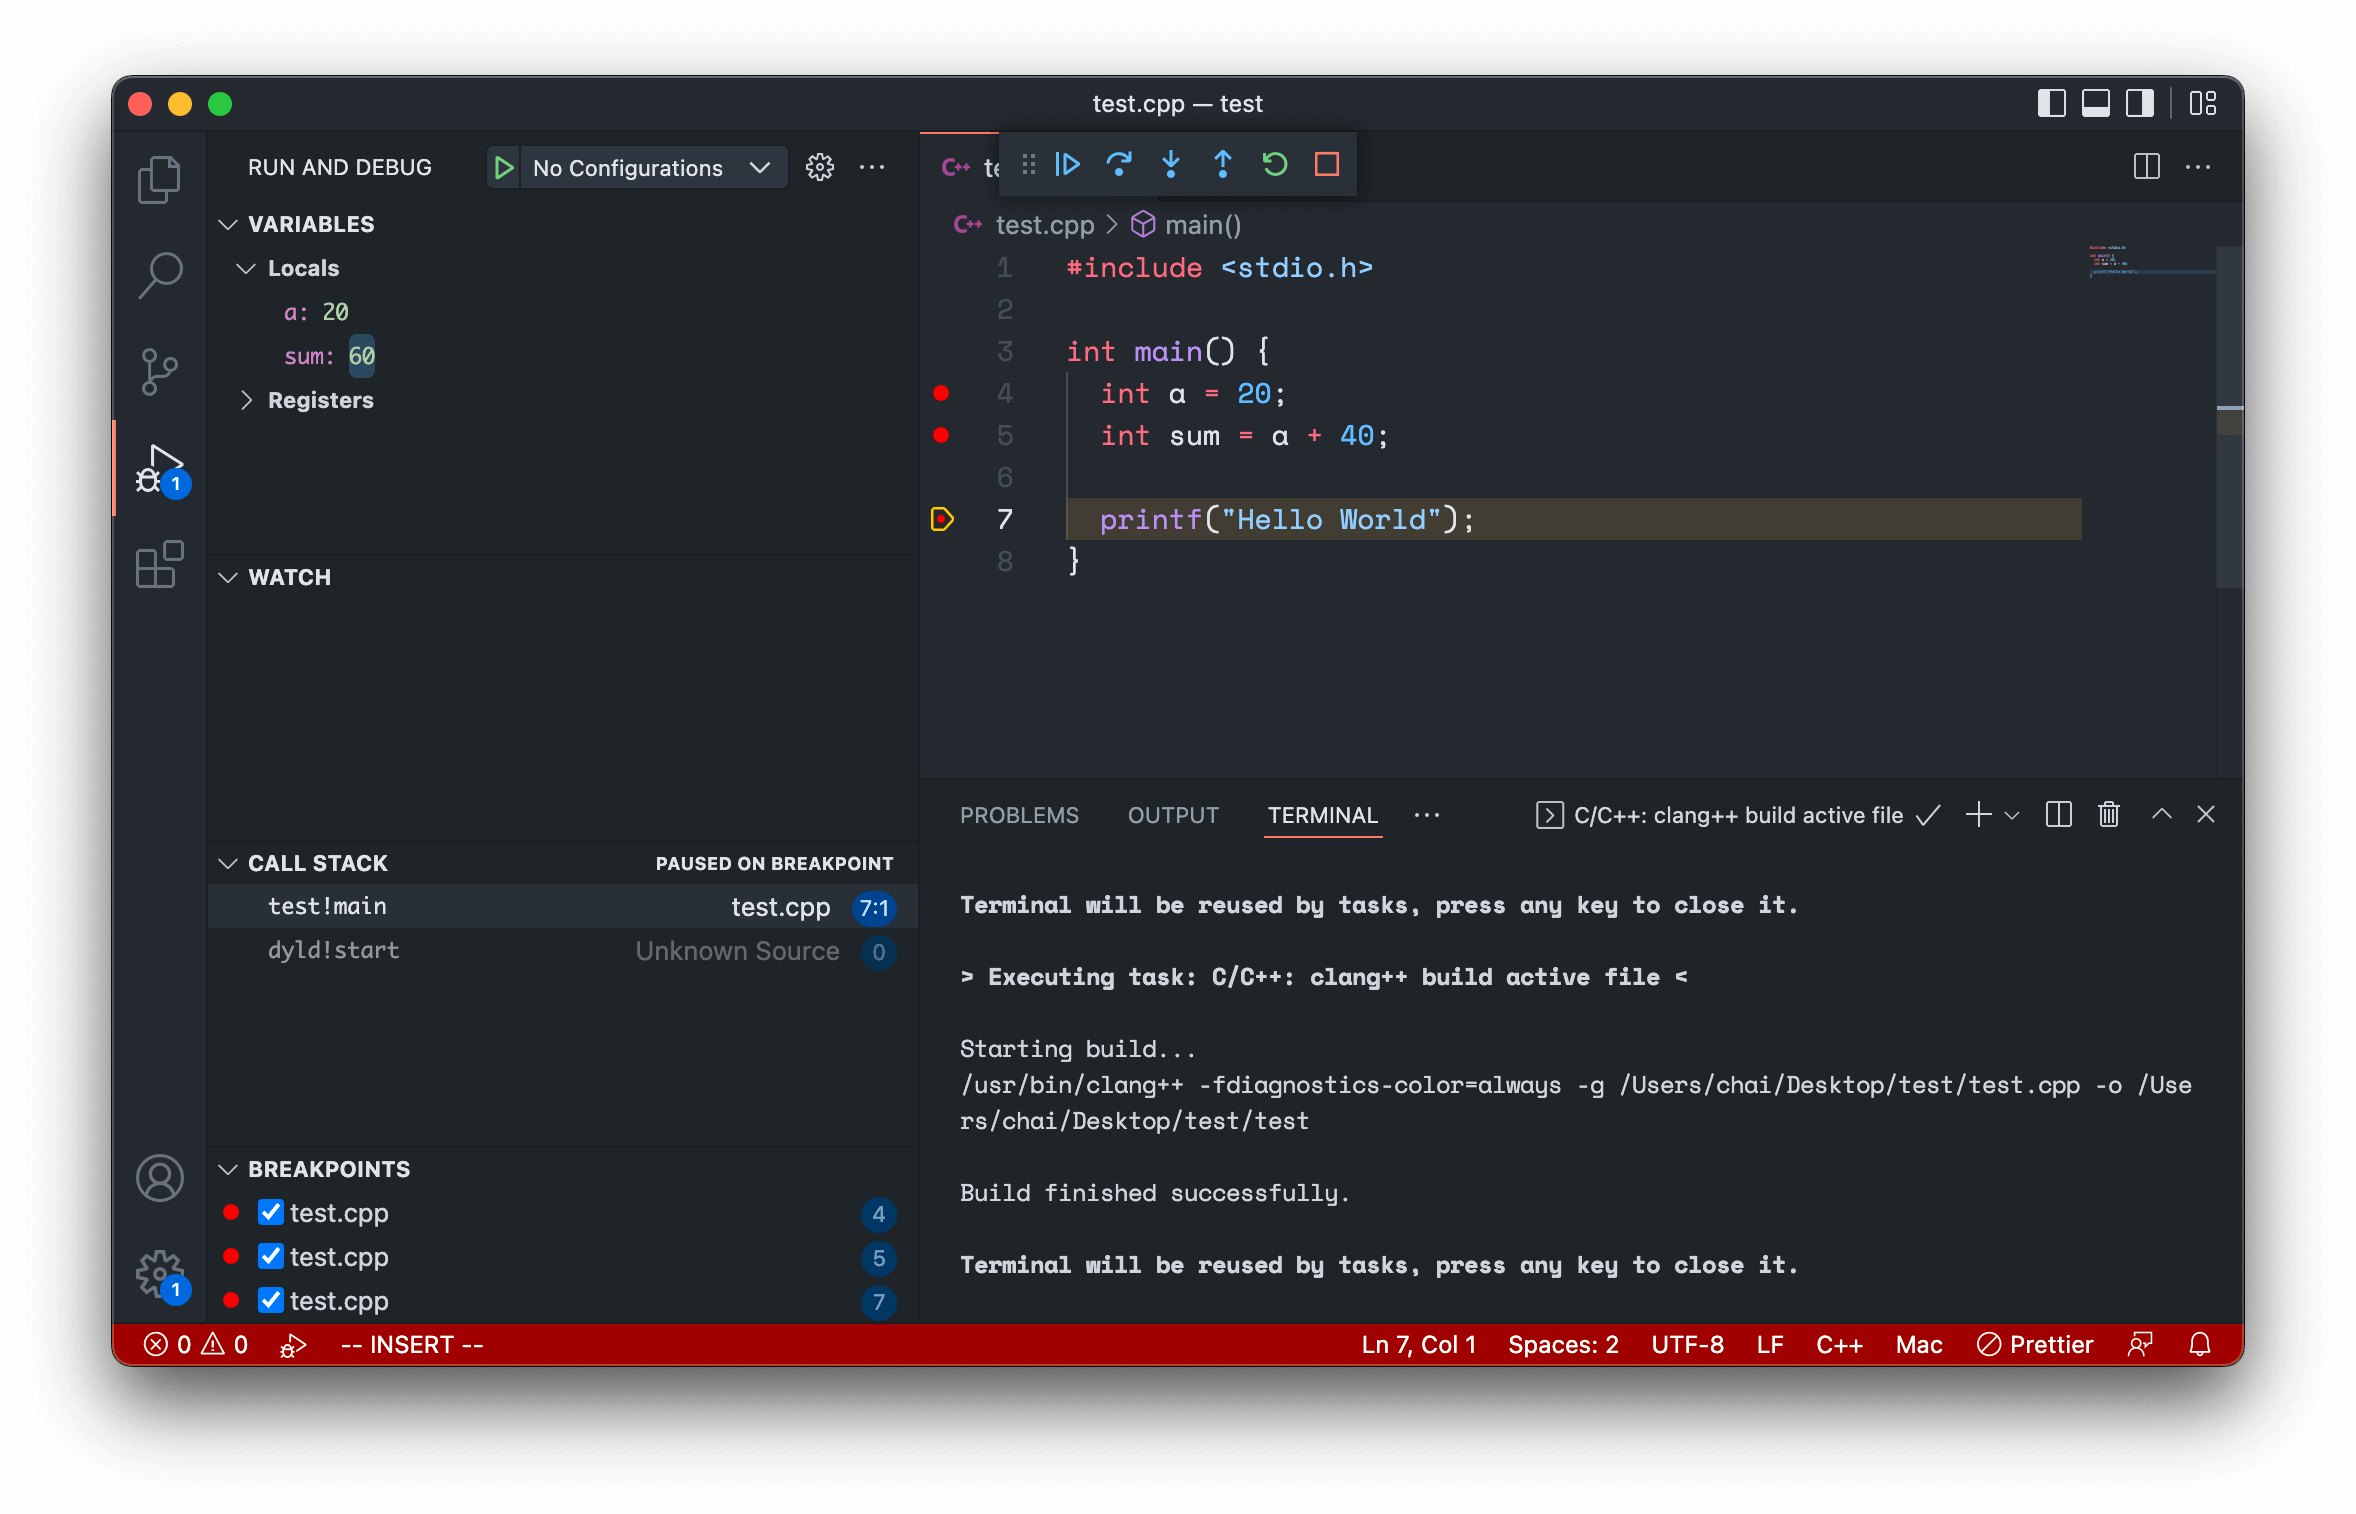
ตัวอย่าง กด breakpoint ที่บรรทัด 5-6 แล้วลอง debug (หน้าตา UI อาจจะแตกต่างกันเนื่องจากผมใช้ Mac OS นะครับ แต่หลักการทำงานยังเหมือนกันครับ)

- เราจะเห็นด้านซ้ายบน จะมีชื่อ ตัวแปร ที่เราตั้งและ value ครับ เช่น
sumมีค่า 60 จากการที่เรา debug ลองคิด ถ้าเป็นการคำนวณที่ซับซ้อน เราสามารถดูว่า ค่ามันมีค่าเท่าไหร่ นอกจากแค่ใช้printfได้ครับ
ถึงขั้นตอนนี้ แนะนำ สำหรับมือใหม่ ที่ไม่รู้จัก Debugging ลองพักก่อนครับ แล้วลองไปเล่น ไปนั่ง Debug และกำหนด breakpoint ลองดูค่า ให้เป็นครับ อันนี้ค่อนข้างสำคัญมากๆครับ เมื่อเราเข้าใจแล้ว เวลาเราติดปัญหา ตัว debugging จะช่วยเราให้เห็นภาพได้มากครับ
Memory
| ชนิด | byte |
|---|---|
| bool | 1 byte |
| char | 1 byte |
| double | 8 bytes (64-bit) |
| float | 4 bytes (32-bit) |
| int | 4 bytes (32-bit) |
| long | 8 bytes (64-bit) |
| string | ? bytes |
- ใน Computer เรามี chips ที่แรกว่า RAM (random-access memory) ซึ่งมันเก็บ 0 กับ 1 ซึ่งมันคือการเก็บ bytes ใน RAM
- ลองคิด Computer เรามี RAM 8GB มีกี่ bytes นะ? แล้วความเร็ว Internet ใช้ bytes หรือ bit นะ? (8GB กับ 8Gb ต่างกันมั้ย?)
Arrays
- สมมติ มี 3 ตัวแปรดังนี้
#include <stdio.h>

int main(void)
{
    int score1 = 72;
    int score2 = 73;
    int score3 = 33;

    printf("Average: %f\n", (score1 + score2 + score3) / 3);
}
- เวลา compile จะได้ข้อความ เพราะว่า เวลา หาร หาร
3.0ไม่ใช่ 3 ซึ่งเป็นfloat
scores.c:9:29: error: format specifies type 'double' but the argument has type 'int' [-Werror,-Wformat]
    printf("Average: %f\n", (score1 + score2 + score3) / 3);
                    ~~     ^~~~~~~~~~~~~~~~~~~~~~~~~~~~~~
                    %d
1 error generated.
make: *** [<builtin>: scores] Error 1
- แก้ด้วยการ หาร
3.0
printf("Average: %f\n", (score1 + score2 + score3) / 3.0);
- Array เราสามารถเก็บค่าได้ที่เป็น type เดียวกัน
- สมมติ
int scores[3]เรากำหนด array ให้เก็บ integer 3 ตัว - Array เป็น zero-index คือเริ่มจาก index ที่ 0 คือตัวแรกใน array
- สามารถกำหนดค่าตัวแปร ให้มันได้ โดยใช้ index แบบนี้
scores[0] = 72(ตำแหน่ง 0 คือตัวแรก) - จากโค๊ดก่อนหน้านี้ พอเปลี่ยนเป็น array จะเป็นแบบนี้
#include <cs50.h>
#include <stdio.h>

int main(void)
{
    int scores[3];

    scores[0] = 72;
    scores[1] = 73;
    scores[2] = 33;

    printf("Average: %f\n", (scores[0] + scores[1] + scores[2]) / 3.0);
}
- code smell เป็นศัพท์ ที่หมายถึงว่าโค๊ดมันน่าจะสามารถปรับปรุงให้ดีขึ้นได้นะ อารมณ์คล้ายๆ มีกลิ่นนิดๆ ทำไงจะให้กลิ่นมันหาย ก็คือการปรับปรุงโค๊ดนั่นเอง
- โค๊ดก่อนหน้านี้ เราต้องกำหนดค่า ให้มันแต่ละ index ถ้าเราปรับโค๊ด ใช้ loop ก็จะง่ายขึ้น
#include <cs50.h>
#include <stdio.h>

int main(void)
{
    int scores[3];

    for (int i = 0; i < 3; i++)
    {
      scores[i] = get_int("Score: ");
    }

    printf("Average: %f\n", (scores[0] + scores[1] + scores[2]) / 3.0);
}
Characters
- character เก็บได้ตัวอักษรเดียว ถ้าจะ print 3ตัว ก็ต้องมี 3 ตัวแปร
#include <stdio.h>

int main(void)
{
    char c1 = 'H';
    char c2 = 'I';
    char c3 = '!';

    printf("%c%c%c\n", c1, c2, c3);
}
- ใช้
$cเพื่อ print char. - สามารถ convert type เช่น float เป็น int ได้ ด้วยการใช้ explicitly convert แบบนี้
printf("%i %i %i\n", (int) c1, (int) c2, (int) c3);
Strings
- จาก char ด้านบน ถ้าใช้ String จะเป็นสั้นกว่า
#include <cs50.h>
#include <stdio.h>

int main(void)
{
    string s = "HI!";
    printf("%s\n", s);
}
- string ก็คือ array ของ character นั่นเอง
- เมื่อเป็น array เราก็สามารถเข้าถึง index เพื่อแสดง char ใน string ได้
#include <cs50.h>
#include <stdio.h>

int main(void)
{
    string s = "HI!";
    printf("%i %i %i\n", s[0], s[1], s[2]);
}
- แต่ผลลัพธ์เป็น
72 73 33
- คือ binary นั่นเอง
\0คือ special character หรือ null character เป็นสิ่งที่ทำให้โปรแกรมรู้ว่า สิ้นสุด string แล้ว ซึ่งมีค่า 0 ฉะนั้น 3 characters ต้องใช้ 4 bytes เพื่อเก็บค่า string.- เราสามารถหาจำนวน (length) ของ string ได้ ด้วย while loop: (จะหยุดลูป เมื่อเจอ
\0)
#include <cs50.h>
#include <stdio.h>

int main(void)
{
    string name = get_string("Name: ");

    int i = 0;
    while (name[i] != '\0')
    {
        i++;
    }
    printf("%i\n", i);
}
- ถ้า include
string.hก็สามารถใช้strlen()ได้เลย เพราะเป็น function ที่ใช้บ่อย และมีคนทำไว้แล้ว
#include <cs50.h>
#include <stdio.h>
#include <string.h>

int main(void)
{
    string name = get_string("Name: ");
    int length = strlen(name);
    printf("%i\n", length);
}
Command-line Argument
- โปรแกรม สามารถรับ command-line argument หรือ input จาก user ได้
- สามารถเปลี่ยน function
mainให้รับค่าได้ เช่น รับค่า argument จาก Terminal
#include <stdio.h>

int main(int argc, string argv[])
{
  ...
}
argcและargv2 ตัวแปร ต่างกันargcคือ argument count จำนวน argumentsargvเป็น vector (array of the arguments)
#include <cs50.h>
#include <stdio.h>

int main(int argc, string argv[])
{
    printf("hello, %s\n", argv[0]);
}
$ make argv
$ ./argv David
hello, ./argv
argv[0]- คือชื่อโปรแกรม (จริงๆ คือ คำสั่งที่เราพิพม์./hello)argv[1]- ฉะนั้นargv[1]คือ argument ตัวที่สอง ก็คือ David- ปกติ return value ของ
main()จะ return 0 หมายถึง exit status - สามารถใช้
return 1;ในเคสที่ให้โปรแกรม exit (เคสที่มี error)
สรุป
Week 2 เป็นเรื่องเกี่ยวกับ Basic และ array ซึ่งถ้าไม่เคยเขียนโปรแกรมมาก่อน ก็อาจจะงงๆ ต้องนั่งทำความเข้าใจ และลองเขียนโปรแกรม ลองเข้าถึง index แล้วจะเข้าใจมากขึ้น การ debugging ก็เป็นสิ่งสำคัญไม่แพ้กัน เราสามารถใช้สำหรับ เพื่อให้เข้าใจการทำงานของโปรแกรมได้เหมือนกัน นอกจากแค่หา bug อย่างเดียว และการอ่าน error หรือ warning จาก compiler เวลาเรา compile ก็มีประโยชน์มากๆครับ
ช่วงนี้ไม่ค่อยว่างมานั่งดู Video ด้วย ไม่แน่ใจว่าจะเขียนสรุป Week 3 เมื่อไหร่นะครับ ยังไม่มีเวลาดูเลย 😅
ขอให้สนุกกับการเรียนนะครับ
Happy Coding ❤️


