ตัวอย่างการใช้ Cookie Consent เพื่อรองรับ PDPA แบบง่ายๆ

Published on
Web Development
cookie-consent-demo
Discord

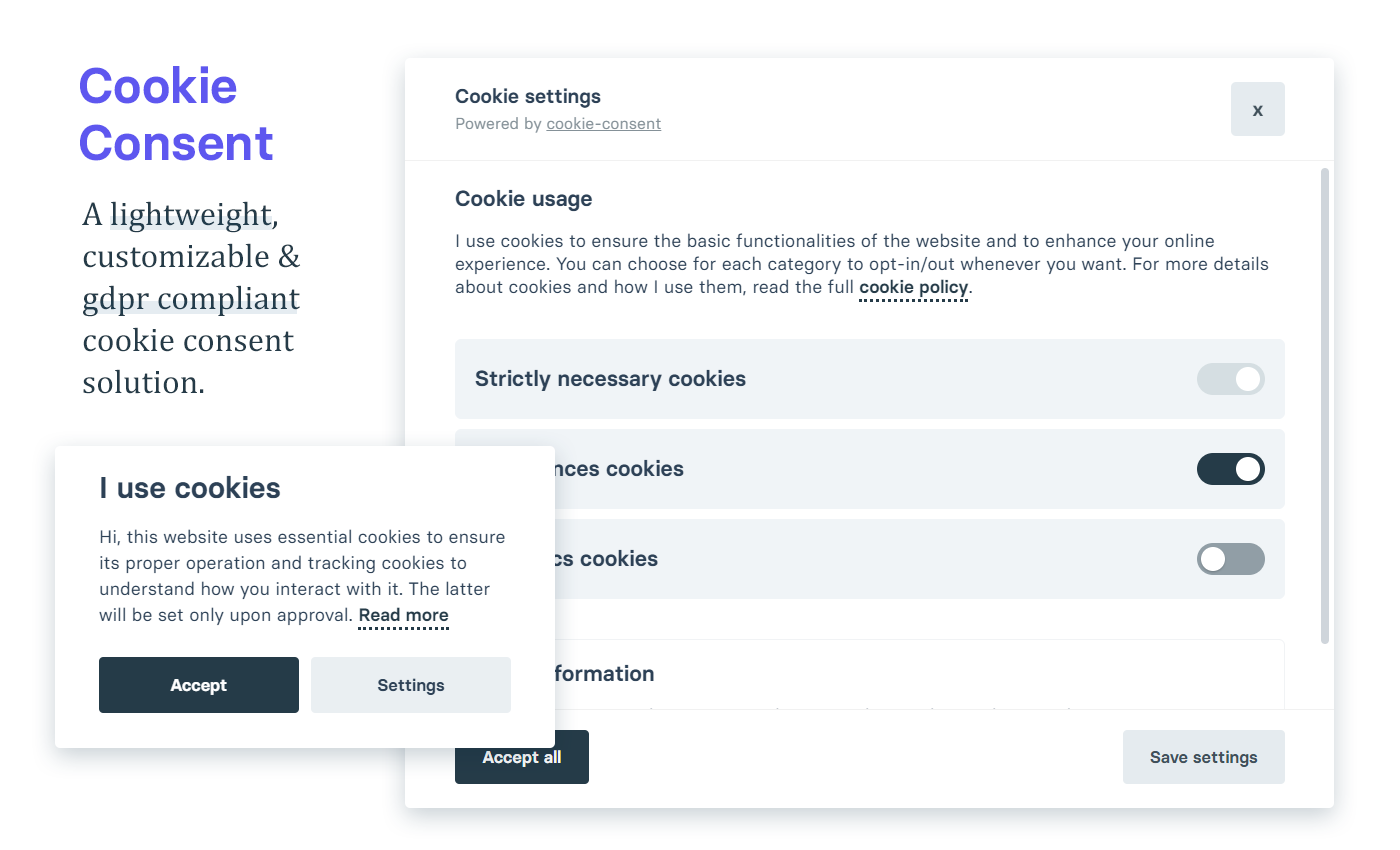
Cookie Consent เป็น JavaScript Plugin ที่ทำให้เราทำ Cookie Consent แสดง Popup เพื่อขอความยินยอมจากผู้ใช้งานได้แบบง่ายๆ เลย ตัว Plugin เป็น Vanilla JavaScript นั่นหมายความว่า สามารถใช้ได้กับทุกๆ เว็บเลย เพียงแค่เพิ่ม script ลงไปในเว็บ

ตัว Cookie Consent ขั้นตอนการใช้คือ ตัว script จะอ่านค่า config พร้อม UI รวมถึงมี callback function กรณีที่ผู้ใช้งานกด ยินยอม หรือกดปฏิเสธ เราก็ไปใส่ business logic ใน function นั้นตามที่เราต้องการได้เลย

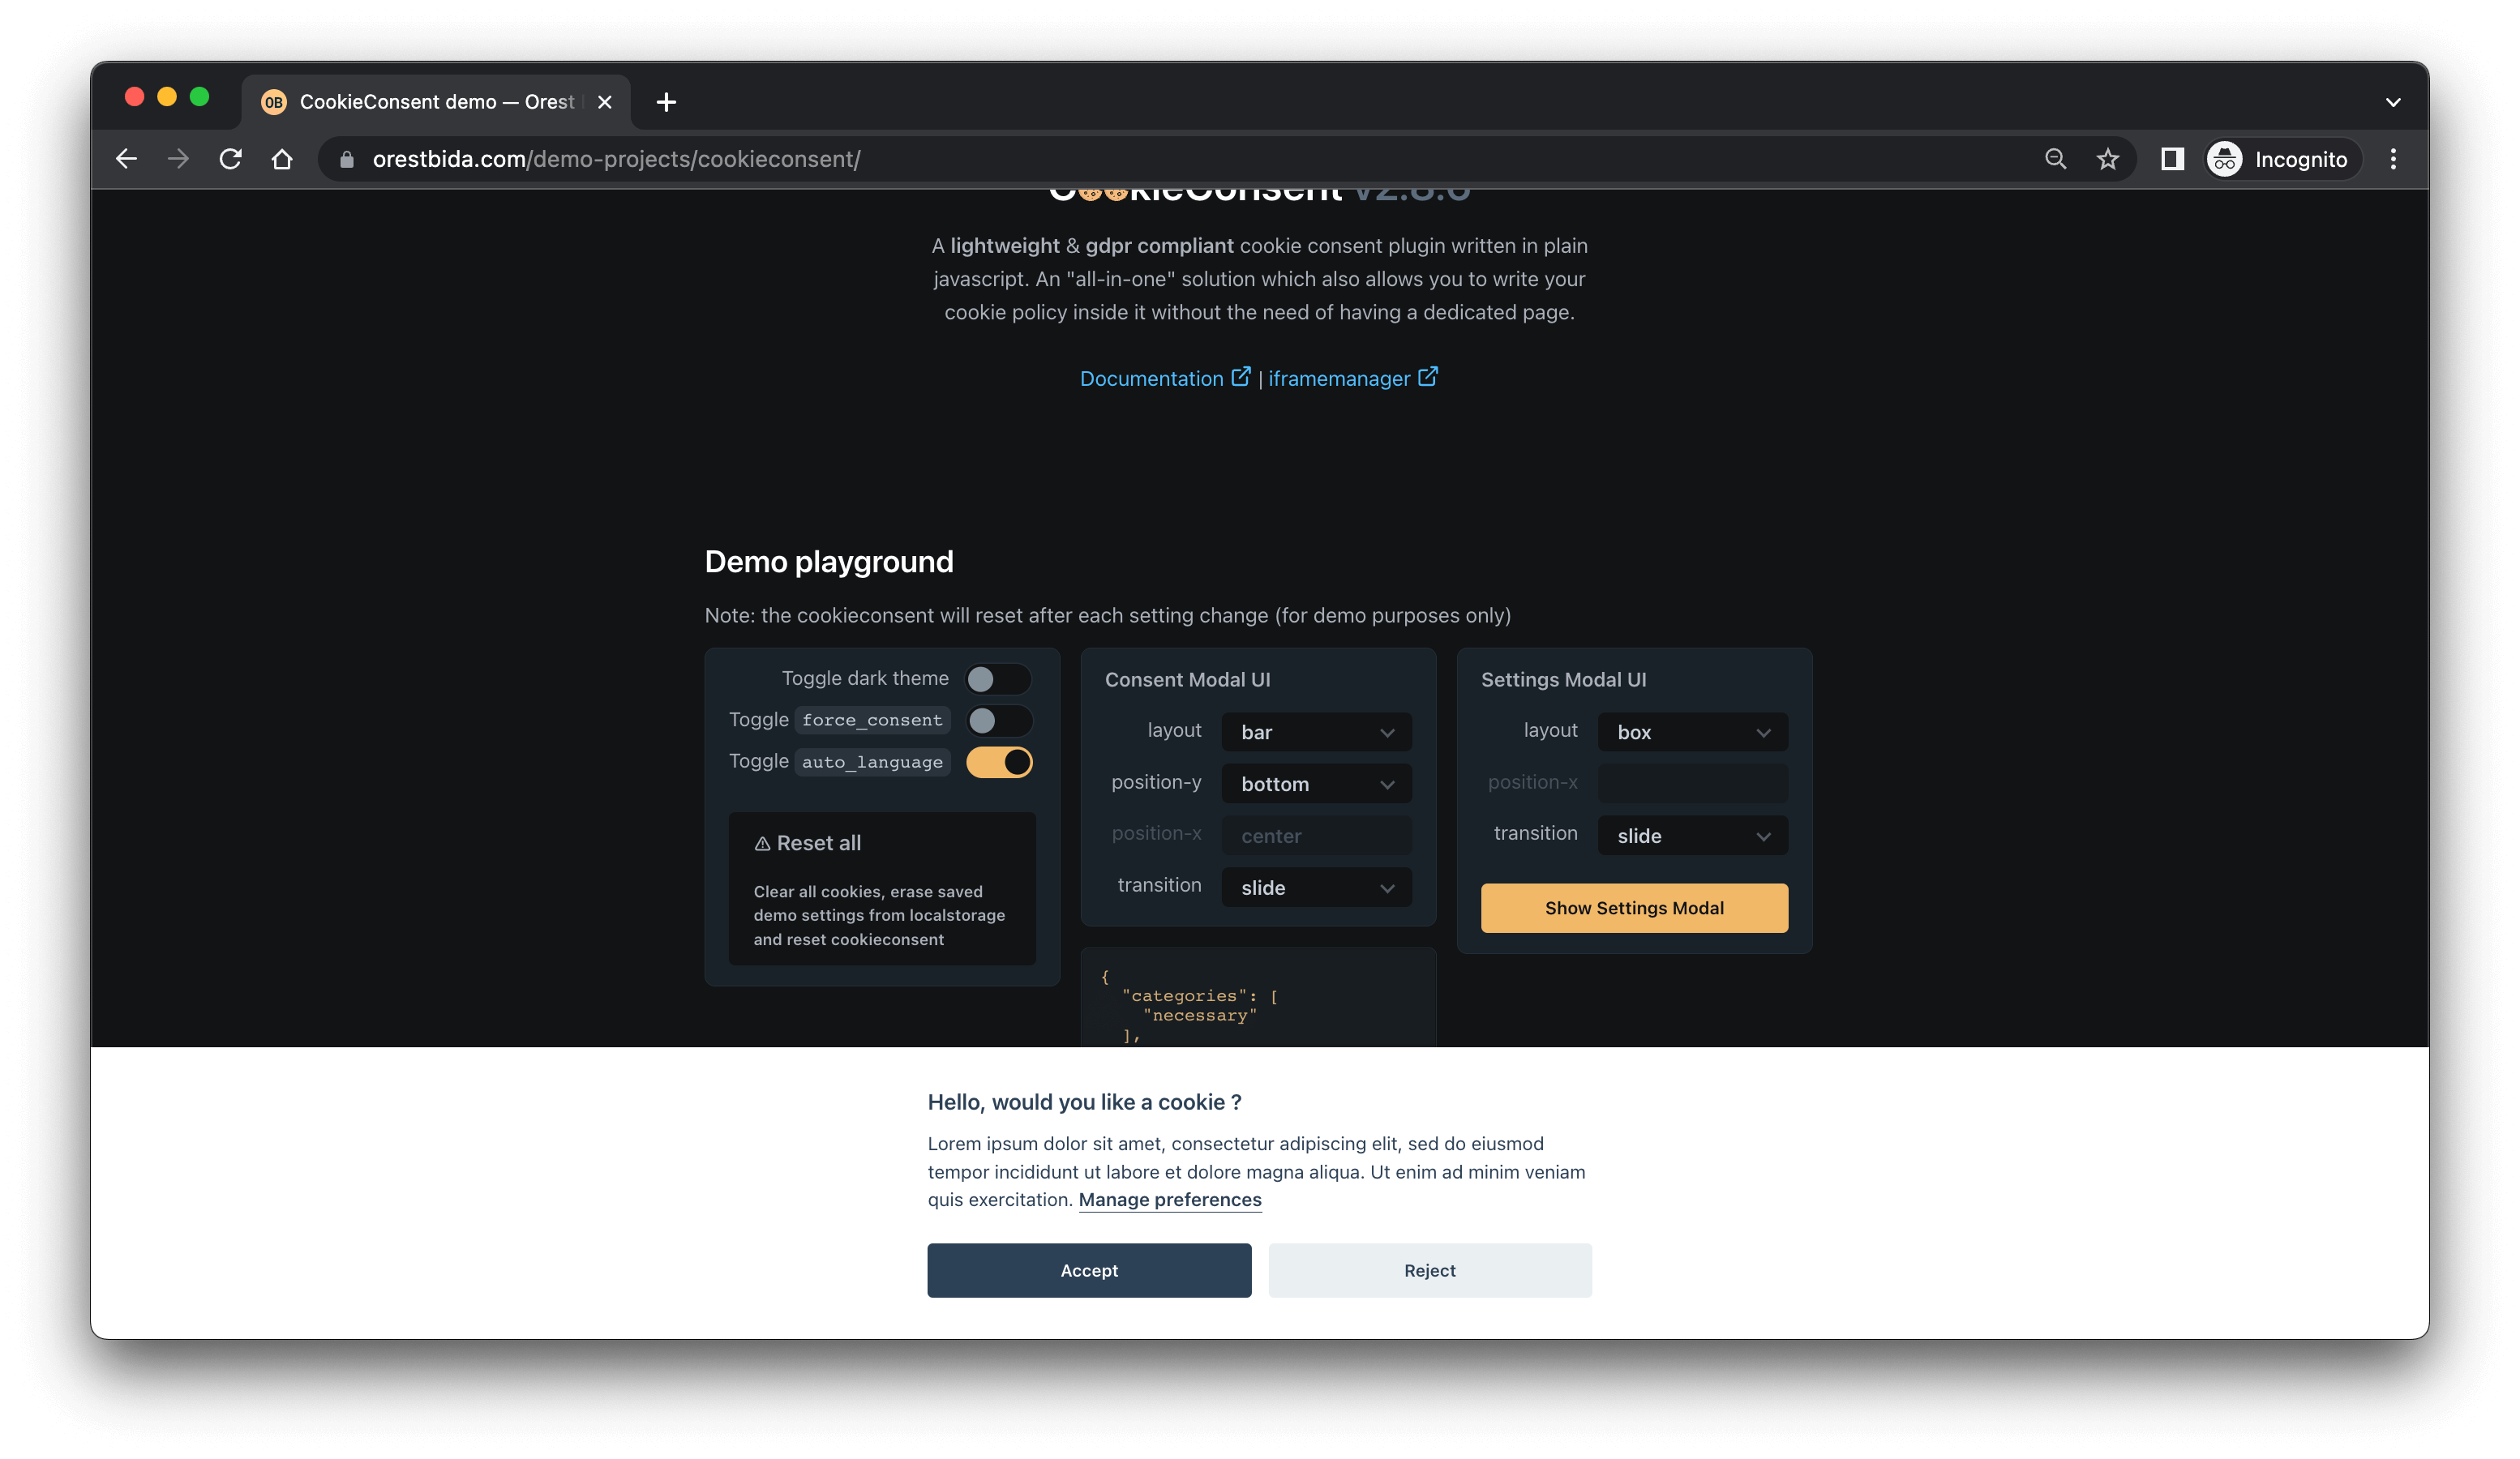
มาลองใช้งานกันดูครับ ตัวเว็บ Cookie Consent มีคำธิบาย การใช้งานอยู่แล้ว

รวมถึงมีหน้าตา Demo ให้เราไปกดเข้าดู ว่าอยากได้หน้าตาประมาณไหน อยากได้กล่องใหญ่ เล็ก ตำแหน่งไหน หรือปรับ Theme ก็ทำได้ เช่นกัน

Cookie Consent

1. แบบ HTML/CSS/JS ธรรมดา

เริ่มต้น สร้างไฟล์ html ขึ้นมาแบบธรรมดาๆ เลย index.html

index.html
<!DOCTYPE html>
<html lang="en">
<head>
  <meta charset="UTF-8">
  <meta http-equiv="X-UA-Compatible" content="IE=edge">
  <meta name="viewport" content="width=device-width, initial-scale=1.0">
  <title>Easy Cookie Consent</title>
</head>
<body>
  <h1>This is example</h1>
  <p>Lorem ipsum dolor sit amet consectetur adipisicing elit. Tempore labore quas sit eveniet saepe repudiandae eligendi perspiciatis sequi earum, natus totam nemo odit, illum nesciunt optio temporibus nihil doloribus blanditiis.</p>
  <p>Lorem ipsum dolor sit amet consectetur adipisicing elit. Tempore labore quas sit eveniet saepe repudiandae eligendi perspiciatis sequi earum, natus totam nemo odit, illum nesciunt optio temporibus nihil doloribus blanditiis.</p>
  <p>Lorem ipsum dolor sit amet consectetur adipisicing elit. Tempore labore quas sit eveniet saepe repudiandae eligendi perspiciatis sequi earum, natus totam nemo odit, illum nesciunt optio temporibus nihil doloribus blanditiis.</p>
  <p>Lorem ipsum dolor sit amet consectetur adipisicing elit. Tempore labore quas sit eveniet saepe repudiandae eligendi perspiciatis sequi earum, natus totam nemo odit, illum nesciunt optio temporibus nihil doloribus blanditiis.</p>
  <p>Lorem ipsum dolor sit amet consectetur adipisicing elit. Tempore labore quas sit eveniet saepe repudiandae eligendi perspiciatis sequi earum, natus totam nemo odit, illum nesciunt optio temporibus nihil doloribus blanditiis.</p>
</body>
</html>

เพิ่ม cookie consent script และ css ลงไป

<head>
  <link rel="stylesheet" href="https://cdn.jsdelivr.net/gh/orestbida/cookieconsent@v2.8.6/dist/cookieconsent.css">
</head>

ส่วน script เพิ่มก่อนปิด body tag และเป็น defer รวมถึงไฟล์ custom js ที่เรากำลังจะสร้างชื่อ cc-init.js ด้วย

<body>
  <script defer src="https://cdn.jsdelivr.net/gh/orestbida/cookieconsent@v2.8.6/dist/cookieconsent.js"></script>
  <script defer src="./cc-init.js"></script>
</body>

สร้างไฟล์ cc-init.js ขึ้นมา

cc-init.js
const config = {}

let cc = initCookieConsent();
cc.run(config);

สุดท้าย config ก็กำหนดค่าให้มัน แบบตัวอย่าง

const config = {
  current_lang: "th",
  autorun: true,
  autoclear_cookies: true,
  languages: {
    en: {
      consent_modal: {
        title: "We use cookies!",
        description:
          'Hi, this website uses essential cookies to ensure its proper operation and tracking cookies to understand how you interact with it. The latter will be set only after consent. <button type="button" data-cc="c-settings" class="cc-link">Let me choose</button>',
        primary_btn: {
          text: "Accept all",
          role: "accept_all", // 'accept_selected' or 'accept_all'
        },
        secondary_btn: {
          text: "Reject all",
          role: "accept_necessary", // 'settings' or 'accept_necessary'
        },
      },
      settings_modal: {
        title: "Cookie preferences",
        save_settings_btn: "Save settings",
        accept_all_btn: "Accept all",
        reject_all_btn: "Reject all",
        close_btn_label: "Close",
        cookie_table_headers: [
          { col1: "Name" },
          { col2: "Domain" },
          { col3: "Expiration" },
          { col4: "Description" },
        ],
        blocks: [
          {
            title: "Cookie usage 📢",
            description:
              'I use cookies to ensure the basic functionalities of the website and to enhance your online experience. You can choose for each category to opt-in/out whenever you want. For more details relative to cookies and other sensitive data, please read the full <a href="#" class="cc-link">privacy policy</a>.',
          },
          {
            title: "Strictly necessary cookies",
            description:
              "These cookies are essential for the proper functioning of my website. Without these cookies, the website would not work properly",
            toggle: {
              value: "necessary",
              enabled: true,
              readonly: true, // cookie categories with readonly=true are all treated as "necessary cookies"
            },
          },
          {
            title: "Performance and Analytics cookies",
            description:
              "These cookies allow the website to remember the choices you have made in the past",
            toggle: {
              value: "analytics", // your cookie category
              enabled: false,
              readonly: false,
            },
            cookie_table: [
              // list of all expected cookies
              {
                col1: "^_ga", // match all cookies starting with "_ga"
                col2: "google.com",
                col3: "2 years",
                col4: "description ...",
                is_regex: true,
              },
              {
                col1: "_gid",
                col2: "google.com",
                col3: "1 day",
                col4: "description ...",
              },
            ],
          },
          {
            title: "Advertisement and Targeting cookies",
            description:
              "These cookies collect information about how you use the website, which pages you visited and which links you clicked on. All of the data is anonymized and cannot be used to identify you",
            toggle: {
              value: "targeting",
              enabled: false,
              readonly: false,
            },
          },
          {
            title: "More information",
            description:
              'For any queries in relation to our policy on cookies and your choices, please <a class="cc-link" href="#yourcontactpage">contact us</a>.',
          },
        ],
      },
    },
  },
};

ทดสอบเปิดเว็บขึ้นมา เราจะเห็น Cookie Consent ขึ้นมาที่หน้าเว็บของเราแล้ว

HTML Cookie Consent

กรณีต้องการปรับแต่งหน้าตา อยากได้แบบ กล่อง อยากได้แบบใหญ่ๆ ก็ปรับจาก gui_options ใน config ได้เลย

cookieconsent.run({
  // ...
  gui_options: {
    consent_modal: {
      layout: 'cloud',               // box/cloud/bar
      position: 'bottom center',     // bottom/middle/top + left/right/center
      transition: 'slide',           // zoom/slide
      swap_buttons: false            // enable to invert buttons
    },
    settings_modal: {
      layout: 'box',                 // box/bar
      // position: 'left',           // left/right
      transition: 'slide'            // zoom/slide
    }
  }
  //...
});

สุดท้าย การเปลี่ยน Theme ก็แค่ไปโหลด css จากหน้า Demo ของ Cookie Consent มาครับ แล้วเพิ่ม stylesheet ลงไป ส่วน index.html ก็เพิ่ม class ให้ body ที่เราต้องการ เช่น theme theme_turquoise

<body class="theme_turquoise">
  ...
</body>
HTML Cookie Consent

ลองดูไฟล์ Config ว่าเราสามารถทำอะไรได้บ้าง? ลองปรับ เพิ่มลดดูได้นะครับ

2. แบบใช้ React.js

สำหรับวิธีนี้ จำเป็นต้องมี Node.js บนเครื่องก่อน และสามารถใช้งาน Command Line / Terminal เพื่อพิมพ์คำสั่งได้

Create Project

โดยขั้นตอนนี้ผมจะยกตัวอย่าง ด้วยการใช้ Vite ขึ้นโปรเจ็ค เริ่มต้น ก็สร้างโปรเจ็คด้วยคำสั่ง

npm create vite@latest

ทำการตั้งชื่อ เลือก React และ JavaScript

✔ Project name: … easy-cc-react
✔ Select a framework: › React
✔ Select a variant: › JavaScript

เปิดโปรเจ็คขึ้นมา ทำการ install แล้วลองทดสอบรัน เพื่อให้เห็นหน้าเว็บก่อน http://127.0.0.1:5174/

npm install
npm run dev

ต่อมา ทำการ install cookie consent

npm i vanilla-cookieconsent

หลังจากติดตั้ง เราจะทำการสร้าง Component ขึ้นมา เพื่อเอาไว้โหลด Cookie Consent ใน useEffect() ตัวอย่างผมใช้ชื่อว่า CookieConsent.jsx ในโฟลเดอร์ components (สร้างใหม่)

CookieConsent.jsx
import { useEffect } from 'react'

import 'vanilla-cookieconsent/dist/cookieconsent.js'
import 'vanilla-cookieconsent/dist/cookieconsent.css'

const config = {}

export default function CookieConsent() {
  useEffect(() => {
    const cc = window.initCookieConsent()
    cc.run(config)
  }, [])

  return null
}

ส่วนไฟล์ config ก็คือ config แบบเดียวกันกับที่ใช้ HTML ธรรมดาเลย ก็อปมาแปะใส่ได้เลยครับ

สุดท้าย นำ Component ที่เราสร้างใหม่ ไปใส่ไว้ในหน้า App.jsx

App.jsx
import CookieConsent from './components/CookieConsent'

function App() {
  const [count, setCount] = useState(0)

  return (
    <div className="App">
      <CookieConsent />
      ...
      ... โค๊ดอื่นๆ
  )
}

ทดสอบดูว่า เราจะมีหน้าเว็บ ที่มี Cookie Consent ขึ้นแล้ว

React Cookie Consent

ทีนี้อยากเปลี่ยน Theme ก็ทำเหมือน HTML ปกติเลยครับ เพิ่ม CSS และเพิ่ม class ไปที่ body ในไฟล์ index.html

index.html
<body class="theme_turquoise">
  <div id="root"></div>
  <script type="module" src="/src/main.jsx"></script>
</body>

เป็นอันเรียบร้อย

React Cookie Consent

นอกจากนี้ เราก็ยังใส่ custom attribute เพื่อให้ Cookie Consent มันทำงานได้ เช่น ให้เปิด Setting, ให้ Accept ตัวอย่าง แก้ไข CookieConsent.jsx ให้มีปุ่ม เมื่อกด ให้เปิด Setting ขึ้นมา ก็ใช้ง่ายๆ แบบนี้เลย

CookieConsent.jsx
export default function CookieConsent() {
  useEffect(() => {
    const cc = window.initCookieConsent()
    cc.run(config)
  }, [])

  return (
    <button type="button" data-cc="c-settings">
      Show cookie settings
    </button>
  )
}

ลองไปเล่นกันดูได้นะครับ ลองปรับแต่งจาก Demo เลือกหน้าตาที่ชอบ ดูว่า Config มันทำอะไรได้บ้าง และปรับใช้ตามความต้องการของเราได้เลย หวังว่าบทความนี้จะเป็นประโยชน์นะครับ สุดท้าย Source Code ใน Repo ด้านล่างเลย

Happy Coding ❤️

Buy Me A Coffee
Authors
Discord