
สวัสดีครับ บทความนี้ผมจะมาพูดถึงเรื่อง Redux กันเนอะ แนะนำว่าควรมีความรู้ React เบื้องต้นมาบ้าง เข้าใจ Props และ State หรือใครไม่เคยเขียน React มาก่อน เริ่มอ่านได้จากบทความนี้ก็ได้ครับ
ก่อนไปเริ่มต้นรู้จักกับ Redux ให้ทุกคนลองนึกภาพตามดูนะครับ ว่าปกติเราเขียน React ในการจัดการกับ State และ Props นั้นใน Application ขนาดใหญ่ เราจะมีวิธีจัดการพวกนี้ยังไง? ถ้า App เรายังเล็กๆ มีไม่กี่ Component มันก็ยังไม่ยุ่งยากมาก แต่มันก็จะเริ่มเกิดปัญหาละ เมื่อเราอยากจะแชร์ State หรือส่งค่า State ข้ามไปมาระหว่าง 2 Components หรือทั้ง App เลยจะทำไง ต้องส่งผ่าน props ไปให้แต่ละ Component กันเลยหรอ ฟังดูยุ่งยากมากเลย ก็เลยทำให้เป็นที่มาว่าทำไม Redux จึงเกิดมา
Redux คืออะไร?
Redux ถ้าความหมายตามเว็บมันเลยคือ “Predictable state container for JavaScript apps” อ่านแล้วงงมั้ย 😁 จริงๆแล้ว แบบง่ายๆเลยมันคือ State Management (ตัวจัดการ State) นั่นเอง และมันก็ไม่จำเป็นว่าจะต้องใช้กับ React เท่านั้นนะครับ มันเป็น Concept ฉะนั้น มันสามารถประยุกต์ใช้ได้หมด เช่น Angular หรือ Vue
ก่อนอื่นเลย มารู้จักกับ 3 Principles ของ Redux กันก่อนว่ามีอะไรบ้าง?
1. Single Source of Truth
The state of your whole application is stored in an object tree within a single store.
กล่าวคือ State ของ Application เราต้องเก็บไว้ใน store เดียว โดยเป็น JavaScript Object ธรรมดานี่แหละ (ซึ่ง State ก็เปรีบบเสมือน Data หรือ ก้อน Model ของเรานั่นเอง)
ตัวอย่าง state ที่เก็บอยู่ภายใน store
console.log(store.getState())
/*{  user: {    id: 1,    name: 'Chai'  },  posts: [{    id: 1,    title: 'Article #1'  }, {    id: 2,    title: 'Article #2'  }]}*/
2. State is read-only
ไม่ได้แปลว่า State จะอ่านค่าได้อย่างเดียว แต่ห้ามแก้ไขนะ แต่หมายถึงว่า เราจะอัพเดท State ได้ผ่านทาง Action ทางเดียวเท่านั้น
ตัวอย่างเช่น
store.dispatch({ type: 'ADD_SCORE', score: 2})store.dispatch({ type: 'RESET_SCORE'})dispatch เป็น function ที่ไว้บอก store ว่าเกิด action ขึ้นแล้วนะ ให้ state ทำการอัพเดทตาม type ที่กำหนดใน reducers ซะนะ
3. Changes are made with pure functions
การเปลี่ยนแปลง State ต้องเป็น Pure function เท่านั้น ก็คือ ใน reducers ของเราสามารถเปลี่ยน state ได้ แต่ไม่ใช่การแก้ไข state เดิม เป็นการส่งค่า state ใหม่กลับมาแทนครับ
ตัวอย่างเช่น
export default (state = 0, action) => { switch (action.type) { case 'INCREMENT': return state + 1 case 'DECREMENT': return state - 1 default: return state }}Reducers นี้จะทำการจัดการเกี่ยวกับ state สำหรับ ค่า โดยเริ่มต้นคือ 0 ซึ่งถ้ามี Action ที่มี type ว่า INCREMENT มันก็จะทำการเพิ่ม state ไปอีก 1 (เป็นค่า state ใหม่ไม่ได้แก้ไขค่าเดิม)
หรือถ้าหากว่า มันไม่เข้าเงื่อนไขทั้ง INCREMENT หรือ DECREMENT มันก็จะ return default state ซึ่งก็คือค่า 0 นั่นเอง
Actions
หน้าที่ของ Action คือ เป็นตัวบอกว่าข้อมูลนั้นคืออะไร จะทำอะไรกับมัน ซึ่งมอง Action เป็น JavaScript Object ธรรมดาเลย เพียงแต่มีข้อจำกัดนึงคือ ต้องมี key ชื่อว่า type ด้วย เช่น จะส่ง action สำหรับการสร้าง Post
const CREATE_POST = 'CREATE_POST'
store.dispatch({  type: CREATE_POST,  payload: {    title: 'Hello Redux',    content: 'lorem ipsum'  }})
Reducers
Reducers เปรียบเสมือนคล้ายๆ Controller ใน MVC คือจะเป็นตัวที่รับ Action มาเพื่อดูว่า Action นี้ต้องการจะทำอะไร จากนั้นก็ส่ง Action ไปหา Store นั่นเอง
reducers: ต้องทำการ return Object ใหม่เท่านั้น จะไม่ทำการแก้ไข Object เดิม (เป็น Pure function)
ซึ่ง Reducer มันเป็นฟังค์ชัน ที่รับ previousState และ action แล้ว return newState กลับไป
;(previousState, action) => newStateสิ่งที่ควรหลีกเลี่ยงใน Reducers
- อย่าเรียก non pure function เช่น
new Date()หรือMath.random() - เปลี่ยนแปลงค่า argument ที่รับมาตรงๆ (mutation)
Store
Store เป็น Object ที่เอาไว้เก็บ State ของ Application และ 1 แอพมีเพียงแค่ 1 Store เท่านั้น ซึ่งเบื้องหลังของ Store นั้นมันทำอะไรบ้าง?
- เก็บ state ของแอพเราไว้ และสามารถเข้าถึงข้อมูลผ่าน
getState()ได้ - สามารถ update state ได้ผ่าน
store.dispatch(action) - register listener ผ่านทาง
subscribe(listener)
การสร้าง Store เราสามารถ สร้างผ่าน createStore() โดยใช้ reducers เป็น argument แบบนี้
import { createStore } from 'redux'import reducers from './reducers'const store = createStore(todoApp)Implement Redux with react-redux
หลังจากพูดทฤษฎีกันไปแล้ว เอาจริงๆ เชื่อว่า 90% ไม่เข้าใจหรือยังจับต้นชนปลายไม่ถูกหรอก ว่า Redux มันคืออะไร ช่วยแก้ปัญหาอะไร ถ้ายังไม่ได้ลองลงมือทำ ลองเล่น ลองปรับๆแก้ๆดู ฉะนั้นมาลงมือทำ Redux จริงๆกันเลยดีกว่า
Step 1 : Setup & Installation
เริ่มจากสร้าง React Project ขึ้นนมาด้วย create-react-app ละกัน
npx create-react-app hello-react-reduxจากนั้นทำการ Add redux dependencies ครับ
yarn add redux react-reduxซึ่งโปรเจ็คนี้จะเป็น Example ง่ายๆในการใช้ Redux โดยเป็น App Counter เพิ่ม ลบ ค่า
Step 2 : Add Provider & Store
ที่ไฟล์ index.js จาก
import React from 'react'import ReactDOM from 'react-dom'import './index.css'import App from './App'import registerServiceWorker from './registerServiceWorker'
ReactDOM.render(<App />, document.getElementById('root'))registerServiceWorker()
ทำการเพิ่ม Provider เป็นแบบนี้ (เนื่องจากต้องหุ้มด้วย Provider เพื่อให้เราสามารถเข้าถึงค่า store ได้)
import { Provider } from 'react-redux'
const MyApp = () => (  <Provider>    <App />  </Provider>)
ReactDOM.render(<MyApp />, document.getElementById('root'))
ต่อมา ตัว Provider ต้องมี props store ด้วย ซึ่งเราจะได้มาจาก createStore ของ redux โดยใช้ reducers ของเราครับ
import { createStore } from 'redux'import rootReducer from './reducers'
const store = createStore(rootReducer)
const MyApp = () => (  <Provider store={store}>    <App />  </Provider>)
ถึงตอนนี้ยังไม่สามารถรัน App ได้นะครับ เนื่องจากเรายังไม่ได้สร้าง reducers และ actions ให้แอพเราเลย
Step 3 : Reducers & Action
ต่อมาทำการสร้าง Reducers ของเราขึน้มาครับ ชื่อ reducers/counters.js (ฟังค์ชันของ reducers จะรับ state และ action เป็น arguments)
export default (state = 0, action) => { switch (action.type) { case 'INCREMENT': return state + action.score case 'DECREMENT': return state - action.score default: return state }}ต่อมาตรงส่วน rootReducers ให้ทำการสร้างไฟล์ reducers/index.js ขึ้นมาแบบนี้
import { combineReducers } from 'redux'import counters from './counters'
export default combineReducers({ counters})combineReducers(): เป็นการรวม Reducers หลายๆตัวให้เป็น Reducers เดียวกัน
โดยที่ reducers/index.js จะเป็นเหมือนการรวม reducers ทั้งหมด ให้ state อยู่ใน store เดียวกันครับ ซึ่ง reducers 1 อันจะยังไม่เห็นผล แต่ถ้าใน Application จริงๆ เราจะได้ rootReducers แนวๆนี้ครับ
export default combineReducers({ form, sessions, users, posts})ซึ่งใน State tree ก็จะเก็บเป็นก้อน Object ได้ลักษณะนี้ (ขึ้นอยู่กับ Reducers)
{ form: {}, sessions: { isAuthentication: false, currentUser: {} }, users: [{...}], posts: [{...}]}และต่อมาเพิ่ม Action ที่ไฟล์ actions.js แบบนี้
export const increment = (score = 1) => ({  type: 'INCREMENT',  score})
export const decrement = (score = -1) => ({  type: 'DECREMENT',  score})
Step 4 : Add Component
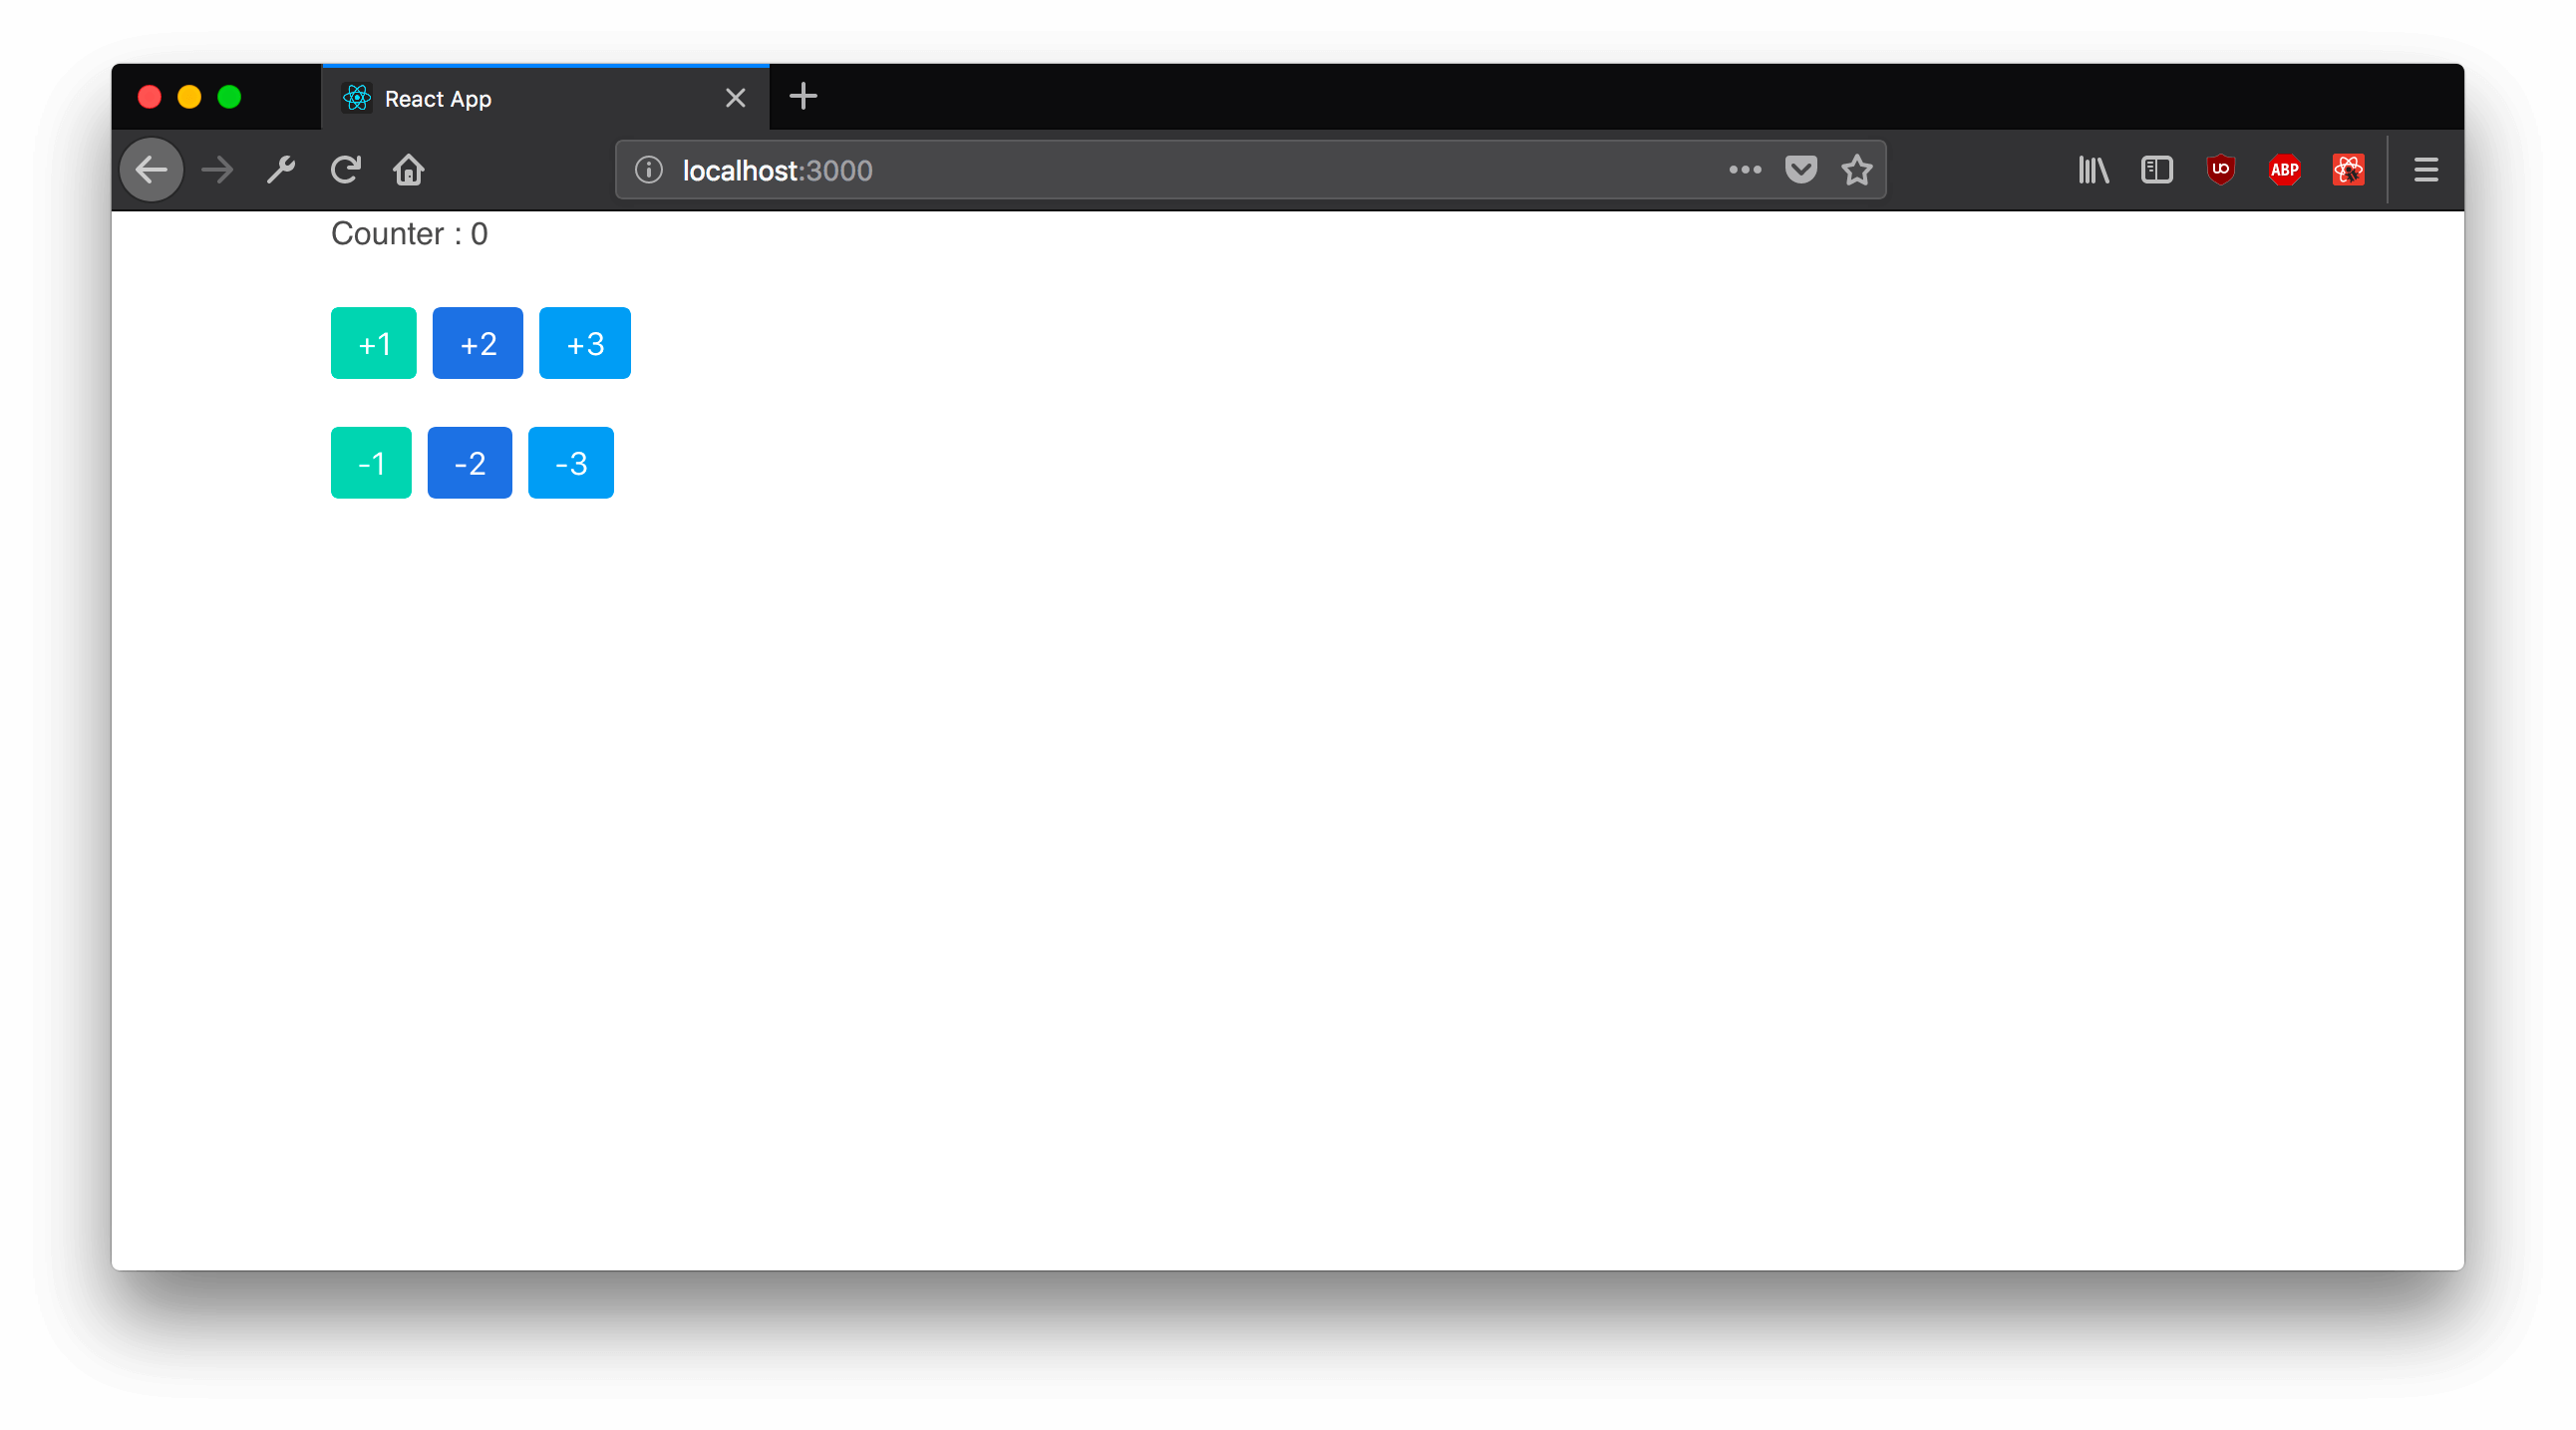
มาที่ไฟล์ App.js ทำการเปลีย่นหน้าตาให้มันซักนิด โดยหน้านี้จะมีแค่โชว์ score และก็ Button ในการเพิ่ม/ลบ score ทีละ 1, 2 และ 3 ตามลำดับ
import React from 'react'import { connect } from 'react-redux'
const App = ({ message, counter }) => (  <div className="container">    <div className="columns column is-12">      <h1>Counter : {counter}</h1>    </div>
    <div className="buttons">      <button className="button is-primary">+1</button>      <button className="button is-link">+2</button>      <button className="button is-info">+3</button>    </div>
    <div className="buttons">      <button className="button is-primary">-1</button>      <button className="button is-link">-2</button>      <button className="button is-info">-3</button>    </div>  </div>)
const mapStateToProps = function (state) {  return {    message: 'This is message from mapStateToProps',    counter: state.counters || 0  }}
const AppWithConnect = connect(mapStateToProps)(App)export default AppWithConnect
ใส่ stylesheet ด้วย Bulma ที่ไฟล์ public/index.html ซักนิด
<link rel="stylesheet" href="https://cdnjs.cloudflare.com/ajax/libs/bulma/0.7.1/css/bulma.min.css"/>เราจะเห็นโค๊ดประหลาดๆอยู่บ้าง กำลังจะอธิบายในหัวข้อถัดไปครับ
connect()
ถ้าเราดูที่ไฟล์ App.js เราจะเห็นทั้ง connect() ทั้ง mapStateToProps แล้วมันคืออะไรล่ะ?
จริงๆแล้ว connect เป็น utility function ที่ช่วยให้เราสามารถเรียกใช้ dispatch() จาก store ได้เลย รวมถึง การ bind หรือ map ค่า state กับ props ต่างๆ ด้วย mapStateToProps และ mapDispatchToProps
ซึ่ง connect() เป็น HOC (Higher Order Component) : ฟังค์ชันที่รับ Component แล้ว return เป็น Component ที่มีดีกว่าเดิม เรียกว่าเป็นการ upgrade component ก็ได้
โดยเมื่อเราใช้ connect ในรูปแบบนี้
const MyComp = () => <h1>Hello World</h1>
connect()(MyComp)
หรือ ส่ง mapStateToProps ไปใน connect() แบบ App.js คือการเปลี่ยนจาก state ของ Application เป็น props ให้เอาไว้ใช้ภายใน App
ย้อนกลับไปเรื่อง Props & State เนาะ ปกติ เวลาเราส่งข้อมูล State ไปให้ Component นึง เราก็ต้องโยนผ่าน Props พอเป็น Redux ก็เหมือนกัน แต่ต่างกันที่ State จะไม่ได้ถูกเก็บไว้ใน Component ของใครของมันละ เป็น State กลางแทน แล้ว Component ไหนจะเข้าถึง State นั้นๆ ก็แค่ไปเรียก connect(mapStateToProps) เอา
ซึ่ง mapStateToProps มันก็เป็นเพียงแค่ function ที่รับค่า state ปัจจุบัน และ return เป็นก้อน Object ที่เราต้องการจะให้มันส่งไปหา Component ตัวอย่างง่ายๆ คือ
const mapStateToProps = function(state) {  return {    message: 'This is message from mapStateToProps',    counter: state.counters || 0  }}
// หรือเขียตนแบบ Arrow function// const mapStateToProps = state => ({//   message: 'This is message from mapStateToProps',//   counter: state.counters || 0// })
const App = ({ message }) => <h1>{message}</h1>export connect(mapStateToProps)(App)
เมื่อเรียก Component
<App />จะสามารถแสดงผลเป็น
<h1>This is message from mapStateToProps</h1>โดยที่มีค่าเท่ากับเราส่ง Props แบบนี้
<App message="This is message from props" />Step 5 : Dispatch an action
ต่อมาที่ปุ่ม Button ต่างๆ เราจะให้มัน store.dispatch(action) สิ่งที่เราต้องการ เช่น ถ้ากด +1 ให้มันส่ง action
{ type: 'INCREMENT', score: 1}และถ้า +2 ก็จะเป็น
{ type: 'INCREMENT', score: 2}และปกติ การ dispatch ก็แค่ dispatch object ด้านบนไปได้เลย แต่ที่นิยมทำกันคือสร้างเป็น actionCreator ขึ้นมามากกว่า ก็เหมือนอย่างที่เราได้สร้าง function ไว้ที่ไฟล์ actions.js แล้วครับ
export const increment = (score = 1) => ({ type: 'INCREMENT', score})ทีนี้เวลาเรา store.dispatch() จาก
store.dispatch({ type: 'INCREMENT', score: 1})ก็ได้เป็น
store.dispatch(increment(1))กลับมาที่ไฟล์ App.js ทำการเพิ่ม dispatch() ให้กับ onClick() ของ Button กันแบบนี้
const App = ({ message, counter, dispatch }) => (  <div className="buttons">    <button onClick={() => dispatch(increment(1))} className="button is-primary">      +1    </button>    <button onClick={() => dispatch(increment(2))} className="button is-link">      +2    </button>    <button onClick={() => dispatch(increment(3))} className="button is-info">      +3    </button>  </div>
<div className="buttons"> <button onClick={() => dispatch(decrement(1))} className="button is-primary"> -1 </button> <button onClick={() => dispatch(decrement(2))} className="button is-link"> -2 </button> <button onClick={() => dispatch(decrement(3))} className="button is-info"> -3 </button> </div>)dispatch: props ที่เราสามารถเข้าถึงได้ มีค่าเท่ากับstore.dispatch()เนื่องจากว่าเราทำการ implementProviderไว้นั่นเองonClick()จะรับ argument เป็น function นะครับ ซึ่ง ในตัวอย่างเป็น function ที่ returndispatch(action)
หน้าเว็บเราก็สสามารถกดปุ่ม เพิ่ม/ลบ ค่าได้แล้ว รวมถึง แสดงผลลัพธ์ counter ได้ถูกต้อง
Step 6 : Redux Logger
ขั้นตอนสุดท้าย เป็นสิ่งที่เราควรจะเอาไว้ log ดูว่า ตอนนี้ Application เรามี State อะไรบ้าง เราจะได้สามารถ map state ได้ถูกต้อง (กรณีที่บางคนดู reducers หรือ combineReducers แล้วไม่เข้าใจ)
ตัว library มันมีชื่อว่า Redux Logger ก็ install ง่ายๆ เลย
yarn add redux-loggerต่อมาที่ไฟล์index.js ทำการเพิ่มโค๊ดนี้
import { createStore, applyMiddleware } from 'redux'import logger from 'redux-logger'
const store = createStore(rootReducer, applyMiddleware(logger))
ซึ่งการใช้ redux logger เราจะใช้ applyMiddleware เข้ามาช่วย โดย
applyMiddleware()รบั logger เป็น argumentcreateStore()รับ applyMiddleware เป็น argument ที่ 2 (ก่อนหน้านี้ มีแค่rootReducer)
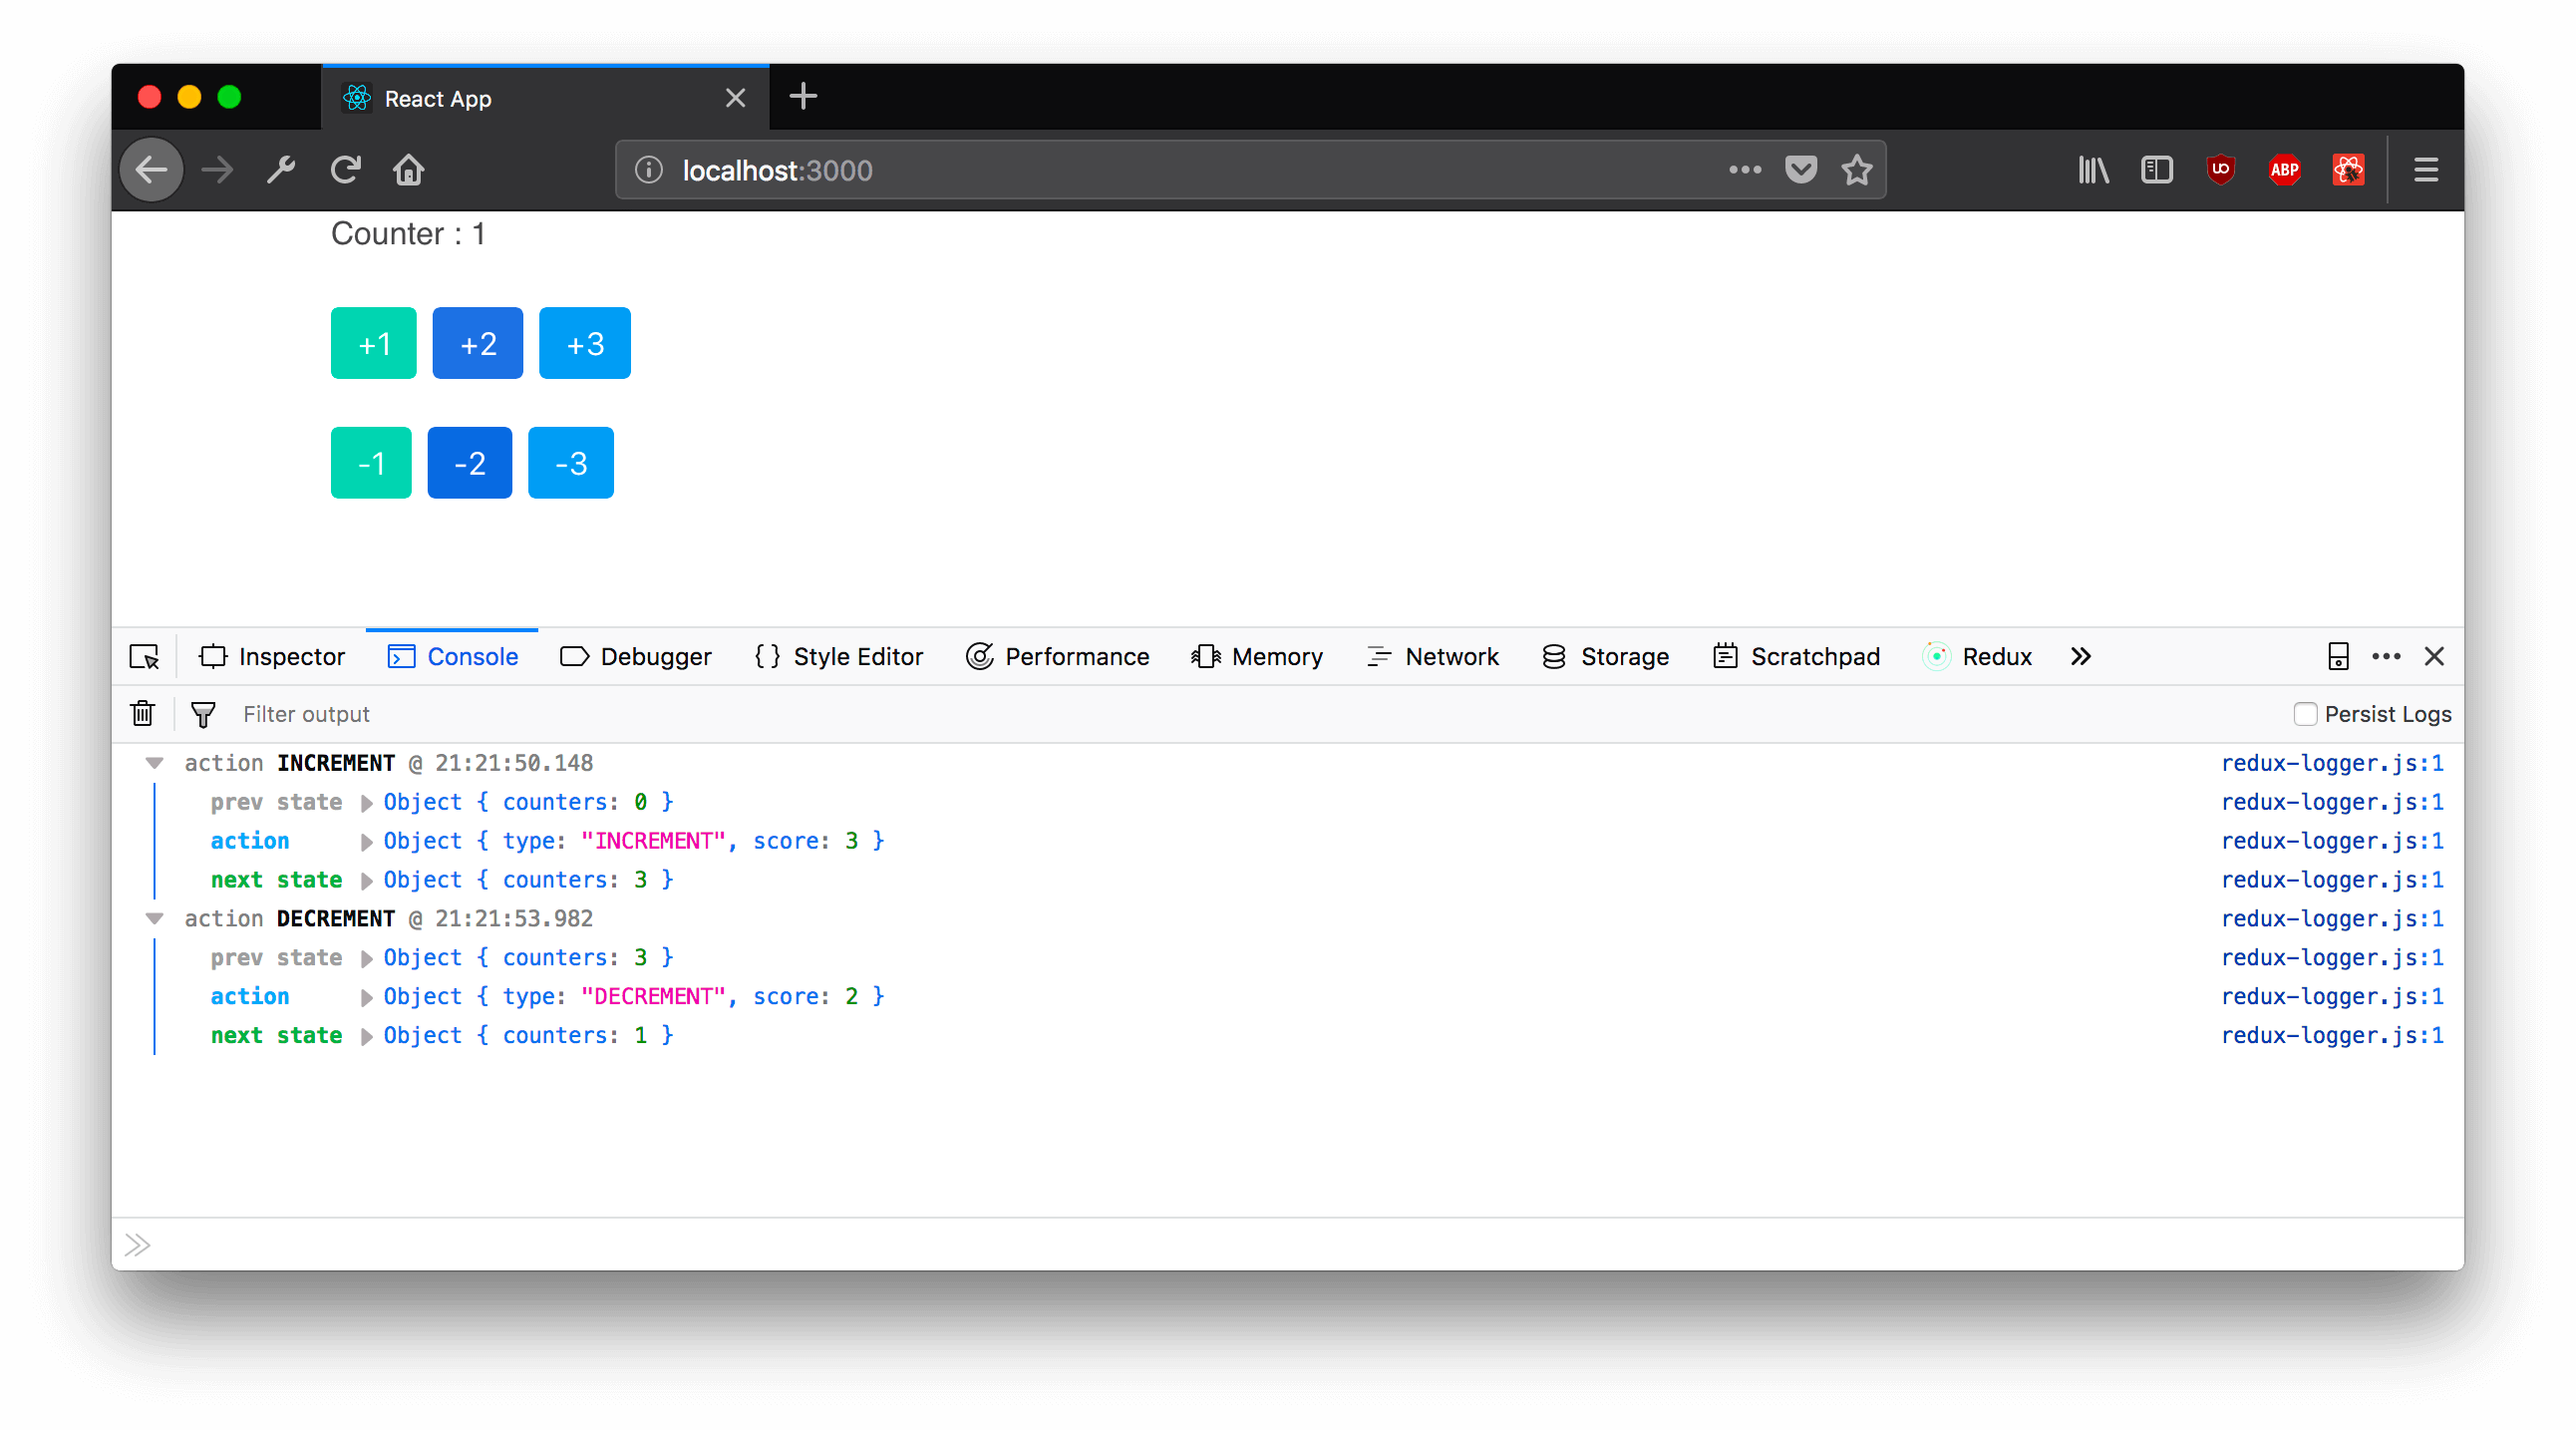
แค่นี้ เราก็สามารถดู Redux Log ของเราได้แล้ว ตอนที่มี Action เกิดขึ้น ลองเปิด Developer Tools (Chrome หรือ Firefox ก็ได้) แล้วดูที่ช่อง Console จากนั้นกด +1, +2 จะเห็นมี Action log เกิดขึ้น รวมถึงเราสามารถดูรายละเอียด ว่า dispatch action อะไร? state ถัดไปคืออะไร state ปัจจุบันเป็นยังไง? เรียกได้ว่ามประโยชน์ในการทำ Application แน่นอน ลองไปเล่นกันดูเนอะ
สรุป
สำหรับบทความนี้ก็เป็นอีกหนึ่งบทความที่พูดถึง Redux ก็หวังว่าผู้อ่านจะได้ไอเดีย ได้รู้ว่า Redux คืออะไร จะเอาไปใช้ยังไง แก้ปัญหาอะไรได้บ้าง ซึ่งหากใครที่ยังอ่านไม่ค่อยเข้าใจ ก็ยังมีแหล่งเรียนรู้ให้ติดตาม ให้อ่านเพิ่มเติมมากมายครับ ซึ่งผู้เขียนก็ไม่ได้หวังว่าผู้อ่านจะอ่านแค่ที่นี่อย่างเดียวและเข้าใจทั้งหมด มันไม่มีทางเป็นไปได้แน่นอน
ฉะนั้นผมก็เลยแนบ Link บางตัวเผื่อเอาไว้ท่านได้ศึกษาต่อยอดกันครับ (ส่วนใหญ่ก็มีแนะนำไว้ใน Docs ของ Redux อยู่แล้วครับ)
- Redux Official Docs
- Getting Started with Redux
- Building React Applications with Idiomatic Redux
- Redux Example
- The Complete Redux Book (2nd edition)
สุดท้าย Source Code ของบทความนี้ครับ
Happy Coding ❤️
- Authors
-

Chai Phonbopit
Senior Software Engineer ประสบการณ์กว่า 12 ปี ด้าน Frontend: React, Next.js, Tailwind CSS และ Backend: Node.js, Express, NestJS ปัจจุบันสนใจ Astro, Cloudflare Workers และ AI Coding Tool
Related Posts