Serving Web Content with Spring MVC

Published on
Java
Discord

ตัวอย่างนี้เป็นตัวอย่างที่อ่านและทดลองทำจากบทความต้นฉบับนี้ Serving Web Content with Spring MVC โดยใช้เครื่องมือคือ Spring Tool Suite

Stack

  • ระบบปฎิบัติการที่ใช้ : Ubuntu 14.04
  • เครื่องมือ : Spring Tool Suite 3.6.3
  • Java JDK 7 update 65 (1.7.0_65)
  • เวลาที่ใช้ : ประมาณ 45 นาที (รวมการอ่าน ทำความเข้าใจด้วย)

สร้างโปรเจ็ค

เปิด Spring Tool Suite ขึ้นมา จากนั้นทำการ Import โปรเจ็ค โดยค้นหา "Serving web content"

Import Project

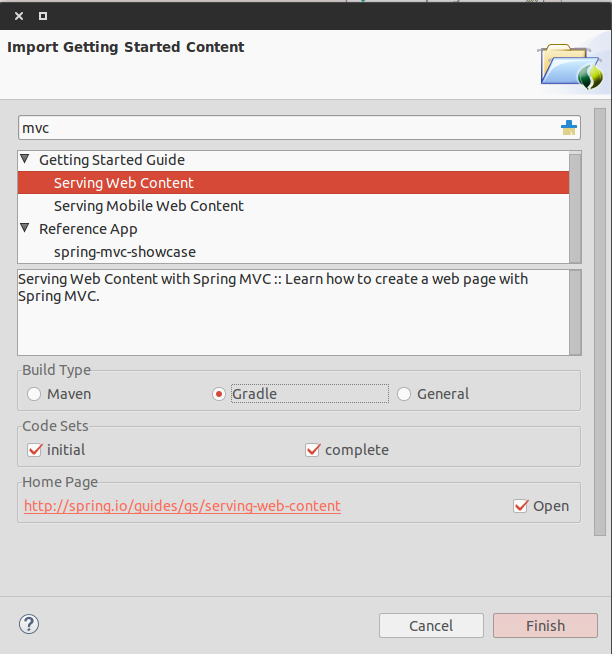
  • Build Type : เลือกเป็น Gradle

เมื่อ Import ได้แล้ว จะเห็นโปรเจ็คอยู่สองตัว คือ

  • gs-serving-web-content-initial
  • gs-serving-web-content-complete

ตัว gs-serving-web-content-initial เป็นโปรเจ็คเปล่าๆ เราจะใช้ตัวนี้ ส่วนอีกตัว gs-serving-web-content-complete เป็นโปรเจ็คที่เสร็จแล้ว เผื่อเอาไว้ดูเปรียบเทียบว่าเราทำตรงไหนผิดพลาด

สร้าง Web Controller

ใน Spring, ตัว Controller จะเป็นตัวควบคุม HTTP request ต่างๆ ง่ายๆ โดยการใส่ annotation @Controller อย่างเช่น ตัวอย่าง GreetingController เป็นตัวจัดการ GET สำหรับ /greeting โดย return เป็น ชื่อของ View กลับมาเพื่อทำการ render เป็น HTML

ไฟล์ /src/main/java/hello/GreetingController.java

package hello;

import org.springframework.stereotype.Controller;
import org.springframework.ui.Model;
import org.springframework.web.bind.annotation.RequestMapping;
import org.springframework.web.bind.annotation.RequestParam;

@Controller
public class GreetingController {

	@RequestMapping("/greeting")
	public String greeting(
			@RequestParam(value="name", required=false, defaultValue="world")
			String name,
			Model model) {
		model.addAttribute("name", name);
		return "greeting";
	}
}
  • @RequestMapping : เป็น annotation สำหรับ mapping ระหว่าง HTTP request /greeting กับเมธอด greeting()
  • @RequestParam : จะทำการ bind ค่าจาก query String parameter name เข้ากับ parameter name ของเมธอด greeting() โดย query String parameter เซตค่า required เป็น false คือไม่บังคับว่าจะต้องมีหรือไม่มีก็ได้ ถ้าไม่มีก็จะใช้ค่า defaultValue แทน โดยค่าของ name ก็จะถูกเพิ่มเข้าไปในออปเจ็ค Model เพื่อสามารถเข้าถึงได้ในหน้า View Template (ใช้ Thymeleaf)

@RequestMapping โดย default นั้น map ทุก HTTP reqeust เช่น GET, PUT, POST ถ้าเราจะเจาะจงว่าจะ map เฉพาะ GET ก็ทำได้เช่น @ReqeustMapping(method=GET)

ต่อมาที่ไฟล์ src/main/resources/templates/greeting.html ทำการเพิ่มโค๊ดด้านล่างลงไป

<!DOCTYPE html>
<html xmlns:th="http://www.thymeleaf.org">
  <head>
    <meta http-equiv="Content-Type" content="text/html; charset=UTF-8" />
    <title>Getting Started : Serving Web Content</title>
  </head>
  <body>
    <p th:text="'Hello, ' + ${name} + '!'" />
  </body>
</html>

ไฟล์ html ด้านบนนี้จะใช้ view technology ในเคสนี้คือ Themeleaf เพื่อทำการเรนเดอร์ HTML ข้อดีคือเราสามารถที่จะเข้าถึงตัวแปร ออปเจ็คของ Java ผ่านหน้า HTML ได้ เช่น

  • xmlns:th="http://www.thymeleaf.org" : เป็นการกำหนด xml schema โดยเวลาจะใช้ thymeleaf ก็แค่ใช้ตัวย่อว่า th
  • th:text : เป็น expression ที่ทำการ render ค่า parameter ${name} จาก controller

สร้างคลาส Application

เปิดไฟล์ src/main/java/hello/Application.java ขึ้นมา แล้วเพิ่มโค๊ดด้านล่างนี้ลงไป

package hello;

import org.springframework.boot.SpringApplication;
import org.springframework.boot.autoconfigure.EnableAutoConfiguration;
import org.springframework.context.annotation.ComponentScan;

@ComponentScan
@EnableAutoConfiguration
public class Application {

	public static void main(String[] args) {
		SpringApplication.run(Application.class, args);
	}
}

เมธอด main() จะมี SpringApplication ทำการรันคลาส Application โดยใช้ component ใน ApplicationContext เป็นตัวจัดการ ตัว @ComponentScan เป็น annotation ที่บอก Spring ให้ทำการค้นหา แพคเกต hello ว่ามีคลาสไหนทำการ register @Component ไว้บ้าง ซึ่งจะเห็นได้ว่า คลาส GreetingController ได้ทำการ register ไว้เพราะว่ามี @Controller อยู่ (@Controller เป็นส่วนหนึ่งของ @Component

annotation @EnableAutoConfiguration เป็นการตั้งค่า auto configuration ให้เราเองโดยตัว DispatcherServlet โดยที่ไม่ต้องมีไฟล์ web.xml เลย

Test the Service

ทดสอบรันโปรแกรม Run As => Spring Boot App ตัว Spring Boot App จะทำการรันโดยใช้ Tomcat Server

 . _ __ _          _            __ _ _
 /\\ / ___'_ __ _ _(_)_ __  __ _ \ \ \ \
( ( )\___ | '_ | '_| | '_ \/ _` | \ \ \ \
 \\/  ___)| |_)| | | | | || (_| |  ) ) ) )
  '  |_ __| .__|_| |_|_| |_\__, | / / / /
 =========|_|==============|___/=/_/_/_/
 :: Spring Boot ::       (v1.1.10.RELEASE)

Starting Application on
Starting Servlet Engine: Apache Tomcat/7.0.57
Tomcat started on port(s): 8080/http
...
...
Started Application in 4.937 seconds (JVM running for 6.005)

เมื่อ start Application เรียบร้อยแล้ว ก็เปิด Browser แล้วเข้าหน้า URL นี้ http://localhost:8080/greeting จะเห็นข้อมูลด้านล่างนี้ปรากฎอยู่

"Hello, World!"

สามารถส่ง parameter ก็ได้เช่นกัน โดยตัวอย่าง ส่ง name เป็น query string parameter จะได้ URL ดังนี้ http://locahost:8080/greeting?name=Devahoy จะเห็นได้ว่าผลลัพธ์เปลี่ยนไปแล้ว จาก Hello, World! เป็น Hello, Devahoy!

"Hello, Devahoy!"

แสดงว่า @RequestParam ใน GreetingController นั้นทำงานได้ตามที่เราคาดหวัง โดย parameter name ค่า default มันคือคำว่า "World" แต่เมื่อไหร่ที่เราส่ง parameter มาด้วย มันก็จะไป override ค่า default และใช้ค่า parameter ของเราเอง

สรุปจากบทความนี้

  • @RequestMapping : map HTTP request กับเมธอดใน Java
  • @RequestParam : ไว้ bind ค่า query string parameter กับ String หรือ Object
  • @Controller : เป็น component เพื่อ handle HTTP request โดยมี HttpServletRequest และ HttpServletResponse
  • @ComponentScan : เอาไว้ค้นหาทั้งแพคเกจ เพื่อหา component ที่ใช้ในโปรเจ็ค
  • SpringApplication : เอาไว้สั่ง launch ตัว Spring Application จาก main class
  • Tomcat : เป็น Servlet Container ที่เอาไว้รัน Spring ได้
  • Spring Boot : เป็น stand-alone สำหรับ Spring โดยรวม Tomcat, Jetty เข้าไปด้วย (ไม่ต้อง deploy โดยใช้ ไฟล์ WAR)
  • thymeleaf : เป็น Template Engine ที่สามารถ render ออปเจ็คของ Java ในไฟล์ HTML ได้ คล้ายๆ Handlebars, Jade หรือ erb ของ Ruby

สิ่งที่ต้องเรียนรู้เพิ่มเติม

  • อ่าน API และ Reference เพิ่มเติม
  • ไปค้นคว้าเกี่ยวกับ Themeleaf ต่อ
  • ลองสร้างโปรเจ็คแบบ Command Line ไม่ใช้ IDE โดยใช้ Gradle/Maven และ Text Editor

Reference

Buy Me A Coffee
Authors
Discord