สวัสดีครับ บทความนี้เป็นบทความที่ 26 แล้วนะครับ ที่ผมจะมาเขียน ในซีรีย์ Learn 30 Android Libraries in 30 days
สำหรับบทความทั้งหมด อ่านได้จากด้านล่างครับ
- Day 1 : AndroidStaggered Grid
- Day 2 : Paralloid
- Day 3 : Retrofit
- Day 4 : SwipeRefreshLayout
- Day 5 : Android GraphView
- Day 6 : Holo Color Picker
- Day 7 : Android Async Http
- Day 8 : Crashlytics
- Day 9 : Butter Knife
- Day 10 : Android Annotations
- Day 11 : DateTimePicker
- Day 12 : Circular Progress Button
- Day 13 : ViewPager
- Day 14 : ViewPagerIndicator
- Day 15 : FadingActionBar
- Day 16 : AutofitTextView
- Day 17 : SwipeListView
- Day 18 : ShowcaseView
- Day 19 : GreenDAO
- Day 20 : AndroidViewAnimation
- Day 21 : ActiveAndroid
- Day 22 : Twitter4J
- Day 23 : ListViewAnimations
- Day 24 : AndEngine
- Day 25 : EazeGraph
- Day 26 : Cardslib
- Day 27 : AdapterKit
- Day 28 : WeatherLib
- Day 29 : FlatUI
- Day 30 : Android Firebase
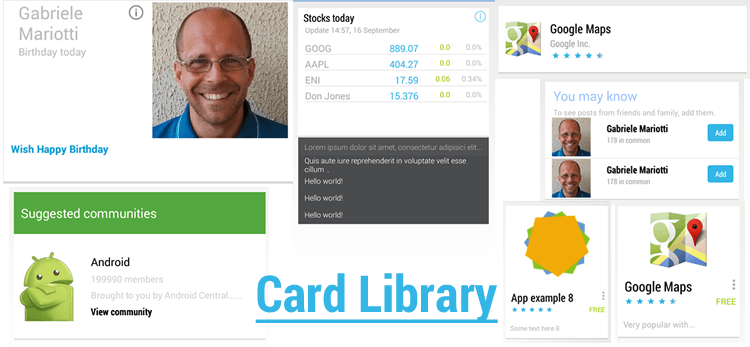
สำหรับวันนี้ขอนำเสนอเรื่อง Cardslib เป็น Library ที่เอาไว้ปรับแต่งหน้า UI ของเราให้มีลักษณะแบบ Card มีทั้งแบบ Card, แบบ List, Grid หรือ staggered grid ตัวอย่างก็ประมาณนี้
Installation
ขั้นตอนการติดตั้ง เปิดไฟล์ build.gradle ขึ้นมา แล้วเพิ่ม dependencies ลงไปดังนี้
dependencies { compile 'com.github.gabrielemariotti.cards:library:1.8.0'}กด Sync Gradle เป็นอันเรียบร้อย
Usage
Card
การสร้าง Card มีส่วนที่จำเป็น 2 อย่างครับ คือ
Card: เปรียบเสมือน View ตัวหนึ่ง ที่เอาไว้แสดงข้อมูลภายใน Card ของเราCardView: อันนี้เปรียบเสมือน ViewGroup เ่ช่นพวก LinearLayout, RelativeLayout
การใช้งาน Card ทำได้โดยเริ่มแรก ประกาศ CardView ไว้ที่ไฟล์ xml ก่อน ดังนี้
<it.gmariotti.cardslib.library.view.CardView android:id="@+id/card" android:layout_width="match_parent" android:layout_height="wrap_content" android:layout_marginLeft="12dp" android:layout_marginRight="12dp" android:layout_marginTop="12dp"/>ต่อมาภายในคลาส Java ทำการ binding CardView จากนั้น ก็ setCard() โดยใช้ Card ที่สร้างขึ้น ดังนี้
CardView cardView = (CardView) getActivity().findViewById(R.id.card);
Card card = new Card(this); // this คือ ContextcardView.setCard(card);
เรายังสามารถ setTitle() , setHeader() ให้กับ Card ได้ครับ เช่น
CardHeader cardHeader = new CardHeader(this);cardHeader.setTitle("This is header");
card.setTitle("This is Title of Card");card.addCardHeader(cardHeader);
ส่วนวิธีการใส่ content เข้าไปใน Card ทำได้โดยการประกาศ Layout ขึ้นมาไฟล์นึง สมมติผมสร้างไฟล์ xml ขึ้นมาใหม่ ชื่อ list_item_card.xml ข้างในมี ImageView และ TextView ดังนี้
<?xml version="1.0" encoding="utf-8"?>
<RelativeLayout xmlns:android="http://schemas.android.com/apk/res/android"              android:padding="16dp"              android:layout_width="match_parent"              android:layout_height="match_parent">
    <RelativeLayout        android:layout_width="wrap_content"        android:layout_height="wrap_content"        android:layout_centerInParent="true">
        <ImageView            android:id="@+id/image"            android:background="@drawable/guitar"            android:scaleType="center"            android:layout_width="128dp"            android:layout_height="90dp"            android:layout_alignParentTop="true"/>
        <TextView            android:layout_toRightOf="@id/image"            android:id="@+id/title"            android:layout_centerInParent="true"            android:text="@string/app_name"            android:layout_marginLeft="16dp"            android:layout_width="wrap_content"            android:layout_height="wrap_content"/>    </RelativeLayout></RelativeLayout>
จากนั้น Card ทำการสร้าง โดยส่ง id คือ Layout ที่เพิ่งสร้าง เช่น
Card card = new Card(this, R.layout.day26_list_item_cards);
Custom Card
ทีนี้ถ้าอยากจะทำการแก้ไข Layout ภายใน Card ทำยังไง? ก็ต้องสร้าง Custom Card ของเราขึ้นมาเองครับ โดยทำการ extends Card แล้วแก้ไขที่เมธอด setupInnerViewElements แบบนี้
package com.devahoy.learn30androidlibraries.day26;
import android.content.Context;import android.view.Gravity;import android.view.View;import android.view.ViewGroup;import android.widget.TextView;
import com.devahoy.learn30androidlibraries.R;
import it.gmariotti.cardslib.library.internal.Card;

public class MyCard extends Card {
    public MyCard(Context context) {        super(context, R.layout.list_item_card);    }
    public MyCard(Context context, int innerLayout) {        super(context, innerLayout);    }
    @Override    public void setupInnerViewElements(ViewGroup parent, View view) {
        TextView title = (TextView) view.findViewById(R.id.title);        title.setText("Lorem ipsum, This is a book!!");    }}
ด้านบนเป็นการสร้างคลาสชื่อว่า MyCard ต้องมี default Constructor 2 ตัวนะครับ เอาไว้สร้างออปเจ็ค 2 แบบ เหมือนตอนสร้าง new Card(Context) และ new Card(Context, Layout) ส่วนเมธอด setupInnerViewElements ก็ทำการหา View โดย ชื่อ title มันก็คือ TextView ที่ประกาศไว้ในไฟล์ `list_item_card.xml จากนั้นก็เปลี่ยน Text มันใหม่ครับ

CardList
CardList คือ Card ที่เรียงกันเป็น List เหมือนอย่าง ListView ส่วนที่จำเป็นในการสร้าง CardList คือ
CardArrayAdapter: เป็น Adapter ที่เอาไว้กำหนด data และ LayoutCardListView: เป็นเหมือน Custom ListView คุณสมบัติเหมือนกับ ListView
การใช้งาน ก็สร้างไฟล์ขึ้นมา 1 ไฟล์ กำหนด CardListView ลงไป เช่น
<it.gmariotti.cardslib.library.view.CardListView android:layout_width="match_parent" android:layout_height="match_parent" android:id="@+id/card_list"/>ส่วนภายในคลาส Java ก็สร้างดังนี้
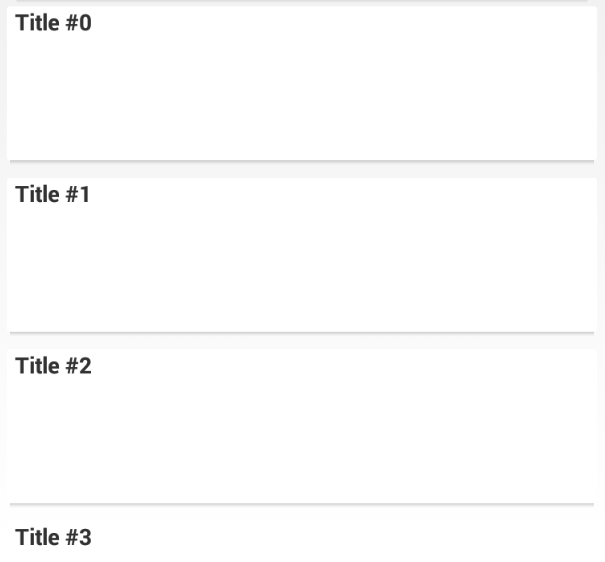
ArrayList<Card> cards = new ArrayList<Card>();
for (int i = 0; i < 5; i++) {    Card c = new Card(this);    c.setTitle("Title #" + i);    cards.add(c);}
CardArrayAdapter mCardArrayAdapter = new CardArrayAdapter(this,cards);
CardListView listView = (CardListView) findViewById(R.id.card_list);if (listView!=null){    listView.setAdapter(mCardArrayAdapter);}
ผลลัพธ์
Example
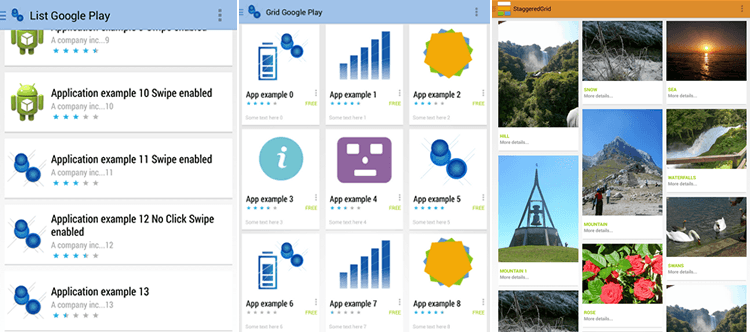
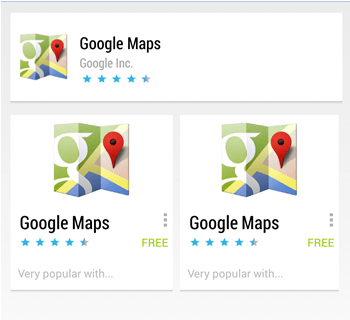
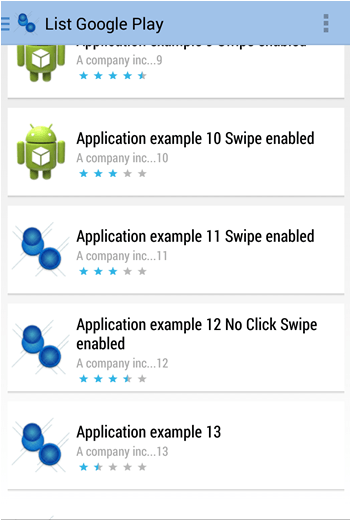
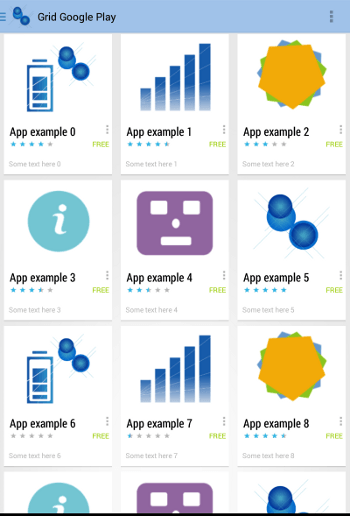
ตัวอย่าง Example อื่นๆ ของ Cardslib นะครับ อันนี้ผมยกมาจาก Docs ต้นฉบับเลย
- Google Map
- Google Now Stock Card

- Google Play CardList
- Google Play Grid
สรุป
Cardslib เป็น Library ที่น่าใช้มากๆครับ สามารถปรับแต่งได้หลากหลาย ในบทความนี้ผมยกตัวอย่างคร่าวๆครับ ทำหมดคงจะไม่ไหว เพราะมันเยอะมาก อีกอย่าง ก็เพิ่งลองใช้ได้ไม่กี่ฟังค์ชั่นเอง หากใครสนใจก็ลองอ่านใน Docs เพิ่มเติมครับ มีทั้งตัวอย่าง คำอธิบาย รูปภาพ เจ้าของ Library ทำไว้ค่อนข้างดีมากครับ
Reference
- Authors
-

Chai Phonbopit
Senior Software Engineer ประสบการณ์กว่า 12 ปี ด้าน Frontend: React, Next.js, Tailwind CSS และ Backend: Node.js, Express, NestJS ปัจจุบันสนใจ Astro, Cloudflare Workers และ AI Coding Tool