Android Design - Linear Layout คืออะไร? + สอนวิธีใช้
หลายๆคนเขียนแอพ Android แต่มีปัญหาเวลาจัดการหน้า Layout ของโปรแกรมทุกที บางคนใช้งานเป็นแต่หน้า Graphical Layout ดึงๆ ลากๆ Widget มาใส่ แล้วก็เปลี่ยนค่า properties ของมันได้ แต่เวลามาเจอตรงส่วนโค๊ดที่เป็น xml ก็ไปไม่เป็นเหมือนกัน ซึ่งถ้าจะเขียน Android จริงๆ มันควรจะรู้ในส่วนโค๊ด xml ไว้ด้วย วันนี้ก็เลยจะมาอธิบายในส่วนของ Layout โดยจะพูดเฉพาะส่วนโค๊ดนะครับ ส่วนหน้า Graphical Layout จะไม่พูด เนื่องจากผมทำไม่เป็นครับ :D
ส่วน Title ของบทความ ได้ไอเดียมาจากเว็บ SiamHTML รู้สึกว่ามันดูกระชับ และน่าสนใจดีครับ เลยเอามาตั้งเป็น Title ลักษณะคล้ายๆกัน
Linear Layout คืออะไร?
Linear Layout คือ View Group ตัวหนึ่ง เปรียบเสมือนตัว Container (เอาไว้รวม View หรือ Widget ต่างๆเข้าด้วยกัน) โดย Linear Layout เป็น Layout ที่เอาไว้จัดเรียง View ภายใน ซึ่งสามารถเรียงกันไปเรื่อยๆ เป็นเส้นตรง จากบนลงล่าง (Vertical) หรือ จากซ้ายไปขวา (Horizontal) เท่านั้น
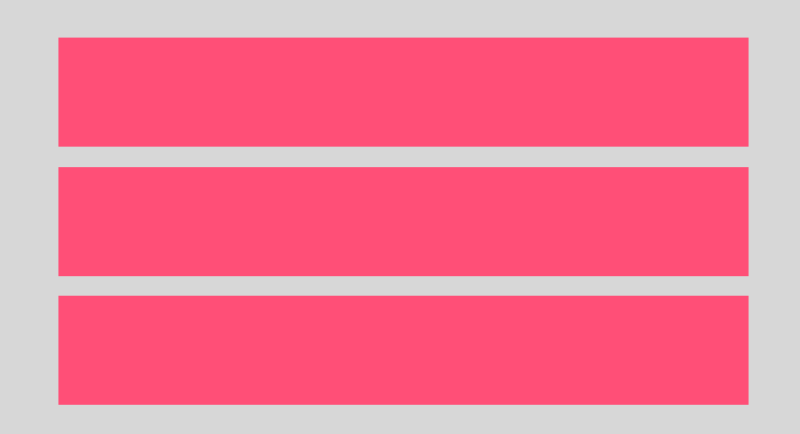
ตัวอย่าง LinearLayout แบบ Vertical
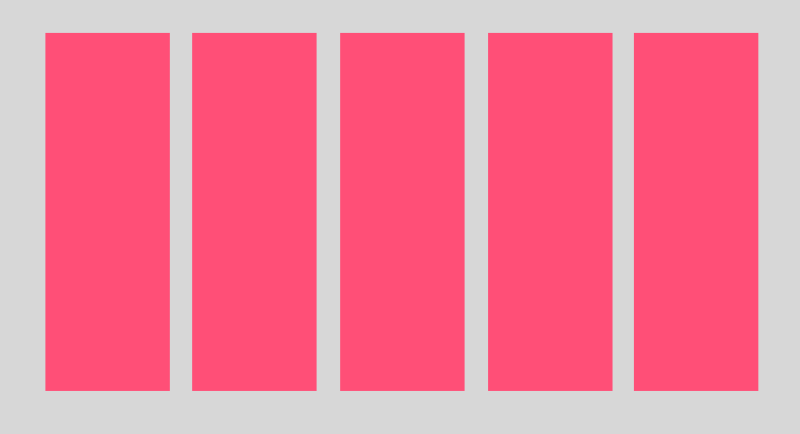
ตัวอย่าง LinearLayout แบบ Horizontal
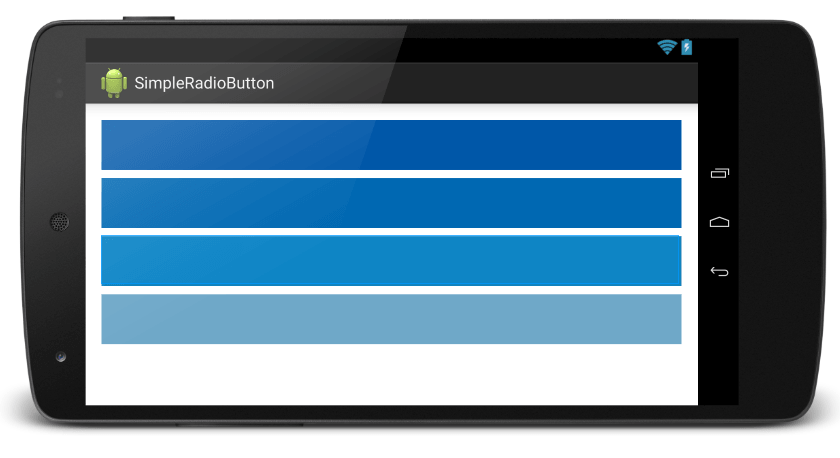
โค๊ดตัวอย่างการใช้งาน LinearLayout โดยภายในประกอบไปด้วย TextView จำนวน 4 ตัว เรียงต่อกันตามแนวตั้ง (จากบนลงล่าง) คนละส่วนกับ แนวตั้งแนวนอนของเครื่องนะครับ โดยในส่วน Demo ขออนุญาตใช้ หน้าจอแบบแนวนอน เพื่อให้ภาพมันพอดีกับตัวเว็บ
<LinearLayout xmlns:android="http://schemas.android.com/apk/res/android" android:orientation="vertical" android:layout_width="match_parent" android:layout_height="match_parent" android:padding="16dp" >
<TextView android:padding="16dp" android:layout_marginBottom="8dp" android:background="#0057A8" android:layout_width="match_parent" android:layout_height="wrap_content" />
<TextView android:padding="16dp" android:layout_marginBottom="8dp" android:background="#0068B2" android:layout_width="match_parent" android:layout_height="wrap_content" />
<TextView android:padding="16dp" android:layout_marginBottom="8dp" android:background="#1082BD" android:layout_width="match_parent" android:layout_height="wrap_content" />
<TextView android:padding="16dp" android:background="#6FA8C8" android:layout_width="match_parent" android:layout_height="wrap_content" />
</LinearLayout>จะได้ผลลัพธ์แบบนี้
ทีนี้มาดูส่วนคำอธิบายก่อนเลยว่าคืออะไร เริ่มจาก
android:orientation: คือการเลือกให้ LinearLayout แสดงผลแบบแนวตั้ง (vertical) หรือว่าแนวนอน (horizontal)android:layout_width: แน่นอน ว่าทุกๆ View ต้องมี ก็คือ ขนาดความกว้างของ Layoutandroid:layout_height: จำเป็นต้องมีเช่นกัน มันคือขนาดความสูงของ Layout
ส่วนขนาดของ width และ height : เลือกได้ระหว่าง wrap_content คือกว้างเท่ากับขนาดของ content ภายใน View หรือ match_parent เท่ากับขนาดของ Parent ซึ่ง Linear Layout ถูกสร้างไว้อันแรกสุดเลย ฉะนั้น Parent ของมันก็คือ หน้าจอ Device หรือก็คือ มีความกว้างและความยาวเท่ากับขนาดของหน้าจอมือถือ (ส่วน fill_parent มันคือชื่อแบบเก่าของ match_parent ถูกเปลี่ยนชื่อตั้งแต่ API 8)
ส่วนรายละเอียด ของ View เพิ่มเติม สำหรับคนไม่รู้ก็คือ
android:padding: เอาไว้สำหรับเว้นระยะ ระหว่าง content กับขอบ border ของ View(Widget) ใครเคยเขียนเว็บก็เท่ากับ การใช้ padding ใน CSSandroid:background: ก็เอาไว้สำหรับใส่สีให้กับตัว View สำหรับเว็บ ก็เปรียบเสมือนbackground-colorandroid:layout_marginBottom: ก็คือการเว้นระยะด้านล่าง ระหว่างตัว View กับระยะของ Parent เปรียบเสมือนmargin-bottomใน CSS
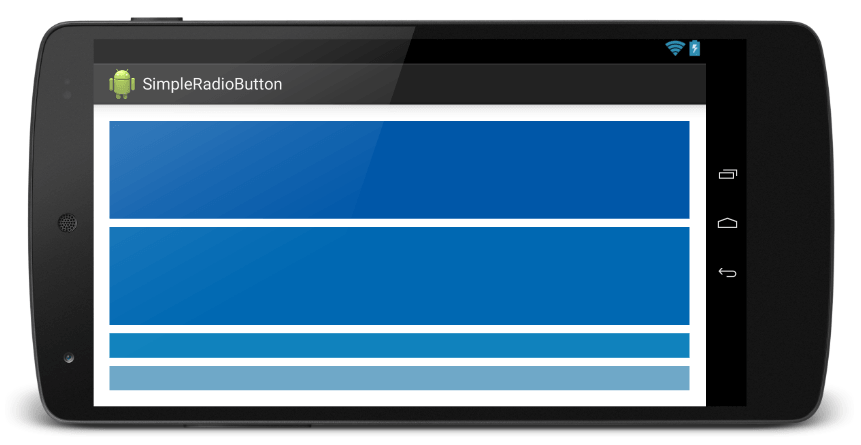
ทีนี้ เมื่อลองเปลี่ยน android:orientation เป็น horizontal ดูเพื่อให้มันเรียงกันแบบแนวนอน ก็จะได้แบบนี้ (แต่ว่าอย่าลืมเปลี่ยนความกว้างให้มันด้วยนะ เพราะตอนนี้เป็น match_parent ทำให้มันยาวเท่าขนาดหน้าจอ มันก็เลยมองเห็นเป็นซ้อนทับกันอยู่)
<LinearLayout xmlns:android="http://schemas.android.com/apk/res/android" android:orientation="horizontal" android:layout_width="match_parent" android:layout_height="match_parent" android:padding="16dp" >
<TextView android:padding="32dp" android:layout_marginRight="8dp" android:background="#0057A8" android:layout_height="match_parent" android:layout_width="wrap_content" />
<TextView android:padding="32dp" android:layout_marginRight="8dp" android:background="#0068B2" android:layout_height="match_parent" android:layout_width="wrap_content" />
<TextView android:padding="32dp" android:layout_marginRight="8dp" android:background="#1082BD" android:layout_height="match_parent" android:layout_width="wrap_content" />
<TextView android:padding="32dp" android:background="#6FA8C8" android:layout_height="match_parent" android:layout_width="wrap_content" />
</LinearLayout>ตัวเลเอาท์ก็จะได้แบบนี้

weight_sum และ layout_weight
ต่อมา การสร้าง LinearLayout แบบนั้นมันพื้นๆ ธรรมดาไป ถ้าเราอยากปรับขนาดความกว้าง ความยาว โดยแบ่งอัตราส่วนตามขนาดของหน้าจอ เราจะทำยังไง เช่น ต้องการ TextView ตัวนี้ ให้มีขนาด ครึ่งนึงของหน้าจอ แม้ว่าหน้าจอจะมีขนาดใดๆก็ตาม วิธีการก็คือ จะใช้ layout_weight เข้ามาช่วยครับ
layout_weight คืออะไรล่ะ ?
layout_weight คือค่าอัตราส่วน (ratio) ที่เราต้องการกำหนด เทียบกับเลเอาท์ของ Parent เช่น ตอ้งการให้ TextView มีขนาด ครึ่งนึงของหน้าจอ เราก็จะใช้ layout_weight มีค่าเท่ากับ 0.5 ส่วนมากนิยมให้ขนาดเต็มๆของ Parent มีค่าเท่ากับ 1 การกำหนดตัวเลเอาท์ก็จะได้ประมาณนี้
<TextView android:padding="32dp" android:layout_marginRight="8dp" android:background="#0057A8" android:layout_weight="0.5" android:layout_height="match_parent" android:layout_width="wrap_content" />จะเห็นว่า ทำไมค่า layout_width มีค่าเป็น 0dp เนื่องจากว่า การใช้ค่า 0dp ทำให้ Android รู้ว่าเราจะใช้ค่า layout_weight แทนที่จะเป็นค่าจาก layout_width แต่มีจุดสังเกตอีกจุดหนึ่งคือ หากเราตั้ง LinearLayout ของเราแบบ vertical เมื่อเราใช้ layout_weight เราต้องปรับ layout_height เป็น 0dp และหากเราตั้งแบบ horizontal เราก็ต้องปรับ layout_width เป็น 0dp เช่นเดียวกัน
สังเกต Layout xml ไฟล์ด้านล่างนี้
<LinearLayout xmlns:android="http://schemas.android.com/apk/res/android" android:orientation="vertical" android:layout_width="match_parent" android:layout_height="match_parent" android:padding="16dp" >
<TextView android:padding="16dp" android:layout_marginBottom="8dp" android:background="#0057A8" android:layout_width="match_parent" android:layout_weight="0.4" android:layout_height="0dp" />
<TextView android:padding="16dp" android:layout_marginBottom="8dp" android:background="#0068B2" android:layout_width="match_parent" android:layout_weight="0.4" android:layout_height="0dp" />
<TextView android:padding="16dp" android:layout_marginBottom="8dp" android:background="#1082BD" android:layout_width="match_parent" android:layout_weight="0.1" android:layout_height="0dp" />
<TextView android:padding="16dp" android:background="#6FA8C8" android:layout_width="match_parent" android:layout_weight="0.1" android:layout_height="0dp" />
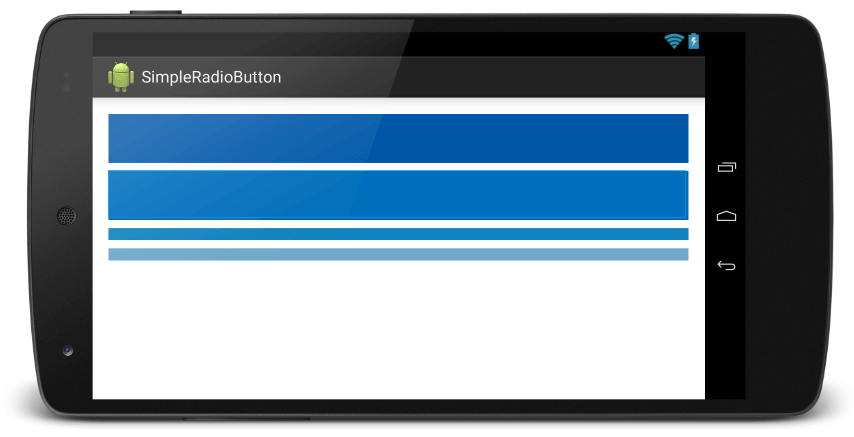
</LinearLayout>จะได้หน้าตาออกมาเป็นแบบนี้
จะเห็นว่า TextView 2 อันด้านบน ตั้ง layout_weight เป็น 0.4 คือมีความสูง เป็นขนาด 4 ส่วน 10 ของขนาดหน้าจอ และ TextView 2 อันล่าง ตั้ง layout_weight เป็น 0.1 คือมีความสูง ขนาด 1 ส่วน 10 ของขนาดหน้าจอ นั่นเอง
weight_sum คืออะไร ?
ต่อมาในส่วน weight_sum คือ ค่าผลรวมของอัตราส่วน ใน Layout ของเรา ตัว weight_sum จะถูกกำหนดที่ LinearLayout เพื่อระบุว่า View ภายใน LinearLayout นั้นจะมีผลรวมของ layout_weight เท่าไหร่ หากไม่ได้กำหนด default ของมันคือ 1 ทีนี้เราลองกำหนด weight_sum ให้กับ LinearLayout ดู โดยใส่เป็น 2 ส่วน TextView ทั้งหมด ไม่ได้เปลี่ยนแปลง
<LinearLayout xmlns:android="http://schemas.android.com/apk/res/android" android:orientation="vertical" android:layout_width="match_parent" android:layout_height="match_parent" android:weightSum="2" android:padding="16dp" > ...
</LinearLayout>ผลลัพธ์ก็ได้จะได้ดังนี้
ก็คือว่า จาก TextView 2 อันด้านบน ที่ใช้ค่า 0.4/1 คือ 4 ส่วน 10 ก็กลายเป็น 0.4/2 จะได้เท่ากับว่ามีความสูงเพียงแค่ 2 ใน 10 ของขนาดหน้าจอเท่านั้น
layout_gravity กับ gravity ต่างกันอย่างไร ?
หลังจากที่เราปรับ อัตราส่วนของ View ได้แล้ว ทีนี้หากเราต้องการปรับตำแหน่งให้มันไปอยู่ กึ่งกลาง ไปซ้าย ไปขวา ละ จะทำยังไง ? โชคดีที่ Android มี layout_gravity และ gravity มาให้ เชื่อว่าหลายๆคนที่เคยใช้ 2 ตัวนี้ ต้องประสบปัญหาแน่นอนว่ามันใช้ยังไงหว่า 2 ตัว มันแตกต่างกันยังไง? วันนี้ผมจะมาอธิบายละกันครับ เริ่มจาก
layout_gravity
layout_gravity คือการปรับค่าตำแหน่ง (gravity) ของ View หรือ Layout เทียบกับขนาดของ Parent เช่น Parent มีขนาดกว้าง และสูง เต็มหน้าจอ หากเราเซต layout_gravity แบบ center ก็จะทำให้ View หรือ Layout นั้นๆ จะอยู่กึ่งกลางของหน้าจอพอดี ดังเช่น ปรับให้ TextView อยู่ทางขวาของ Layout
<?xml version="1.0" encoding="utf-8"?>
<LinearLayout xmlns:android="http://schemas.android.com/apk/res/android" android:orientation="vertical" android:layout_width="match_parent" android:layout_height="match_parent">
<TextView android:background="#0057A8" android:layout_width="200dp" android:layout_height="200dp" android:layout_gravity="right"/>
</LinearLayout>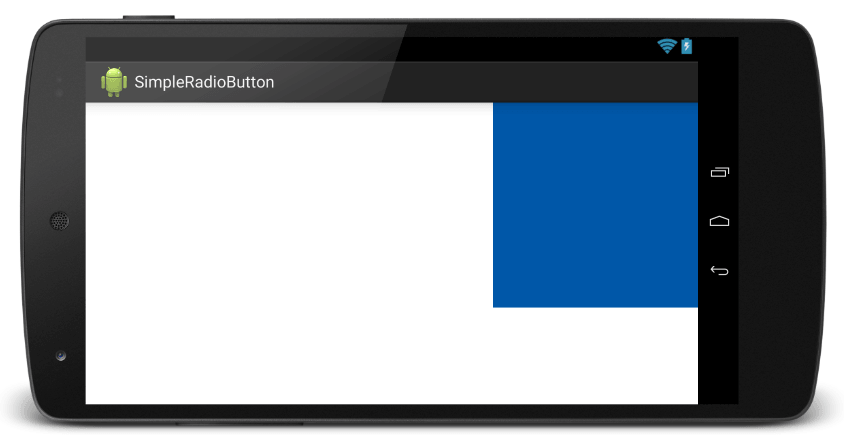
gravity
gravity คือการปรับตำแหน่ง (gravity) ของ content ภายใน View นั้นๆ เช่น TextView มีความกว้างเต็มจอ และความสูงเท่ากับ wrap_content หากเรามีข้อความที่สั้นๆ ซัก 5 ตัวอักษร เมื่อเราปรับ gravity เป็น center ตัวข้อความใน TextView มันก็จะไปอยู่กึ่งกลางของ View นั้นๆ หรืออย่างเช่น ปรับให้ TextView ซึ่งมีขนาด 200x200dp ให้อยู่กึ่งกลางของ LinearLayout
<?xml version="1.0" encoding="utf-8"?>
<LinearLayout xmlns:android="http://schemas.android.com/apk/res/android" android:orientation="vertical" android:gravity="center" android:layout_width="match_parent" android:layout_height="match_parent">
<TextView android:background="#0057A8" android:layout_width="200dp" android:layout_height="200dp" />
</LinearLayout>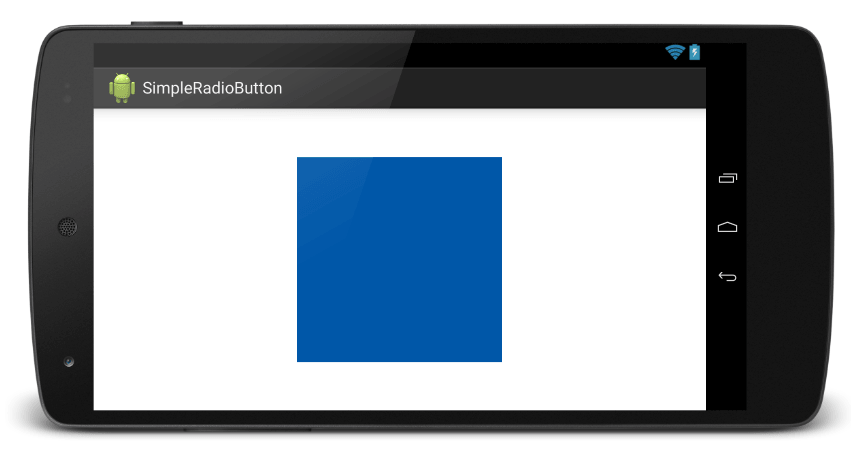
ส่วนค่าภายใน gravity และ layout_gravity ที่ใช้ได้ก็คือ ดังเช่น
center: ปรับให้อยู่กึ่งกลางcenter_horizontal: ปรับให้กึ่งกลางในแนวนอนcenter_vertical: ปรับให้อยู่กึ่งกลางในแนวตั้งright: ปรับไปทางขวาleft: ปรับไปทางซ้าย
และยังมีอีกหลายๆ ตัวเลือกที่เลือกปรับแต่งได้ ลองไปเล่นดูครับ
สรุปง่ายๆเกี่ยวกับ gravity และ layout_graity คือ
layout_gravity: การปรับตำแหน่งโดยอ้างอิงจาก Parent ( เปรียบกับ CSS ก็เหมือนกำหนด margin)gravity: การปรับตำแหน่งโดยอ้างอิงภายใน View (เปรียบกับ CSS ก็เหมือนกับ padding)
บางคนมีวิธีการจำอีกแบบคือ inside และ outside สุดท้าย ก็ลองไปปรับแต่ง ลองเปลี่ยนค่า และลองเปรียบเทียบดูครับ เมื่อเห็นภาพ และเข้าใจการทำงานของ LinearLayout แล้ว บางทีคุณอาจจะออกแบบหน้าจอ Android ได้สวยงามมากยิ่งขึ้นก็เป็นได้ สำหรับบทความหน้า จะพูดเรื่อง RelativeLayout รอติดตามอ่านนะครับ :D
- Authors
-

Chai Phonbopit
เป็น Web Dev ในบริษัทแห่งหนึ่ง ทำงานมา 10 ปีกว่าๆ ด้วยภาษาและเทคโนโลยี เช่น JavaScript, Node.js, React, Vue และปัจจุบันกำลังสนใจในเรื่องของ Blockchain และ Crypto กำลังหัดเรียนภาษา Rust