สวัสดีครับ บทความนี้เป็นบทความที่ 3 แล้วนะครับ ที่ผมจะมาเขียน ในซีรีย์ Learn 30 Android Libraries in 30 days
สำหรับบทความทั้งหมด อ่านได้จากด้านล่างครับ
- Day 1 : AndroidStaggered Grid
- Day 2 : Paralloid
- Day 3 : Retrofit
- Day 4 : SwipeRefreshLayout
- Day 5 : Android GraphView
- Day 6 : Holo Color Picker
- Day 7 : Android Async Http
- Day 8 : Crashlytics
- Day 9 : Butter Knife
- Day 10 : Android Annotations
- Day 11 : DateTimePicker
- Day 12 : Circular Progress Button
- Day 13 : ViewPager
- Day 14 : ViewPagerIndicator
- Day 15 : FadingActionBar
- Day 16 : AutofitTextView
- Day 17 : SwipeListView
- Day 18 : ShowcaseView
- Day 19 : GreenDAO
- Day 20 : AndroidViewAnimation
- Day 21 : ActiveAndroid
- Day 22 : Twitter4J
- Day 23 : ListViewAnimations
- Day 24 : AndEngine
- Day 25 : EazeGraph
- Day 26 : Cardslib
- Day 27 : AdapterKit
- Day 28 : WeatherLib
- Day 29 : FlatUI
- Day 30 : Android Firebase
ส่วนวันนี้นำเสนอ Library ตัวที่สาม ชื่อว่า Retrofit ครับ จริงๆมีแผนที่จะลองศึกษานานละ เพราะเห็นมีคนรีเควสมา แต่ก็ยังไม่ได้เริ่มซักที มาวันนี้ก็ถือโอกาส ลองทดสอบ ลองเล่นซะเลย
Retrofit คืออะไร?
Retrofit คือ REST Client API ที่ใช้การเชื่อมต่อ Http สำหรับจัดการข้อมูล Json หรือ XML จุดเด่นของ Retrofit คือ แปลงข้อมูลเป็น POJO (Plain Old Java Object) สามารถใช้ได้ทั้ง GET หรือ POST จุดเด่นของ Retrofit อีกอย่างคือ มี OkHttp และ Gson เป็น built-in อยู่ในนี้ด้วย
Installation
การติดตั้ง สามารถดาวน์โหลด Library ไฟล์ jar ได้จากลิงค์นี้ retrofit-1.6.1.zip หรือว่า ใช้ gradle ก็แก้ที่ไฟล์ build.gradle
compile 'com.squareup.retrofit:retrofit:1.6.1'บทความนี้ขอเป็น Advanced นิดนึงนะครับ จะไม่พูดถึงพื้นฐานมากนัก และผู้อ่านควรมีความรู้ด้าน REST API มาบ้าง
Getting Started
เริ่มต้นด้วยการสร้างโปรเจ็คใหม่ขึ้นมาครับ สำหรับโปรเจ็คตัวอย่าง ผมจะเป็นการสร้าง โดยการดึงข้อมูลมาจาก API Service ของทาง Dribbble API ซึ่งจะเห็นได้ว่า ผมเอา API มาจาก Dribbble บ่อยมาก เนื่องจากว่ามันฟรี นั่นเอง
สำหรับบางคนที่อยากอ่านเรื่อง Json หรือ Gson เพิ่มเติม ให้อ่านบทความ GSon ประกอบครับ
ดูตัวอย่างของ [Dribbble API] ประกอบด้วยนะครับ
http://api.dribbble.com/shots/21603: คือ path ของรูปที่มีไอดี = 21603ttp://api.dribbble.com/shots/everyone: คือ List รูปทั้งหมด ในหมวด everyonettp://api.dribbble.com/shots/popular: คือ List รูปทั้งหมด ในหมวด popular
จะเห็นว่าด้านบนคือ URI Endpoint แต่ละอย่างที่ผมต้องการ คือ ต้องการแสดงรายละเอียดของรูปว่ามีอะไรบ้าง โดยระบุไอดีของรูป กับอีกอันนึงคือโชว์ว่ามีรูปอะไรบ้าง ในหมวดนั้นๆ เช่นในหมวด popular
RestAdapter
RestAdapter เป็นหัวใจของ Retrofit เลย มันคือ API Class ที่เอาไว้แปลงเป็น Object โดย default แล้ว RestAdapter จะสร้างได้ประมาณนี้
RestAdapter restAdapter = new RestAdapter.Builder() .setEndpoint("http://api.dribbble.com") .build();ด้านบน ผมทำการ set Endpoint เป็น path ของ Dribble จากนั้นก็ทำการ build RestAdapter จาก Builder()
สร้าง Interface
ในการใช้งาน Retrofit เราจำเป็นต้องสร้าง Interface ของเราขึ้นมา เพื่อใช้ร่วมกับ RestAdapter ของทาง Retrofit เพราะ RestAdapter จะแปลง REST API เป็น Interface ที่เราสร้าง
ฉะนั้น เมธอดต่างๆ ที่เราต้องการ จะถูกประกาศไว้ใน Interface อย่างเช่น ผมสร้าง Inteface ขึ้นมา 1 ตัว ชื่อว่า SimpleRetrofit.java และข้างในมีเมธอด สำหรับดึงข้อมูลรูปภาพที่มีไอดีเท่ากับ 21603 จะได้ดังนี้
package com.devahoy.learn30androidlibraries.day3;
import retrofit.http.GET;
public interface SimpleRetrofit {
    @GET("/shots/21603")    Shot getShot();}
ผมสร้างเมธอด getShot() ใน Interface จากนั้นก็ return ค่าเป็น Shot ซึ่งคลาส นี้ยังไม่ได้สร้างนะครับ ส่วน @GET("/shots/21603 มันคือ path ของ API ที่เราเรียกใช้งาน เต็มๆคือ http://api.dribbble.com/shots/21603 เนื่องจาก http://api.dribbble.com เรา config ไว้ที่ RestAdapter แล้ว
ต่อมาสร้างโมเดลคลาส ชื่อ Shot มีแค่รายละเอียดพื้นฐานดังนี้
package com.devahoy.learn30androidlibraries.day3;
import com.google.gson.annotations.SerializedName;
public class Shot {
    private int id;    private String title;    private String description;    private String url;
    @SerializedName("image_url")    private String imageUrl;
    //GETTER and SETTER    ...
ต่อมาที่ RetrofitActivity.java ที่เมธอด onCreate() สร้าง RestAdatper พรอ้มทั้งให้ RestAdatper แปลง API ให้อยู่ในรูปแบบ Interface SimpleRetrofit ของเรา จะได้แบบนี้
package com.devahoy.learn30androidlibraries.day3;
import android.os.Bundle;import android.support.v7.app.ActionBarActivity;import android.widget.Toast;
import retrofit.RestAdapter;
public class RetrofitActivity extends ActionBarActivity {
    private static final String TAG = RetrofitActivity.class.getSimpleName();
    @Override    protected void onCreate(Bundle savedInstanceState) {        super.onCreate(savedInstanceState);
        RestAdapter restAdapter = new RestAdapter.Builder()                .setEndpoint("http://api.dribbble.com")                .build();
        SimpleRetrofit retrofit = restAdapter.create(SimpleRetrofit.class);        Shot shot = retrofit.getShot();
        Toast.makeText(this, "Name : " + shot.getTitle() + " URL : " + shot.getUrl(),                Toast.LENGTH_LONG).show();
        new HttpAsyncTask().execute();    }
}
ทดสอบรัน ดูว่าได้ผลลัพธ์เป็นยังไง? หรือว่ามี error อะไรมั้ย?
ปรากฎว่า เกิด error Caused by: android.os.NetworkOnMainThreadException เนื่องจาก ตัว Retrofit มันทำการ request ใน Mainthread ฉะนั้นแก้ไขด้วยการใช้ AsyncTask เข้ามาช่วย อ่าน AsyncTask เพิ่มเติม ที่นี่ Android กับการใช้งาน AsyncTask
เมื่อเพิ่ม AsyncTask เข้าไป ก็จะได้หน้าตา แบบนี้
package com.devahoy.learn30androidlibraries.day3;
import android.os.AsyncTask;import android.os.Bundle;import android.support.v7.app.ActionBarActivity;import android.widget.Toast;
import retrofit.RestAdapter;
public class RetrofitActivity extends ActionBarActivity {
    private static final String TAG = RetrofitActivity.class.getSimpleName();
    @Override    protected void onCreate(Bundle savedInstanceState) {        super.onCreate(savedInstanceState);
        new HttpAsyncTask().execute();    }
    public class HttpAsyncTask extends AsyncTask<Void, Void, Shot> {        @Override        protected Shot doInBackground(Void... params) {
            RestAdapter restAdapter = new RestAdapter.Builder()                    .setEndpoint("http://api.dribbble.com")                    .build();
            SimpleRetrofit retrofit = restAdapter.create(SimpleRetrofit.class);            Shot shot = retrofit.getShot();
            return shot;        }
        @Override        protected void onPostExecute(Shot shot) {
            Toast.makeText(getApplicationContext(),                    "Name : " + shot.getTitle() + " URL : " + shot.getUrl(),                    Toast.LENGTH_LONG).show();            super.onPostExecute(shot);        }    }}
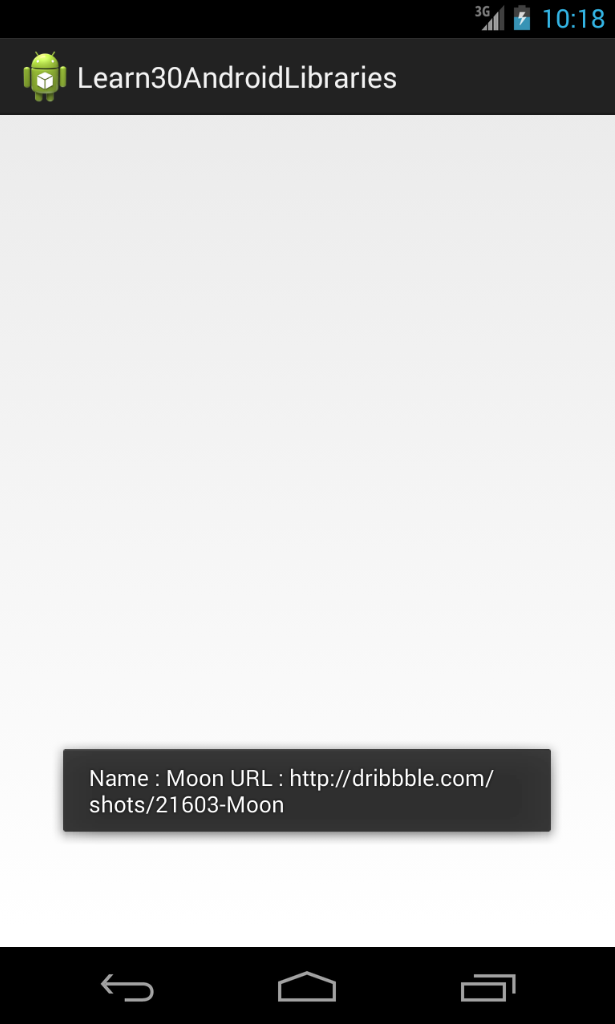
ทดสอบรันดูใหม่ จะเห็น Toast ขึ้นพร้อมทั้ง Title และ Url ของรูปภาพ
โอเค แบบนี้ถ้าเราจะเปลี่ยนจากหารูปที่ไอดีอื่นละ จะต้องทำยังไง สร้างเมธอดทุกๆ อันเลยหรอ ?
คำตอบคือ มีวิธีที่ดีกว่านั้นครับ คือสร้างแบบนี้
package com.devahoy.learn30androidlibraries.day3;
import retrofit.http.GET;import retrofit.http.Path;
public interface SimpleRetrofit {
    @GET("/shots/21603")    Shot getShot();
    @GET("/shots/{id}")    Shot getShotById(@Path("id") int id);}
เรียกหลักการนี้ว่า URL MANIPULATION โดย url ที่เราเรียก มันจะถูกแทรก ในบล็อกที่มีฟอแมต { } โดยใช้ parameter ที่เราส่งค่ามา
ไปหน้า RetrofitActivity.java แล้วลองทดสอบ เรียกเมธอดนี้ดู โดยเปลี่ยนจาก
Shot shot = retrofit.getShot();เป็น
Shot shot = retrofit.getShotById(30000);ที่นี้เวลาเราอยากเรียนดูรูปภาพ id อะไร เราก็แค่ส่ง parameter เป็นไอดีตัวนั้นๆไป ก็ง่ายกว่าต้องมานั่งทำทุกเมธอดแน่นอน :D
Callback
เราสามารถใช้ Retrofit แบบ Asynchronous ได้ โดยการ implement Callback ฟังค์ชัน เพิ่มเข้าไปเป็น parameter อีกตัว ตัวอย่างเช่น ในคลาส SimpleRetrofit
package com.devahoy.learn30androidlibraries.day3;
import retrofit.Callback;import retrofit.http.GET;import retrofit.http.Path;
public interface SimpleRetrofit {    ...
    @GET("/shots/{id}")    void getShotByIdWithCallback(@Path("id") int id, Callback<Shot> callback);}
แล้วในคลาส RetrofitActivity.java ก็สามารถ เรียกใช้งานได้ด้วย คำสั่งนี้
SimpleRetrofit retrofit = restAdapter.create(SimpleRetrofit.class);retrofit.getShotByIdWithCallback(21603, new Callback<Shot>() {    @Override    public void success(Shot shot, Response response) {        Toast.makeText(getApplicationContext(),                "Name : " + shot.getTitle() + " URL : " + shot.getUrl(),                Toast.LENGTH_LONG).show();    }
    @Override    public void failure(RetrofitError error) {        // If any error.    }});
เมื่อเราใช้แบบ Callback ก็ไม่จำเป็นต้องให้ return ค่ากลับมา เพราะค่าจะถูกส่งมาใน success() เราก็ get ค่าจาก callback ที่ส่งมาได้เลย
โชว์รูป Popular แบบ GridView
ต่อมาผมจะทำการ ดึงรูปในหมวด popular มาแสดงใน GridView ภายในแอพ
เริ่มแรก ผมสร้างคลาส model อีกคลาส ชื่อว่า ShotList.java เอาไว้แสดงลิสต์รูปภาพ จากหมวด popular ภายในคลาส ก็มีแค่ List<Shot> อันเดียว ชื่อต้องตรงกับทาง API ด้วยนะครับ เนื่องจากต้อง map กับคลาส java ด้วย Gson หากชื่อไม่ตรงก็ต้องใช้ @SerializedName
package com.devahoy.learn30androidlibraries.day3;
import java.util.List;
public class ShotList {
    private List<Shot> shots;
    public List<Shot> getShots() {        return shots;    }
    public void setShots(List<Shot> shots) {        this.shots = shots;    }}
เพิ่มเมธอดนี้ลงไปที่คลาส SimpleRetrofit
package com.devahoy.learn30androidlibraries.day3;
import java.util.List;
import retrofit.Callback;import retrofit.http.GET;import retrofit.http.Path;
public interface SimpleRetrofit {    ...
    @GET("/shots/popular")    void getShotsByPopular(Callback<ShotList> callback);}
ทำการเพิ่ม Layout GridView เข้าไปที่ไฟล์ retrofit_activity.xml
<?xml version="1.0" encoding="utf-8"?><GridView xmlns:android="http://schemas.android.com/apk/res/android" android:id="@+id/gridview" android:layout_width="match_parent" android:layout_height="match_parent" android:columnWidth="120dp" android:numColumns="auto_fit" android:verticalSpacing="4dp" android:horizontalSpacing="4dp" android:stretchMode="columnWidth" android:gravity="center" />ต่อมาก็สร้าง Adapter ให้กับ GridView ผมก้สร้างแบบง่ายๆ ในชื่อ GridAdapter.java แบบนี้
package com.devahoy.learn30androidlibraries.day3;
import android.content.Context;import android.view.LayoutInflater;import android.view.View;import android.view.ViewGroup;import android.widget.BaseAdapter;import android.widget.GridView;import android.widget.ImageView;
import com.squareup.picasso.Picasso;
public class GridAdapter extends BaseAdapter {    private Context mContext;    private LayoutInflater mInflater;    private ShotList mShots;
    public GridAdapter(Context context, ShotList shots) {        mContext = context;        mInflater = LayoutInflater.from(context);        mShots = shots;    }
    public int getCount() {        return mShots.getShots().size();    }
    public Object getItem(int position) {        return null;    }
    public long getItemId(int position) {        return 0;    }
    public View getView(int position, View convertView, ViewGroup parent) {        ImageView imageView;
        if (convertView == null) {            imageView = new ImageView(mContext);            imageView.setLayoutParams(new GridView.LayoutParams(                    ViewGroup.LayoutParams.MATCH_PARENT, 200));            imageView.setScaleType(ImageView.ScaleType.FIT_XY);            imageView.setPadding(4, 4, 4, 4);        } else {            imageView = (ImageView) convertView;        }
        Picasso.with(mContext)                .load(mShots.getShots().get(position).getImageUrl())                .into(imageView);
        return imageView;    }
}
ด้านบน ผมจะนำ ShotList ที่ได้มา มาแสดงใน GridView โดยใช้ Picasso มาช่วยในการโหลดรูปครับ
ต่อมาที่คลาส RetrofitActivity.java ผมเพิ่ม setContentView() เพิ่ม GridView แล้วก็ setAdapter() ให้กับ GridView เมื่อมีการส่ง callback กลับมา เมื่อเรียกเมธอด getShotsByPopular ดังนี้
package com.devahoy.learn30androidlibraries.day3;
import android.os.AsyncTask;import android.os.Bundle;import android.support.v7.app.ActionBarActivity;import android.view.View;import android.widget.AdapterView;import android.widget.GridView;import android.widget.Toast;
import com.devahoy.learn30androidlibraries.R;
import retrofit.Callback;import retrofit.RestAdapter;import retrofit.RetrofitError;import retrofit.client.Response;
public class RetrofitActivity extends ActionBarActivity {
    private static final String TAG = RetrofitActivity.class.getSimpleName();
    private GridView mGridView;
    @Override    protected void onCreate(Bundle savedInstanceState) {        super.onCreate(savedInstanceState);
        setContentView(R.layout.day3_activity_retrofit);        mGridView = (GridView) findViewById(R.id.gridview);
        RestAdapter restAdapter = new RestAdapter.Builder()                .setEndpoint("http://api.dribbble.com")                .build();
        SimpleRetrofit retrofit = restAdapter.create(SimpleRetrofit.class);
        retrofit.getShotsByPopular(new Callback<ShotList>() {            @Override            public void success(ShotList shots, Response response) {                mGridView.setAdapter(new GridAdapter(RetrofitActivity.this, shots));            }
            @Override            public void failure(RetrofitError error) {                Toast.makeText(getApplicationContext(),                        error.getMessage(),                        Toast.LENGTH_LONG).show();            }        });
        mGridView.setOnItemClickListener(new AdapterView.OnItemClickListener() {            public void onItemClick(AdapterView<?> parent, View v, int position, long id) {                Toast.makeText(RetrofitActivity.this, "" + position, Toast.LENGTH_SHORT).show();            }        });
    }}
สุดท้ายทดสอบรันโปรแกรม ก็จะได้ดังรูป

สรุป
หลักจากทดสอบใช้งาน Retrofit ก็รู้สึกว่ามันก็ใช้งานง่ายดี คล้ายๆกับที่เคยทำกับแอพ Bubbble แอพที่ผมใช้ Dribble API เหมือนกัน ต่างกันที่แอพนั้น ผมไม่ได้ใช้ Retrofit แต่ว่าใช้ตัว ion
สำหรับตัวอย่างนี้ ก็มีแค่ GET นะครับ ส่วน POST ไปลองทำกันดูได้ครับ หลักการคล้ายๆกัน หากเราจะส่ง POST ไป ก็สร้าง model แล้วก็ส่งไปด้วย @Body รายละเอียดอ่านตาม Docs เลยครับ มีอธิบายไว้
เมื่อลองเล่นดูรู้สึกน่าสนใจมากๆ อาจจะมีเวลา หรือว่าโปรเจ็คอื่นๆ ที่จะต้องได้ลองใช้เจ้า Retrofit แน่นอน สำหรับใครที่เคยใช้ หรือมีประสบการณ์มาก่อน ก็สามารถมาพูดคุย แนะนำเพิ่มเติมได้นะครับ
สุดท้าย Source Code เหมือนเดิมครับ
- Authors
-

Chai Phonbopit
เป็น Web Dev ในบริษัทแห่งหนึ่ง ทำงานมา 10 ปีกว่าๆ ด้วยภาษาและเทคโนโลยี เช่น JavaScript, Node.js, React, Vue และปัจจุบันกำลังสนใจในเรื่องของ Blockchain และ Crypto กำลังหัดเรียนภาษา Rust
