สวัสดีครับ บทความนี้เป็นบทความที่ 12 แล้วนะครับ ที่ผมจะมาเขียน ในซีรีย์ Learn 30 Android Libraries in 30 days
สำหรับบทความทั้งหมด อ่านได้จากด้านล่างครับ
- Day 1 : AndroidStaggered Grid
- Day 2 : Paralloid
- Day 3 : Retrofit
- Day 4 : SwipeRefreshLayout
- Day 5 : Android GraphView
- Day 6 : Holo Color Picker
- Day 7 : Android Async Http
- Day 8 : Crashlytics
- Day 9 : Butter Knife
- Day 10 : Android Annotations
- Day 11 : DateTimePicker
- Day 12 : Circular Progress Button
- Day 13 : ViewPager
- Day 14 : ViewPagerIndicator
- Day 15 : FadingActionBar
- Day 16 : AutofitTextView
- Day 17 : SwipeListView
- Day 18 : ShowcaseView
- Day 19 : GreenDAO
- Day 20 : AndroidViewAnimation
- Day 21 : ActiveAndroid
- Day 22 : Twitter4J
- Day 23 : ListViewAnimations
- Day 24 : AndEngine
- Day 25 : EazeGraph
- Day 26 : Cardslib
- Day 27 : AdapterKit
- Day 28 : WeatherLib
- Day 29 : FlatUI
- Day 30 : Android Firebase
สำหรับวันนี้ขอนำเสนอเรื่อง Circular Progress Button ครับ
Circular Progress Button คืออะไร?
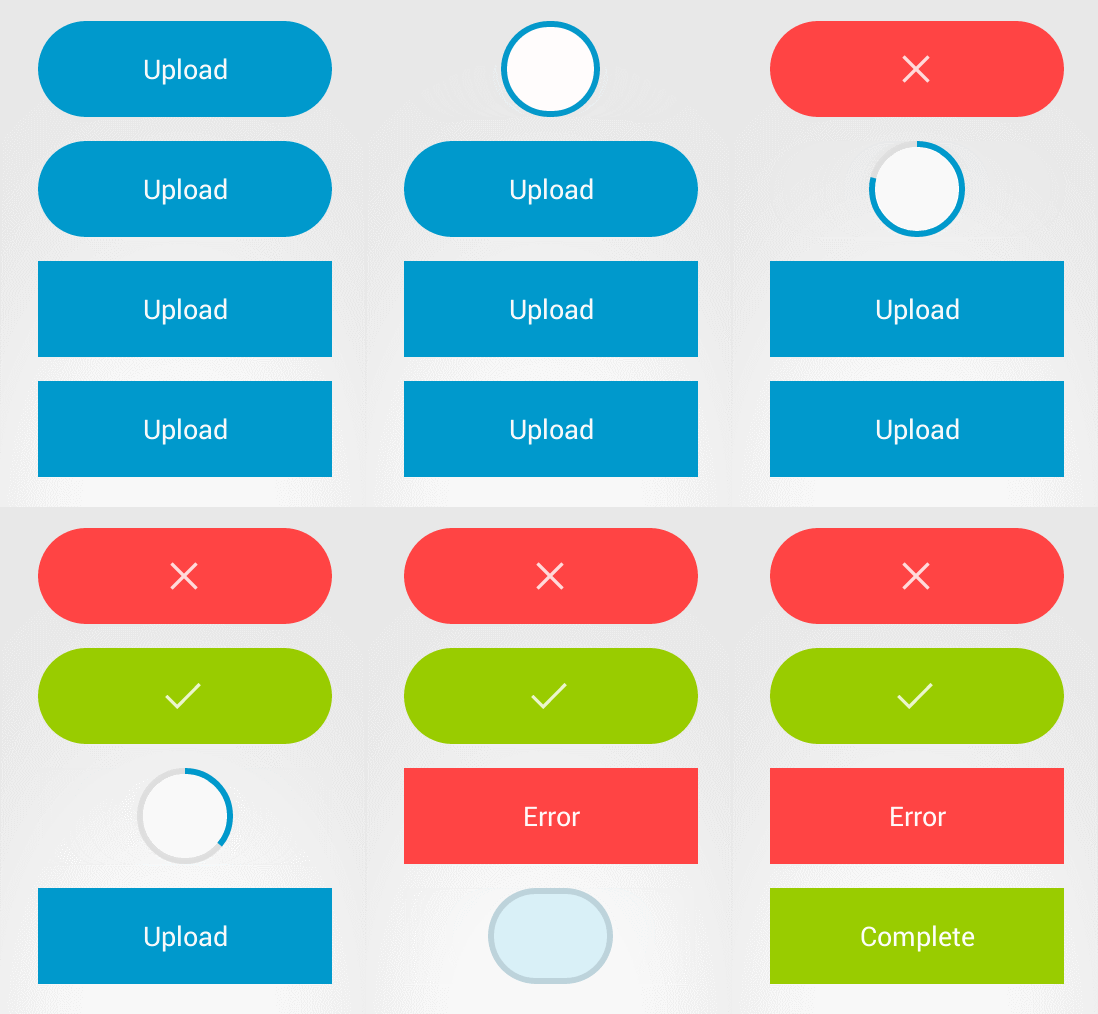
Circular Progress Button เป็น Library ที่เอาไว้ปรับแต่งให้โดยใส่ Progress ให้กับ Button เหมือนกับการเอา ProgressBar มารวมกับ Button ตัวอย่าง ก็แบบรูปข้างล่างเลยครับ
สำหรับ Library อันนี้ การใช้งานง่ายมากๆครับ เริ่มด้วย
Installation
ขั้นตอนการติดตั้ง เปิด build.gradle จากนั้นก็เพิ่ม dependencies ข้างล้างนี้ลงไป
dependencies { compile 'com.github.dmytrodanylyk.circular-progress-button:library:1.0.5'}Circular Progress Button ใช้ MinSDK 14 เพราะฉะนั้นในโปรเจ็คของเรา ต้องตั้งอย่างน้อย 14 นะครับ
Layout
ตัว Circular Progress Button ในไฟล์ Layout จะใช้ View ชื่อ com.dd.CircularProgressButton แบบนี้นะครับ
<LinearLayout xmlns:android="http://schemas.android.com/apk/res/android" xmlns:app="http://schemas.android.com/apk/res-auto" android:orientation="vertical" android:layout_width="match_parent" android:layout_height="match_parent"> <com.dd.CircularProgressButton android:id="@+id/circular_button" android:layout_width="196dp" android:layout_height="64dp" android:layout_marginTop="16dp" android:textColor="@color/white" android:textSize="18sp" android:layout_gravity="center_horizontal" app:cpb_textComplete="@string/complete" app:cpb_textError="@string/error" app:cpb_textIdle="@string/upload" />
</LinearLayout>cpb_textComplete: คือข้อความที่ต้องการ เมื่อ Progress Completecpb_textError: ใส่ข้อความที่ต้องการ หาก Progress Errorcpb_textIdle: ใส่ข้อความเริ่มต้นให้กับ Button
สำหรับไฟล์ res/values/strings.xml เพิ่ม String ไป 3 ชื่อ ดังนี้ครับ
<resources> <string name="complete">Completed</string> <string name="error">Error!</string> <string name="upload">Upload</string></resources>Progress
ตัว Circular Progress Button จะแบ่ง State ออกเป็น 4 ส่วนคือ
- Normal State (มีค่าเป็น 0)

- Progress State (มีค่าตั้งแต่ 1 - 99)

- Success State (มีค่า 100)

- Error State (มีค่า -1)

Custom
เราสามารถปรับแต่ง หน้าตาของ Button เพิ่มเติมได้ เช่น
- rounded corner ให้กับ Button
app:cpb_cornerRadius="48dp"
- ใส่ icon ให้กับ Button ได้ โดยมี 2 state คือ
iconCompleteและiconError
app:cpb_iconComplete="@drawable/ic_action_accept"![]()
app:cpb_iconError="@drawable/ic_action_cancel"![]()
Usage
การใช้งาน ง่ายๆเลยครับ ทำการ binding View จากไฟล์ xml ก่อน ไฟล์ xml
<?xml version="1.0" encoding="utf-8"?>
<LinearLayout xmlns:android="http://schemas.android.com/apk/res/android" xmlns:app="http://schemas.android.com/apk/res-auto" android:orientation="vertical" android:gravity="center" android:layout_width="match_parent" android:layout_height="match_parent">
<com.dd.CircularProgressButton android:id="@+id/circular_button_simple" android:layout_width="196dp" android:layout_height="64dp" android:layout_marginTop="16dp" android:textColor="@color/white" android:textSize="18sp" app:cpb_textComplete="@string/complete" app:cpb_textError="@string/error" app:cpb_textIdle="@string/upload" />
</LinearLayout>ส่วนคลาส จาวา เป็นแบบนี้
public class CircularActivity extends ActionBarActivity { CircularProgressButton mCircularButtonSimple
@Override protected void onCreate(Bundle savedInstanceState) { super.onCreate(savedInstanceState); setContentView(R.layout.day12_activity_circular);
mCircularButtonSimple = (CircularProgressButton) findViewById(R.id.circular_button_simple); }}แล้วก็ setProgress() ให้กับ CircularProgressButton แบบนี้
mCircularButtonSimple.setProgress(50);อันนี้คือตัวอย่าง โดยใช้ onClickListener เมื่อเวลา คลิก Button Progress ก็จะถูก set ค่าเป็น 50 ถ้ากดอีกที ก็จะเป็น 100 จะแสดง textComplete
mCircularButtonSimple.setOnClickListener(new View.OnClickListener() { @Override public void onClick(View v) { if (mCircularButtonSimple.getProgress() == 0) { mCircularButtonSimple.setProgress(50); } else if (mCircularButtonSimple.getProgress() == 100) { mCircularButtonSimple.setProgress(0); } else { mCircularButtonSimple.setProgress(100); } }});แล้วมันเอาไปใช้ทำอะไรได้ละ เราต้องมา setprogress ให้มันเอง แล้วมันจะมีประโยชน์อะไร? จริงๆ มันเอาไปใช้ร่วมกับ AsyncTask เวลาอัพโหลดหรือดาวน์โหลดไฟล์ก็ได้ครับ โดย implement ในส่วน doInBackground() แล้วก็คำนวณ ขนาดไฟล์ หรืออะไรก็ว่าไปครับ ในส่วนนี้ไม่ได้ทำตัวอย่างให้ดูนะครับ พอดีไม่มีเวลาเขียนเท่าไหร่ เดี๋ยวถ้ามีเวลาว่าง จะมาแก้ไขโพสนี้ โดยเพิ่มตัวอย่างการใช้งานจริงไปด้วย
ลองเอาไปเล่นกันดูนะครับ ส่วนรายละเอียดเพิ่มเติมก็อ่านจาก User Guide ได้เลย :D
สุดท้าย Source Code ทั้งหมด ก็อยู่ที่ Github ครับ
Reference
- Circular Progress Button - รูปตัวอย่างทั้งหมด เอามาจากต้นฉบับครับ
- Authors
-

Chai Phonbopit
เป็น Web Dev ในบริษัทแห่งหนึ่ง ทำงานมา 10 ปีกว่าๆ ด้วยภาษาและเทคโนโลยี เช่น JavaScript, Node.js, React, Vue และปัจจุบันกำลังสนใจในเรื่องของ Blockchain และ Crypto กำลังหัดเรียนภาษา Rust
